Scaling to multiple servers
Deephaven is designed with horizontal scaling in mind. This means adding capacity for services typically involves adding additional compute resources in the form of servers or virtual machines.
When considering how to scale Deephaven, the types of capacity needed should be determined before adding resources.
Scaling capacities
- Read capacity
- Queries requiring access to very large data sets might require more IO bandwidth or substantial SAN caching.
- Add more
db_query_serverprocesses with added IO bandwidth.
- Write capacity
- Handling multiple near real-time data streams quickly (through the Deephaven binary log/tailer/
db_disarchitecture). - Expanding IO for batch data imports or merges.
- Large batch imports of historical data.
- Query capacity (Memory and CPU)
- Queries may take large amounts of memory to handle large amounts of data, a lot of CPU to handle intensive manipulation of that data, or both.
- Support for more end-user queries.
- Support for analysis of large datasets that may consume smaller server's resources.
Server types
- Query servers
- Increase read and analysis capacity of the database for end-users.
- Large cpu and memory servers.
- Run the
db_query_serverand the spawned worker processes.
- Real-time import servers
- Increase write capacity for importing near real-time data.
- Increase write capacity for merging near real-time data to historical partitions.
- Run the
db_disanddb_ltdsprocesses.
- Batch import servers
- Increase write capacity for batch data imports to intraday partitions.
- Increase write capacity for merging batch data to historical partitions.
- Separate the batch data import function away from the near real-time data imports.
- Administrative Servers
- Run administrative Deephaven processes, such as the Deephaven controller, the authentication server, and the ACL write server
- May have additional requirements, such as access to MySQL.
A single host may run multiple server types. For example, the administrative processes do not require many resources, and consequently may be co-located with other services.
Single Server Architecture
The Deephaven Installation guide illustrates the provisioning of a server with a network interface and the loopback interface (network layer), local disk storage (storage layer), and the Deephaven software (application layer) to create a single server Deephaven deployment. The guide then used this single server to perform basic operations by connecting to Deephaven from a remote client.
With that in mind, this single-server installation looks like the following:
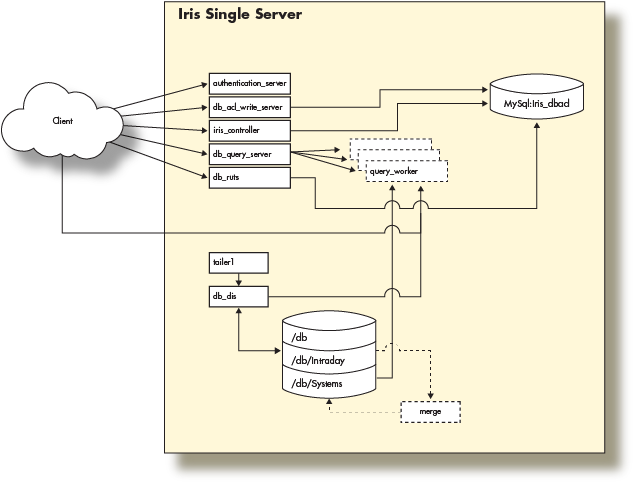
This fully functional installation of Deephaven is limited to the compute resources of the underlying server. As the data import or query capacity requirements of the system grow beyond the server's capabilities, it is necessary to distribute the Deephaven processes across several servers, converting to a multiple server architecture.
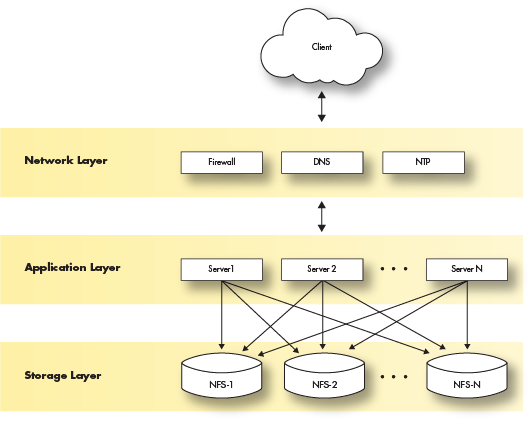
Multiple server architecture
The multiple server architecture is built by moving the network and storage layers outside the server, and by adding hardware to run additional data loading or querying processes. The network layer moves to subnets or vlans. The storage layer becomes a shared filesystem that is mounted across all servers. The application layer becomes a set of servers with the Deephaven software installed and configured to perform certain tasks.
Deploying Deephaven on multiple servers has the following requirements:
- Modification of each layer in the three-layer model.
- Modification and management of the Deephaven configuration.
- Modification and management of the
monitDeephaven configuration.
The network layer
The network and necessary services (DNS, NTP, etc.) is supplied by the customer. Therefore, this document will not cover configuration or implementation of the network except to specify the network services on which Deephaven depends.
Deephaven requires a subnet or VLAN for the servers to communicate. Like all big data deployments, fast network access to the data will benefit Deephaven in query and analysis speed. If using FQDNs in the Deephaven configuration, a robust DNS service is also recommended.
It is recommended that the network layer provide the fastest possible access to the storage layer.
The storage layer
The storage layer has the most changes in a multiple server installation. Deephaven requires access to a shared filesystem for historical and intraday data that can be mounted by each server in the Deephaven environment.
Typically, these disk mounts are provided via the NFS protocol exported from a highly available storage system. Other types of distributed or clustered filesystems such as glusterFS or HDFS should work but have not been extensively tested.
As mentioned, Deephaven relies on a shared filesystem architecture for access to its data. Currently, the larger installations use ZFS filers to manage the storage mounts that are exported to the query and data import servers via NFS over 10g network interfaces.
Deephaven divides data into two categories:
- Intraday data is any data that hasn't been merged to historical storage partitions, including near real-time as well as batch-imported data. Depending on the data size and rate, the underlying storage should typically be high-throughput (SSD) or contain sufficient caching layers to allow fast writes.
Intraday data is written to the database via the Data Import Server or other import processes onto disks mounted on
/db/Intraday/<namespace>/. - Historical data is populated by performing a merge of the Intraday data to the historical file systems. As storage needs grow, further storage can be easily added in the form of writable partitions without the need to reorganize existing directory or file structures, as Deephaven queries will automatically search additional historical partitions as they are added.
Intraday data is typically merged to Historical data on the Data Import Servers during off hours by scheduled processes.
The historical disk volumes are mounted into two locations on the servers:
- For writing:
/db/Systems/<databaseNamespace>/WritablePartitions/[0..N] - For reading:
/db/Systems/<databaseNamespace>/Partitions/[0..N]
- For writing:
The Deephaven application layer
The software installation procedure for each server does not change from that posted in the Deephaven installation guide. Once the server is deployed, the network storage should be mounted on all the servers. Once this is done, the main configuration of Deephaven must now be managed and the Monit configuration modified to only run processes for each server type.
Users and groups
Deephaven requires three unix users and five unix groups that are created at install time by the iris-config rpm.
The uid and gids associated with the users and groups need to be created on the shared storage to allow them to read and write to the mounted file systems.
| Group Name | gid | Members |
|---|---|---|
dbquery | 9000 | dbquery |
dbmerge | 9001 | dbmerge |
irisadmin | 9002 | irisadmin |
dbmergegrp | 9003 | dbquery, dbmerge, irisadmin |
dbquerygrp | 9004 | dbquery, dbmerge, irisadmin |
| User Name | uid |
|---|---|
dbquery | 9000 |
dbmerge | 9001 |
irisadmin | 9002 |
Deephaven server types
In the server types section we described four server types: Data Import Server, Batch Import Server, Query Server and an Infrastructure Server. Each of these server types is defined by the Deephaven processes they run and defined by the hardware resources required for each. You can also easily combine server types into a single server to provide both sets of functionality given sufficient hardware resources. For instance, it is common to have administrative servers combined with a data import server.
As an example, a query server will require more CPU and memory than an administrative server, which requires a smaller CPU and memory footprint.
Example server types and associated resources are outlined below.
Administrative server
Server Hardware and Operating System
- 6 cores (2 core minimum) @ 3.0 Ghz Intel
- 10GB RAM
- Linux - RedHat 7 or derivative
- Network: 1g
- Storage:
- Root - sufficient local disk space
Processes
- MySql - ACL database
authentication_server- Securely authenticates users on logindb_acl_write_server- Serves as a single writer for ACL information stored within the ACL databaseiris_controller- Specialized client that manages persistent query lifecycles, and provides discovery - services to other clients for persistent queries
Real-time import server
Server Hardware and Operating System
- 24 cores (6 cores minimum) @ 3.0 Ghz Intel
- 256GB RAM (32GB minimum)
- Linux - RedHat 7 or derivative
- Network: 10g mtu 8192
- Storage:
- Root - sufficient local disk space
- Database mount - 250GB SSD mirror local
- Intraday data - SSD either local or iScsi
- Historical data - NFS mounts for all historical data
Processes
db_dis- receives binary table data from user processes and writes it to user namespaces, simultaneously serving read requests for samedb_ltds- serves read requests for local data, used for serving intraday data not managed bydb_disTailer1- The
tailer1application sends data from the processes in the stack to thedb_disfor theDbInternalnamespace. - A tailer application is used to read data from binary log files and send them to a
db_disprocess. - Tailer configuration is covered in Importing Data.
- The
Batch import server
Server Hardware and Operating System
- 24 cores (6 cores minimum) @ 3.0 Ghz Intel
- 256GB RAM (32GB minimum)
- Linux - RedHat 7 or derivative
- Network: 10g mtu 8192
- Storage:
- Root - sufficient local disk space
- Database mount - 250GB SSD mirror local
- Intraday data - SSD either local or iScsi
- Historical data - NFS mounts for all historical data
Processes
- Batch import processes run via
cronor manually to load intraday data from external data sources such as CSV files - Validation and merge processes run via
cronor manually to validate intraday data and add it to the historical database - Scripts to delete intraday data after it has been successfully merged
Query server
Server Hardware and Operating System
- 24 cores (6 cores minimum) @ 3.0 Ghz Intel
- 512GB RAM (32GB minimum)
- Linux - RedHat 7 or derivative
- Network: 10g mtu 8192
- Storage:
- Root - sufficient local disk space
- Database mount - 250GB SSD mirror local
- Historical data - 16 NFS mounts @ 35TB each
Processes
db_query_server- manages query requests from the client and forksdb_query_workerprocesses to do the actual work of a query
Adding a dedicated DIS for Centrally Managed User Tables
One option Deephaven provides for user tables are intraday user tables written by a Data Import Server (Centrally Managed User Tables (Legacy) or Live Partioned User Tables (Core+)). While historical user tables are directly written to disk by the worker, DIS-written user tables are written by the worker passing binary log rows to the Log Aggregation Server (LAS). The LAS then writes them to disk, where a tailer picks them up and streams them to a DIS. Besides processing the binary log rows into table rows on disk, the DIS also serves these updates to subscribers, which allows for ticking user tables, and also for multiple appends to user tables.
In environments where there is significant use of DIS-written user tables, it may be desirable to add a dedicated Data Import Server to avoid contention for DIS resources between system table log file processing and intraday user table operations. Note that this is only a concern for Centrally Managed User Tables (which use appendCentral and related commands) or Live Partitioned User Tables (which use appendLiveTable and related commands).
Adding the DIS process
The assumption is that the dedicated DIS server is some non-"infra" server in the Deephaven cluster -- most likely a query server with sufficient local storage for Centrally Managed User Tables. Like the regular system DIS, the dedicated server requires locally-attached high-speed storage for storing user table data; NFS should not be used for this.
The first step in setting up this dedicated server is to install or activate a DIS process on the server. This can be done during the cluster installation or upgrade process by adding DH_NODE_<node_number>_ROLE_DIS=true for the node running the dedicated DIS to the cluster.cnf file. This activates a DIS on the selected server when the installer's master_install.sh is run.
If the dedicated DIS server is an already existing Deephaven server, activate the DIS process by:
- Renaming
db_dis.disabledtodb_dis.confon the dedicated server, under/etc/sysconfig/deephaven/monit/. - Running
/usr/illumon/latest/bin/dh_monit reload.
/usr/illumon/latest/bin/dh_monit summary should now show a db_dis process.
Configuring the DIS process
- Edit the routing YAML to:
- Change the dh-rta anchor to point to the new node:
- Add a filter for System tables to the default DIS.
- Add an entry for the dedicated DIS, including a filter for User tables.
See Edit Routing Configuration for details on editing the routing configuration.
Note the change of port for db_rta to 8086, since 8084 is now used by the db_query_server.
- On the dedicated server, edit
illumon.iris.hostconfig(located in/etc/sysconfig/illumon.confs/) and add theEXTRA_ARGSdetails below. (This is so the dedicated DIS still gets config properties that apply to DISes and routing fordb_rta.)
- On the dedicated server, edit
/etc/sysconfig/deephaven/monit/db_dis.confand change the first line as below (so monit can find the right PID file):
-
Run
/usr/illumon/latest/bin/dh_monit reloadto update monit's configuration. -
Run
/usr/illumon/latest/bin/dh_monit restart allon all servers.