Installation and upgrade guide
Upgrading to Vermilion+
As always, read the release notes for any releases being skipped during this upgrade. In particular, if upgrading from Jackson; then read the Silverheels release notes, Silverheels version log and Vermilion release notes and Vermilion version log.
Warning
Etcd should be upgraded as part of any Deephaven upgrade from a Jackson-or-earlier release to Vermilion.
When upgrading etcd, you should prefer the Deephaven-tested 3.5.12 point release. Note that 3.5.5 has a known bug which can break your etcd cluster if you perform an etcdctl password reset.
Upgrading to Vermilion+ from a release earlier than Jackson (1.20221001) may require existing persistent query scripts to change. The following links provide further details.
-
If you're upgrading from Jackson or earlier, the required Envoy version has changed and an upgrade to 1.24 is required. See Using Envoy as a front proxy for more details.
-
If you use a customized
cluster.cnffile and do not update it from the installation-generated file, check it for the valueDH_ACLS_USE_ETCD. If it does not exist, you are using ACLs stored in SQL and you need to either migrate to Etcd-based ACLs or add the valueDH_ACLS_USE_ETCD=falseto your file.
Note
The Deephaven Vermilion+ release introduces several new DbInternal tables. For upgrades, ACLs must be manually added to permit users to read these tables as described in the version log. If ACLs are not added, then only superusers are permitted to read these tables.
System requirements
Deephaven requires a Linux variant OS for the server nodes. Clients, and some remote services, like data loggers, can run on a variety of operating systems, including OSX and Windows, but the server installations need to be Linux, such as:
- Red Hat 8 or 9
- Rocky 8 or 9
- Ubuntu 20.04 or 22.04. Note: Ubuntu only supports tar, with or without install generator.
At least one server should have high speed storage locally attached for data import and streaming data. All query servers should have shared storage, such as NFS, for shared access to historical data.
Minimum hardware requirements
-
Processor:
- x86_64 (64-bit)
-
RAM:
- 128 GB minimum, 512 GB preferred
-
Intraday data:
- Mount:
/db/Intraday - Size: Sized for several days of the data set.
- Type: Low-latency direct attached; SSD is usually ideal.
- Needed on server(s) running the Data Import Server (DIS) process or batch import processes.
- Mount:
-
Historical data:
- Mount:
/db/Systems - Size: Depends on the size of the historical data set.
- Type: Network attached storage shareable between query servers (i.e., NFS).
- Mount:
-
Binary Log Data:
- Mount:
/var/log/deephaven/binlogs - Size: Sufficient to store at least a day's streamed data.
- Type: Low-latency direct attached; SSD is usually ideal.
- Needed on server(s) running logger and tailer processes. Deephaven services also generate binary logs for internal monitoring.
- Mount:
-
Process Log Files:
- Mount:
/var/log/deephavenother than binlogs - Size: Sufficient for a minimum of a week's log files.
- Type: Locally attached disk.
- Needed on all Deephaven servers.
- Mount:
-
Enterprise Binary Files:
- Mount:
/usr/illumon - Size: 1GB or more
- Type: Locally attached disk; SSD is ideal
- Needed on all Deephaven servers.
- Mount:
-
Core+ Binary Files:
- Mount:
/usr/illumon/dnd - Size: 2GB or more
- Type: Locally attached disk; SSD is ideal
- Needed on all machines running query or merge servers.
- Mount:
-
Enterprise Configuration Files:
- Mount:
/etc/sysconfig/deephaven - Size: 50MB or more
- Type: Locally attached disk; SSD is ideal
- Needed on all Deephaven servers.
- Mount:
-
Instructions for reclaiming disk space can be found in the File system cleanup guide.
-
Operating System:
- See Linux support matrix.
Regarding System RAM
Deephaven connections — either from users/applications interactively executing queries, or from persistent queries managed by the Deephaven Controller process — allocate heap space to worker processes spawned on the server(s). The amount of heap allocated to a worker is configurable, and more complex queries that manipulate more and larger columns of data will need more heap.
A reasonable starting point in determining the RAM needed for a query server is to allow 8GB per concurrent user and per persistent query. For example, 160GB of RAM should be able to comfortably serve 10 users running 10 persistent queries.
Operating System settings
- Turn off swap in the kernel.
Important
Many Deephaven processes use large amounts of RAM. If swapping is permitted, the kernel may swap a significant portion of RAM allocated to Deephaven processes. In some environments, this can drastically increase the time needed to run garbage collection (GC). Extremely long GCs can cause network timeouts that adversely impact system stability. For this reason, in addition to general performance concerns, it is strongly recommended that servers running Deephaven are provisioned with ample RAM and configured to avoid swapping.
- Set minimum process limits.
Add or adjust the following settings in /etc/security/limits.conf file:
- Set minimum open files limits.
Add or adjust the following settings in /etc/security/limits.conf file:
Ensure that these limits be applied to non-interactive user sessions, so Deephaven processes running under the dbmerge, dbquery, and irisadmin accounts have sufficient process and file handles available.
Planning the installation
Although Deephaven can run with all its component services on a single server, this type of "single-node" deployment is normally only used for test or development purposes.
Production installs will typically have three or more servers, as shown below. The primary reasons for this number of servers are to allow specialized configuration and to provide fault tolerance of system configuration management. The system will have designated server roles, such as query servers or merge servers. (See Scaling to Multiple Servers to learn more.)
Within a Deephaven deployment, the following services are used:
- Query Server - one or more instances per deployment. This is the main service that processes user queries, and query server instances will often run on dedicated query servers in larger deployments.
global-rqd-serveris the Query Server used by remote processes which do not have a specific service.name stanza with aRemoteQueryDispatcherParameters.hostentry in theiris-endpoints.propfile. For example, if a custom Java application is running on a standalone server or workstation and attempts to launch a Deephaven worker without specifying a Query Server, this is the Query Server it will connect to.console-rqd-serveris the default Query Server used by Console instances.
- Merge Server - usually one instance per deployment. This service is responsible for writing historical data tables.
- Data Import Server (DIS) - one or more instances per deployment. This service writes data to intraday tables based on streams sent to it by the tailers.
- Controller - usually one instance per deployment. The controller manages scheduled persistent queries.
- Local Table Data Service (LTDS) - usually one instance per DIS. This service provides query servers with access to previous days' intraday data. Current day intraday data is sourced from the DIS process that wrote the data.
- Table Data Cache Proxy (TDCP) - optional, but, when used, usually one instance per query server. This process caches and consolidates client data requests.
- Log Aggregation Service (LAS) - one per Deephaven server. This process allows other Deephaven processes to write log files.
- Configuration Service - At least one instance per deployment; additional instances can be deployed for high availability. This process allows other Deephaven processes to access common configuration data. Because the Configuration Service is a dependency for most other Deephaven services, it is strongly recommended to deploy multiple instances in production installations.
- Authentication Server - at least one per Deephaven installation. This process authenticates login requests from Deephaven client processes. The Authentication Server can be configured to use a variety of back-end account stores for its credential authorities.
- DB ACL Write Server - usually one per Deephaven installation. Provides write access to the database used for storage of Deephaven accounts and permissions data.
- Web API Service - usually one per Deephaven installation. Provides HTTP(S) presence and port handling for Deephaven Web API and Web IDE clients. Also hosts the Client Update Service (CUS). The Client Update Service facilitates installation and updating of client components on Windows, OSX, and Linux clients.
- Tailer - at least one per Deephaven server. Additional tailers may run on external servers. This process watches for new binary log files - usually used to transmit streaming data - and feeds new data from them to the Data Import Server.
- Remote Table Appender - unifies the user and system data stream by putting user data into the Log Aggregator Service-Tailer-Data Import Service pipeline. This increases stability, persistence, and repeatability.
Besides these core Deephaven services, Deephaven also makes use of third-party services:
- m/monit - one instance per Deephaven server. A process monitoring service normally used to start and manage Deephaven services.
- etcd - etcd servers can be dedicated to just running etcd, or can be servers that also run other Deephaven services; however, a Deephaven installation must have its own etcd cluster and cannot share one, or the servers of one, that is used for other purposes. Single node installations are possible, but odd numbers of multiple nodes are recommended to allow fault tolerance and high availability. A distributed property store that is used as the back-end data store for the Configuration Service.
- Mysql or MariaDB - optional. Usually one instance per Deephaven deployment. Can be external to the Deephaven deployment. A relational database used as the back-end to the Authentication Service to store Deephaven user, group, and permissions information. The default is to use etcd for storage of this data. See the
DH_ACLS_USE_ETCDsetting in thecluster.cnffile options below. - envoy - optional. Usually one instance per Deephaven installation. May be external to the Deephaven installation. Provides reverse proxy handling between external Web API clients and the Web API Service, allowing a single external port to map to multiple internal Web API ports.
The iris-endpoints.prop file defines server names and addresses, service host points, and ports for Deephaven services in the installation.
When planning a new installation, it is important to plan the number of servers, and which servers should run which of the Deephaven services. Scale of load (number of concurrent users and the sizes of their queries), the volume of incoming data, and fault tolerance needs, are all considerations for this planning.
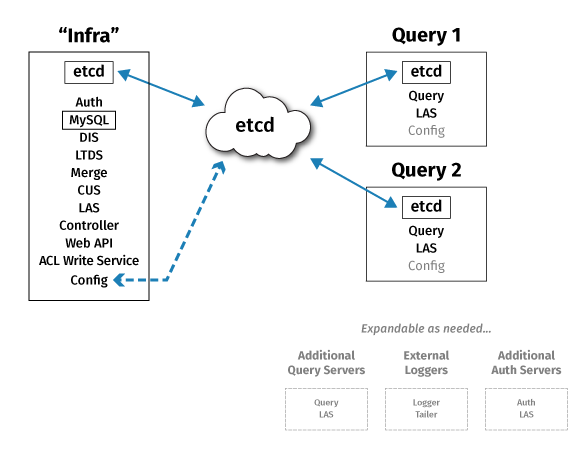
A typical small production deployment might look like this:
"Infra" node
- Etcd
- DIS
- LTDS
- LAS
Merge Server
- CUS
- Web API Service
- MariaDB (if not disabled)
- Authentication Server
- DB ACL Write Server
- Controller
- Tailer
- M/Monit
"Query" server 1
- Etcd
- Query Server
- LAS
- Tailer
- M/Monit
"Query" server 2
- Etcd
- Query Server
- LAS
- Tailer
- M/Monit
This provides fault tolerance for etcd-maintained configuration data, and scale-out of query processing across two query servers, but no fault tolerance for other Deephaven processes. The "Infra" server should have fast locally attached storage for intraday data being written by the DIS, and all servers should have shared (e.g., NFS) storage for access to historical data (written by the merge server or merge processes and read by the query servers).
Certificate requirements
For installation of the cluster, Deephaven requires a certificate containing an Extended Key Usage with TLS Web Server Authentication, and a Subject Alternative Name containing the Fully Qualified Domain Name of all the hosts in the cluster. If a friendly alias will be used to access the Deephaven Web UI, this alias name must also be included in the SAN block.
Note
If a wildcard certificate is to be used, note that such certificates are only valid for one level of subdomain; *.my.company suffices for test.my.company, but NOT for my.test.my.company.
This certificate should be obtained either from an internal corporate certificate authority that is already trusted for use in the organization, or from an external provider, such as Digicert or Verisign. It must be trusted by web browsers to use the Deephaven web IDE, and by the organization's Java installation to use the Deephaven Classic swing console. The certificate and key files must be named (or renamed to) tls.crt and tls.key and must be PEM format without passwords.
For PKI environments (certificates issued by internal Certificate Authorities) the tls.crt file should be a bundle that includes the root and issuing CA as well as the certificate for the Deephaven cluster. More information about certificates and Deephaven's use of them can be found here.
Installation process overview
The installation process introduced in version 1.20201022 is used for both new installations and for upgrades from previous versions of Deephaven. Versions from 1.20190607 and later can be upgraded directly to the latest version using this process.
This installer supports a complete cluster-installation pipeline called the “no root installer”. Despite this name, there is one script which contains all root-requiring operations that must be performed on all machines: dh_root_prepare.sh. An alternative to the use of root/sudo to execute this script is to manually execute the enumerated set of root-requiring setup steps. When these root prerequisites are in place, the dh_root_prepare.sh will simply validate that root setup is correct, and will not actually invoke sudo anywhere.
Important
The Deephaven system will not use any root permissions once the product has been installed (e.g., monit, and other tools, which previously required sudo, now run under irisadmin, the Deephaven administrative OS user account).
This installer comes in the form of an “installation generator” jar, which can be run against a single “cluster definition file” called cluster.cnf. This file is formatted as a “very strict” java properties file, as it is read by both java and sh/bash (space characters should only appear within “quoted values”). This allows the cluster.cnf file to be used by the installation generator to create install scripts, as well as being sourced by installation scripts to check the configured environment variables during the installation.
The cluster.cnf file is provided to the installation generator jar, and is used to generate all other necessary installation scripts. This file is also placed on each installed node, at /etc/sysconfig/deephaven/cluster.cnf, and values from this file are consumed at runtime by various installation scripts. While it is possible to place different cluster.cnf on different machines, you should never do so, as this file is meant to define the entire Deephaven cluster, and, in a later release, will be stored in a single centralized location within etcd.
A “standard installation” in which the person performing the installation must unpack all files and call all post-installation scripts manually is still supported; additionally, the scripts generated by the no-root installer can be run all together to set up the entire cluster, or they can be run individually as part of a customized installation process. The same installer will work for new installations, updating to a newer Deephaven version on existing installations, as well as adding or removing nodes from a cluster.
cluster.cnf may only contain supported variable declarations and #-prefixed comments.
The Files and formatting of the installation process section below includes detailed descriptions of cluster.cnf properties, an overview of the generated scripts, and filesystem locations that are searched for installation files.
Installation typically takes place from one machine, called the Installation Host. Typically, the Installation Host is not part of the cluster being set up; the Installation Host will usually be a “CI machine” or “developer’s laptop”. The Installation Host (Local Host) must be able to ssh into all nodes on the cluster. The machines being configured are called Remote Hosts or Target Hosts. Note that the use case of running the installation from one of the target nodes is not tested or officially supported but has been done when the Target Host can ssh to itself and the configuration property DH_LOCAL_DIR does not equal DH_REMOTE_DIR (described below).
A Service Account, referred to as dh_service, but which can be any user account name (specified in cluster.cnf as DH_SSH_USER), will be the acting user on all remote machines. If DH_SSH_USER is not specified, the acting user will be the same as the user who is logged in and running the installation process - shell $(id -un). For all production deployments, it is highly recommended to specify both DH_SSH_USER and DH_SSH_KEY, so authentication to the target hosts can be strictly controlled. The Service Account user will need some administrative permissions on the Remote Hosts to modify the filesystem, and sudo permissions to act as the various Deephaven user accounts. Details about this account can be found in the DH_SSH_USER variable in the Files and formatting of the installation process section.
Caution
The upgrade process regenerates and replaces iris-endpoints.prop. Any environment-specific property settings should be placed in iris-environment.prop so they will be preserved through the upgrade.
Installation and upgrade process
- Please see the System requirements above.
- For offline installs (where the installer is not able to download packages from public repositories) install a supported version of the Java JDK on each node. This can be Java 8 (1.8), Java 11, or Java 17. Oracle or OpenJDK distributions are valid - including Adopt and Azul. This must be a JDK install, not JRE. (e.g.,
sudo apt install openjdk-11-jdk). IfDH_OFFLINE=false, the installer will automatically download and deploy a JDK of the version specified incluster.cnf. - On the installation machine, create a directory to hold installation files.
- Create a sub-directory:
certs. Puttls.keyandtls.crtfiles there. Ensure they are readable by the account running the installation. - If MariaDB or MySQL is being used for ACL data, obtain the
mysql-connector-java.jarfile, copy it to this directory and rename it tomysql-connector-java-[DH_MYSQL_VERSION].jar.- The default value is
5.1.43if the jar was obtained from maven central, or with no version number in the name if it was installed using apt or yum. - If a
mysql-connector-javais not provided, the installer will attempt to download one unlessDH_OFFLINE=trueorDH_ACLS_USE_ETCD=true. - The connector jar used must be a version 5.x variant.
- The default value is
- Copy the Deephaven product tgz and installer jar files to this directory.
- Create a
cluster.cnffile in this directory (see example in the appendix and set properties as needed. In the case of upgrades, edit thecluster.cnfthat was used for the previous install, and update version numbers and anything else that has changed since the previous installation.
- Create a sub-directory:
The install process itself
For a typical installation - where the installer will be installing and configuring all processes and permissions - there are only two steps to the installation. These are executed from the local installation directory created in step 3 above.
- Execute the installation script generator:
java -jar ./Installer-1.20230511.309.jar - Execute the installation master script:
./master_install.sh
For this installation scenario, the master script which was generated by the installer jar will handle the entire installation process.
More complex scenarios include those where:
- sudoer permissions will be set directly by an administrator.
- Underlying processes, like MySQL or etcd, already exist or will be configured manually.
- Service accounts already exist or will be configured manually. See the Files and formatting section for details about customizing your installation and more complex installations.
Verify the installation
-
On each node, run:
/usr/illumon/latest/bin/dh_monit up --block. This will watch the status of all the processes and return with an exit code of 0 when all processes are started correctly. Ifdh_monit uptimes out,dh_monit summarycan be used to see which process is not starting correctly. -
Set a password for the iris user or create a user using
iris_db_user_mod.To interactively set a password:
To set a password without terminal input:
To create a user:
-
From a client system attempt to create a new instance connection to the new installation.
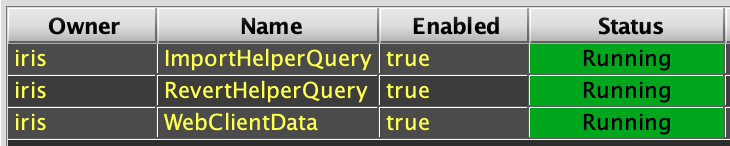
- Launch a Query Config panel and verify the three initial persistent queries (ImportHelper, etc.) are running:
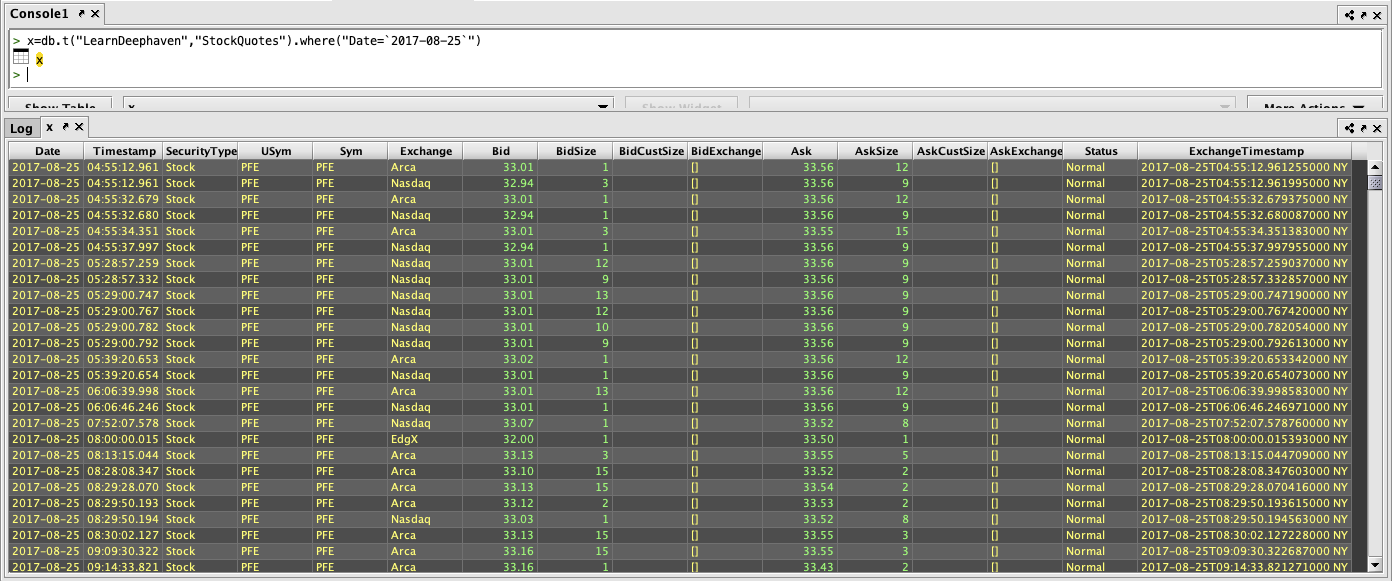
- Launch a Console against each of the query servers and execute a simple query, like
x=db.i("DbInternal","ProcessEventLog").where("Date=currentDateNy()").head(100)
- From a browser, connect to
https://<web server FQDN>:8123/irisideand attempt to log in and create a console.
Configure Python
If Python 3.8 was preinstalled on the system, or a different Python version was installed during the Deephaven installation process, it may be necessary to modify the shared object path and/or set or change a system default VEnv
Once these steps have been completed, launching Legacy workers from the Web or Swing consoles with Python selected as the worker language should be possible.
Install example data
Many of the example queries in the Deephaven documentation are based on the LearnDeephaven data set. This data set consists of three tables of historical data covering a few dates in the range from 2017-08-21 to 2017-08-25, plus 2017-11-01. The LearnDeephaven dataset, and its corresponding namespace, takes about 350MB on disk.
Historical data is accessed from disk "locally" by query server processes. Normally, historical data storage, which is under the path /db/Systems, is shared across Deephaven servers using NFS or some other type of sharable file system. Configuration of shared storage for historical data is covered in the Scaling to Multiple Servers guide.
If the installation is a single-node test/dev system, no shared storage is needed, so LearnDeephaven can be installed immediately after installing the system. For other installations, with multiple servers, LearnDeephaven should be installed only after shared storage for historical data has been configured.
The LearnDeephaven data set is installed by running this command once on a server from which writes to the shared /db/Systems storage are allowed (or the only server, in the case of a single-node installation):
/usr/illumon/latest/install/learn_install.sh
After installing the LearnDeephaven namespace, query workers will need to be restarted before they can query from it. LearnDeephaven is, by default, made readable for all Deephaven users.
Troubleshooting installation failures
If anything goes wrong, $DH_LOCAL_DIR/logs will contain very detailed logs for each script. In most cases, all logs from remote hosts will be copied to DH_LOCAL_DIR/logs/$node_hostname; in rare cases, it may be necessary to manually run dh_log_sync.sh to copy logs from remote machines to the local installer host, or connect to a Remote Host and look in $DH_REMOTE_DIR/logs directly for logs.
In rare cases, if the etcd cluster is set up correctly, but the dh_node_finalize.sh script does not complete normally, the dh_install.sh script may encounter problems trying to update files in etcd that have not yet been imported. In this case try:
sudo -u irisadmin touch /etc/deephaven/SKIP_ETCD_IMPORT- Run on nodes with etcd client keys (configuration_server)
- if
[-d /etc/sysconfig/deephaven/etcd/client], then sudo -u irisadmin touch /etc/deephaven/SKIP_ETCD_IMPORT
fi
- Rerun the installation until
dh_node_finalize.shsucceeds. sudo -u irisadmin rm /etc/deephaven/SKIP_ETCD_IMPORT- If there are error messages in
dh_install.shabout an update_system script failing, try touchingSKIP_ETCD_IMPORT, as outlined above.
Configuration scripts log their activities to /var/log/deephaven/install_configuration. Any logs containing sensitive information will only be visible to the irisadmin user; on a secure production system, these logs should be purged or moved to a more secure archive after system functionality has been fully verified. Before an installation is run, all logs in install_configuration will be moved to /var/log/deephaven/previous_install, so only logs relevant to the last installation will be found in install_configuration.
After install, component services will log their details to: /var/log/deephaven/<service/process name>/
It is normal to see Authentication Server failures in the Configuration Server log while the Authentication Server is starting up. The Configuration Server must start first, as it is a dependency for the Authentication Server. The Configuration Server will then attempt to connect to the Authentication Server, and will retry while waiting for the Authentication Server to begin accepting connections. This nuance is handled gracefully if processes are started using /usr/illumon/latest/bin/dh_monit up (passing the --block flag will direct dh_monit to wait until all processes are online).
If the Configuration Server client fails because it cannot find a matching Subject Alternative Name (SAN), check that /etc/sysconfig/illumon.d/dh-config/clients/single/host contains the correct name or IP address of the Configuration Server, and that /etc/sysconfig/deephaven/auth/truststore-iris.pem has a SAN for its configuration_server entry that matches the contents of the host file. Note that this will require reading the contents of the .pem file with something like OpenSSL that can decode the X509 formatting.
For example, run:
Then paste the certificate_server section of the .pem file to decode it.
Note
See also: Reducing Root to Zero
Files and formatting of the installation process
Supported cluster.cnf variables
The various supported cluster.cnf variables will be listed here, in an approximate descending order of importance.
Caution
Note that the format of the cluster.cnf file is very strict.
Required variables
DH_LOCAL_DIR
The location on the Installation Host where all generated scripts will be written to and run from. When the install generator jar is run, this directory will be created, and all files will be written into this directory. It is typical to run the generator jar from this directory, but it is not required. If this property is not defined, it will default to the value for DH_REMOTE_DIR. If neither is specified, an error is thrown and no files are generated.
DH_LOCAL_DIR is where the installer will look for certain files.
Web certificates are found in the certs directory:
$DH_LOCAL_DIR/certs/tls.crt$DH_LOCAL_DIR/certs/tls.key
The Deephaven tar.gz containing all product installation files can be placed directly in DH_LOCAL_DIR, and will be uploaded to all remote hosts over ssh. See DH_VERSION for details on naming convention of the tar.gz.
Finally, the Mysql connector jar, which Deephaven cannot legally distribute, can be placed into this directory. If it is not found here, and its installation is not disabled with either DH_OFFLINE=true or DH_ACLS_USE_ETCD=true, the installer will attempt to download it from maven central. See DH_MYSQL_VERSION for details on the naming convention of this jar.
DH_REMOTE_DIR
The location on each Remote Host where the installer will copy all files and store all logs.
This directory will be created if missing, and will be used as a staging location for all uploaded files. To bypass the uploading of archives, place the deephaven tar.gz, the MySQL connector jar (if needed) and etcd installation medium (if needed) in the $DH_REMOTE_DIR/lib directory.
$DH_REMOTE_DIR/logs is where all scripts which run on the remote machine will store their logs.
If DH_REMOTE_DIR is not specified, it will be the same as DH_LOCAL_DIR. If both are missing, an error is thrown and no files are generated.
DH_VERSION
The version of Deephaven that will be installed. This must match the name of the Deephaven tar.gz file.
The installer will search for the tar.gz in various locations on the filesystem, in order of precedence:
/var/lib/deephaven/deephaven-enterprise-$DH_VERSION.tar.gz(owned byirisadmin)- If the file is not found here, the installer will next search:
$DH_REMOTE_DIR/lib/deephaven-enterprise-$DH_VERSION.tar.gz(readable by Service Account ANDirisadmin) If the file is found here, it is copied byirisadmininto/var/lib/deephaven. - If the file is not found here, the installer will next search:
$DH_LOCAL_DIR/deephaven-enterprise-$DH_VERSION.tar.gz(readable by service account). - If the file is found here, it will be copied to
$DH_REMOTE_DIR/libas service account, then transferred to irisadmin in/var/lib/deephaven. By default, the copy in$DH_REMOTE_DIRwill be deleted upon successful installation.
If the tar.gz cannot be found in any of these places, it is possible to download on demand from Deephaven’s artifactory repository if a DH_REPO_KEY_FILE (file containing password to artifactory) is specified. If none of these options are available, the scripts will break and the installation will fail.
Note
It is possible to do an RPM installation, but all testing and all operating systems support tar.gz, so this document will primarily reference tar.gz. If DH_ROOT=true is passed, the installer will use RPM files that match the naming convention of all RPMs published by Deephaven.
DH_CLUSTER_NAME
This is required, but is only used for log messages.
DH_NODE_N_NAME
$N should be replaced with an integer number starting at 1.
All DH_NODE_$N variables are used to describe each Remote Host in the cluster that the installer will be setting up (domain name, hostname and running processes). At least one node must be specified.
DH_NODE_$N_NAME is required, and it is best practice to match the machine’s hostname (the short name, not the fully qualified domain name).
The other DH_NODE_$N variables will be described in the Optional variables section, below.
Custom user accounts (optional)
DH_MONIT_USER
The OS user account to use to run monit. It defaults to irisadmin, but can be root (not recommended) or any OS user. This user will be created if it does not exist, and can be the same user as your DH_SSH_USER service account. This user account will be created if it does not exist, and must have sudoer privileges to run as the DH_ADMIN_USER, the DH_MERGE_USER, and the DH_QUERY_USER.
DH_MONIT_GROUP
The OS group to use to run monit. By default, the group will have the same name as DH_MONIT_USER, and will be created if missing.
DH_ADMIN_USER
The OS user - by default, named irisadmin- to run administrative processes like the authentication_server, the configuration_server, the iris_controller, and the db_acl_write_server. Access to this user account should be as restricted as possible. Both the DH_SSH_USER and DH_MONIT_USER must be able to sudo as DH_ADMIN_USER : DH_ADMIN_GROUP. This user account is created if it does not exist.
DH_ADMIN_GROUP
The OS group to use when running administrative processes. By default, a group of the same name as DH_ADMIN_USER will be used and will be created if it does not exist.
The primary group for DH_ADMIN_USER must be DH_SHARED_GROUP (typically dbmergegrp), NOT DH_ADMIN_GROUP (typically irisadmin).
To check your primary group, run:
DH_MERGE_USER
The OS user to use when running merge processes (allowed to write historical data). By default, this account is named dbmerge, but can be any account and will be created if it does not exist. It is strongly discouraged to set DH_MERGE_USER == DH_ADMIN_USER or DH_MONIT_USER, as this will grant administrative privileges to any user allowed to run queries on the merge server. The DH_MONIT_USER and DH_SSH_USER must be able to use sudo as DH_MERGE_USER : DH_MERGE_GROUP.
DH_MERGE_GROUP
The OS group to use for files that are only readable by DH_MERGE_USER. By default, a group with the same name as DH_MERGE_USER (dbmerge) is created and used. Note that processes are run using DH_SHARED_GROUP, so files created by merge processes are visible to other OS user accounts.
The primary group for DH_MERGE_USER must be DH_SHARED_GROUP (typically dbmergegrp), NOT DH_MERGE_GROUP (typically dbmerge).
DH_QUERY_USER
The OS user to use when running query processes. By default, this account is named dbquery, but can be any account and will be created if it does not exist. It is strongly discouraged to set DH_QUERY_USER == DH_ADMIN_USER or DH_MONIT_USER, as this will grant administrative privileges to any user allowed to run code on the query server. The DH_MONIT_USER and DH_SSH_USER must be able to use sudo as DH_QUERY_USER : DH_QUERY_GROUP.
DH_QUERY_GROUP
The OS group to use for files that are only readable by DH_QUERY_USER. By default, a group with the same name as DH_QUERY_USER (dbquery) is created and used. Note that processes are run using DH_SHARED_GROUP, so files created by query processes are visible to other OS user accounts.
The primary group for DH_QUERY_USER must be DH_SHARED_GROUP (typically dbmergegrp), NOT DH_QUERY_GROUP (typically dbquery).
DH_SHARED_GROUP
The OS group to use for ownership of files which must be shared between DH_ADMIN_USER, DH_MERGE_USER, and DH_QUERY_USER. This group must be the primary group for these three Deephaven system accounts, and any files which must be readable by all three OS users should have group ownership of DH_SHARED_GROUP (or DH_SHARED_QUERY_GROUP, described below, if you wish to share data beyond Deephaven system accounts).
The DH_SHARED_GROUP unix group will be created if it does not exist, and the OS user membership of DH_ADMIN_USER, DH_MERGE_USER, and DH_QUERY_USER will set this group as the primary (default) group of the given user accounts.
DH_SHARED_QUERY_GROUP
The OS group to use for ownership of files which must be shared between any operating system user that you want to be able to run a Deephaven worker / query / console.
All three system users, DH_ADMIN_USER, DH_MERGE_USER and DH_QUERY_USER must have secondary group membership in the DH_SHARED_QUERY_GROUP, but you may also allow any operating system user to start Deephaven sessions by granting them membership to DH_SHARED_QUERY_GROUP. See the Configuration guide for more information.
Optional variables
DH_OS
The operating system that the installer targets. Valid options are:
- centos7 (default)
- ubuntu20
- ubuntu22
- rocky8
- rocky9
- rhel8
- rhel9
You may set this value to centos or ubuntu to get centos7 or ubuntu20, but it is recommended to use the full values.
If you set DH_OS=rhel9, then you must also set DH_ACLS_USE_ETCD=true, as mysql-based ACLs are not supported on this operating system.
The version support matrix details when each Operating System is supported by a specific version of Deephaven. Both the install generator and product archive must have matching versions listed on the support matrix to install on that OS.
If you wish to use more than one operating system within a single cluster, you may only add new machines of one operating system at a time. For example, if you have a cluster with three centos machines and two rocky8 machines, you must, in order:
- Install only the three machines with DH_OS=centos7
- The first OS chosen should match the OS of the "infra" machine, where the config server and auth server run.
- Edit cluster.cnf, add the two rocky8 machines and update DH_OS=rocky8
- If you edit a cluster.cnf (/etc/sysconfig/deephaven/cluster.cnf) from a live machine, be aware it includes generated default values (located at the bottom of the file, with one-line #comments above each entry).
- Any time you update DH_OS, you should also erase any "generated values" present in your cluster.cnf file, in case the generated default value is different for the new Operating System you are targeting.
- Re-run the installer across all machines
Once Deephaven has been successfully installed on a given machine, the code paths that care about operating-system-specific files will no longer be used, so it is safe to change the DH_OS variable to match any machines that have not been fully set up.
When ubuntu20 or ubuntu22 is selected, the installer changes how third-party dependencies are handled as well as change other default values to match an Ubuntu operating system. It is NOT recommended to mix ubuntu machines with centos/rocky/rhel machines.
DH_SSH_USER
The remote-system ssh user to act as when communicating over ssh. The default is the user running the given script. It is strongly recommended always to set the DH_SSH_USER variable when generating scripts, so the installer can validate all files are owned and operated by the correct user account.
DH_SSH_KEY
The ssh key to use when communicating to Remote Hosts. Specifying this may be necessary on systems with many ssh keys (ssh gives up after five failures). Combining this with DH_SSH_USER ensures all communication happens with the correct user and the correct keys.
DH_LAX_SSH
When set to true, will bypass all ssh remote host verification. The default value is false, and requires that the known_hosts file for the ssh user is already set up to communicate with all target Remote Hosts.
DH_WORLD_READABLE_LOGS
Set to true to make created log files world readable. Default is false. true should only be used if access to the service account is heavily restricted, and other users need to be able to debug logs without logging in as the service account. Deephaven strives to keep all sensitive data out of logs, but the default is false for additional protection.
DH_CLEANUP
When true, the installer will scrub all temporary files AND logs on all remote machines after installation completes. Logs will be copied from Remote Host to Installer Host before they are deleted.
DH_DOMAIN_ROOT
The DH_DOMAIN_ROOT exists solely for the convenience of computing per-node domain names. If DH_DOMAIN_ROOT is specified, then DH_NODE_$N_DOMAIN is computed by concatenating DH_NODE_N$_HOST to DH_DOMAIN_ROOT (see below). This should generally be set to match the domain name used in provided TLS certificate files.
DH_NODE_$N_HOST
The hostname of machine number $N. If this is not specified, the installer will use the DH_NODE_$N_NAME, which is required.
DH_NODE_$N_DOMAIN
The fully qualified domain name of machine number $N. If this is not specified, and DH_DOMAIN_ROOT is specified, the installer will use the value {DH_NODE_$N_HOST}.${DH_DOMAIN_ROOT}. If there is no DH_DOMAIN_ROOT, the installer will just use the hostname, and assume that the networking layer will be able to resolve all machines directly by hostname. Note that this value will be used for exposed services, like the web IDE or the swing GUI, and all client machines must be able to correctly perform DNS resolution on the domain name.
DH_NODE_$N_ROLE_$SERVICE
In order to tell the installer what services will run on each node, a “flattened map” of variables is used that look like:
The full list of available values for $SERVICE, with [monit_name] are:
_QUERY:trueto run a query-class (read only) RemoteQueryDispatcher[db_query]_MERGE:trueto run a merge-class (read-write) RemoteQueryDispatcher[db_merge]_CONFIG:trueto run a ConfigurationServer. This will also require etcd client keys on disk [configuration_server]._AUTH:trueto run an AuthenticationServer[authentication_server]._DIS:trueto run DataImportServer[db_dis]._RTA:trueto mark a single node to handle all user inputs. There can only be one RTA node, and this node must also be a_DISnode. If not specified, the installer will use the first DIS node to handle user inputs. This setting only affects therouting.ymlon new installations._WEB:trueto run a WebServer (web IDE) and a Client Update Service[web_api_server]._CONTROLLER:trueto run a PersistentQueryController[iris_controller]._ETCD:trueto run an etcd server on this node. An etcd node need not run any other services. There must be an odd number of etcd nodes, and if not specified, the first one or (if available) three nodes will be marked as etcd servers._SQL:trueto run a MySQL ACL database on a given node. If this is not set, the installer will use the first auth server node to run the SQL server._SCHEMA:trueto specify a default node (which must run a merge server) that will be used when running the schema editor in a java client. The user will be able to change this to any valid merge server when running the schema editor. If this value is not specified, the first merge server in the service list is used._LAS:trueto run a Log Aggregator Service. Currently, all nodes will always run a log aggregator service[log_aggregator_service], so this flag is not typically needed._LTDS:trueto run a LocalTableDataService[db_ltds]. An LTDS is deployed automatically on nodes that are running a DIS, as this is where it is normally needed, so this flag is typically not needed._TDCP:trueto run a TableDataCacheProxy[db_tdcp]. Currently, all nodes will always run a table data cache proxy, so this flag is not typically needed._TAILER:trueto run a Logtailer[tailer1]. Currently, all nodes will always run a log tailer, so this flag is not typically needed._ENVOY:trueto run Envoy reverse proxy. Note that Envoy configuration also requires thatDH_CONFIGURE_ENVOYbe set totrue. If Envoy configuration is enabled, but no node is designated for Envoy, this will default to the first Web API node.
DH_NODE_$N_ROLE_INFRA
The DH_NODE_$N_ROLE_INFRA flag is a shortcut for enabling many other services at once. INFRA nodes will have: CONFIG, AUTH, DIS, WEB, RTA, SCHEMA, CONTROLLER, CUS and MERGE all set to true. To remove any of these, set the service to be removed to false after setting the INFRA flag.
DH_SKIP_MONIT_CHECK
Set to true to bypass built-in 'is monit setup correctly' checks. Some installations might have monit set up in non-standard ways, so the Deephaven automated method of using root permission to change monit from “run as root” to “run as irisadmin” will fail. This flag instructs installer scripts to skip all checks and modifications and simply trust that monit has been configured correctly.
DH_ACLS_USE_ETCD
Set to true to configure the installation to use etcd for storage of ACL data (Deephaven logins, groups, and permissions). When this option is false, MariaDB and the MySQL connector jars are installed, and instead of the etcd installation used for schema, properties, etc., ACL data is stored in MySQL.
If you use Red Hat 9 when first setting up a new cluster, via DH_OS=rhel9, then you MUST set DH_ACLS_USE_ETCD=true, as rhel9 is incompatible with legacy mysql-based ACLs. If you need to continue using MySQL-based ACLs, and are NOT already providing an externally-managed MySQL server, then you must first set up at least one machine on a different operating system before updating DH_OS=rhel9 to add more machines.
DH_SKIP_ACL_INIT
Set to true to bypass built-in 'is mysql setup correctly' checks. Some installations set up mysql outside of this installer, and this flag allows them to bypass the Deephaven setup code. When true, the installer will simply trust that MySQL is set up correctly.
DH_CONFIGURE_ENVOY
Set to true to configure the installation to use Envoy as a reverse proxy for access to all Deephaven services. This configuration is recommended for environments where only a single port will be opened between the Deephaven cluster and users' networks. Enabling this setting directs the installer to update iris-endpoints.prop to use Envoy, and to create an Envoy configuration yaml file. This setting does not install Envoy itself or update iris-environment.prop. Before the system can be used, Envoy must be installed, configured, and started. Installation instructions are in the Envoy topic: Using Envoy as a front proxy. The simplest option to configure Envoy is to enable just this one Envoy configuration flag; this will result in the installer configuring the cluster to use an Envoy installation on the Web API host, with the default Envoy port of 8000, and with the Envoy admin page disabled. See Envoy-related installer flags for additional details.
DH_ROOT
When DH_ROOT is false (default) the installer will be installing Deephaven as a tar.gz archive. When DH_ROOT is true, the installer will install an RPM and require sudo permissions to do so at runtime.
Ubuntu installs CANNOT use DH_ROOT=true. If DH_ROOT=true is used, the installer will also allow other scripts to use sudo to change ownership of files during installation. DH_ROOT=true should not be used unless Deephaven representatives and infosec teams involved in the installation planning process agree that it is ideal for Deephaven scripts to correct file permissions at install time. On an already-installed Deephaven system, /usr/illumon/latest/install/with_root/prepare_filesystem.sh can be run directly to repair file permissions.
DH_MODIFY_ETC_SUDOERS
Set to true to allow the generated scripts to modify /etc/sudoers. The default of false will simply break if sudoers permissions are incorrect.
DH_PARALLEL
When set to true (default), all scripts will use as much parallelism as is safe. This can greatly improve installation speed, especially on large clusters. However, it can cause some log messages to interleave and become harder to read. When debugging an issue where the logs are interleaved in a confusing manner, set DH_PARALLEL=false to trade speed for clarity.
DH_STRICT
When set to true (default), all cluster.cnf entries will be validated to be understood by the generator to easily catch typos. Using a value of false should only be used in rare cases when upgrading to a new version of the installer and it is needed to ignore deprecated or removed properties.
DH_ETCD_TOKEN
This optional property allows specifying the etcd token to use. The installer requires some root permissions to be able to set up etcd systemd services, and some installations will set up those services outside of this installer, and pass in the etcd token they used via DH_ETCD_TOKEN.
DH_JAVA
This optional variable tells the Deephaven server where to find a java executable, regardless of the system PATH.
DH_JAVA works correctly whether you point to a Java executable or a Java installation directory (like "JAVA_HOME").
Both DH_JAVA=/path/to/java_to_use and DH_JAVA=/path/to/java_to_use/bin/java will behave the same.
If different machines in your cluster have Java executables located in different locations,
it will be your responsibility to set DH_JAVA correctly in /etc/sysconfig/deephaven/cluster.cnf on each machine.
DH_DIR_ETCD_BIN
Set DH_DIR_ETCD_BIN to a directory to tell Deephaven where to find the etcd and etcdctl binaries.
The default value is /usr/bin. The specified directory must exist before performing an installation. If the required etcd binaries are not found in this directory, the installer attempts to download them for you.
DH_JAVA_VERSION
Which version of java to use. Valid values are jdk1.8 (default), jdk11, and jdk17.
DH_JAVA_PACKAGE
The exact Java package name to use with apt/dnf/yum install. This is normally computed from DH_JAVA_VERSION, and is only needed if an installed JDK version was not provided; e.g., if a suitable Java JDK was not already installed on the target nodes for cluster.
DH_JAVA_REPO
When Java is not installed, Deephaven adds a repository definition to your remote machine's package manager so we can install DH_JAVA_PACKAGE using apt/dnf/yum.
When using the default value for DH_JAVA_REPO, Deephaven saves the Temurin OpenJDK repositories from adoptium.net into /etc/apt/sources.list.d/adoptium.list on Debian distributions and /etc/yum.repos.d/adoptopenjdk.repo on RPM-based distributions.
When using a non-default value of DH_JAVA_REPO, we instead save the repository definition to /etc/apt/sources.list.d/deephaven-java.list and /etc/yum.repos.d/deephaven-java.repo.
If you do not wish to modify any of these files, simply pre-install Java on all remote machines.
DH_JAVA_GPG_KEY
When Java is not installed, Deephaven adds, by default, the Temurin OpenJDK repositories at adoptium.net to your remote machine's package manager so we can install DH_JAVA_PACKAGE using apt/dnf/yum.
The DH_JAVA_GPG_KEY variable defines a URL where the installer can download the gpg key used to verify packages in DH_JAVA_REPO.
If you do not wish to download any gpg keys, simply pre-install java on all remote machines.
DH_PYTHON
Whether to install Python to the target node(s). Default is true. By default, Python 3.8 will be checked for, and, if it is not already available, Python 3.8.7 will be downloaded and built from source. The file Python-3.8.7.tgz will be downloaded or can be locally provided. See DH_PYTHON_VERSION and DH_PYTHON_PATCH_VERSION for options to install other versions of Python. If a different DH_PYTHON_VERSION major.minor version is specified, and DH_PYTHON = true, the specified version will be checked for and installed if not already present.
DH_DND_PYTHON
Whether to install the Python virtual environment for Community in Enterprise (DnD) workers. Defaults to the value of DH_PYTHON. If DH_PYTHON is not set, the system still attempts to install Community environments using the version specified by DH_PYTHON_VERSION, but Python is not automatically installed.
DH_PYTHON_VERSION
Which version of Python to install when DH_PYTHON is set to true. Valid values are 3.8, 3.9, and 3.10 (default). The corresponding file will be downloaded from https://www.python.org/ftp/python or can be locally provided.
DH_PYTHON_PATCH_VERSION
Which patch version of Python to install when DH_PYTHON is set to true.
Valid values are 0 or higher integers. The corresponding file will be downloaded from https://www.python.org/ftp/python or can be locally provided.
Defaults are:
DH_PYTHON_VERSION="3.8" :DH_PYTHON_PATCH_VERSION="7"DH_PYTHON_VERSION="3.9" :DH_PYTHON_PATCH_VERSION="13"DH_PYTHON_VERSION="3.10" :DH_PYTHON_PATCH_VERSION="12"
DH_LIGHTTPD_PEM
The location on the Remote Host running a client_update_service where the pem certificates will be placed. If a lighttpd.pem file is found in the legacy location /etc/ssl/private, it will be moved and chown’d into the configured DH_LIGHTTPD_PEM location. On new installs, the installer will concatenate the tls.key and tls.crt files supplied in $DH_LOCAL_DIR/certs directory.
DH_OFFLINE
Set to true to disallow any attempts to download missing resources from Deephaven jfrog or the public internet. Default is false. Scripts will not download resources that are already present on the running system.
DH_FORCE_NEW_CERTS
Set to true to forcibly overwrite all tls certificates. The default is false, and should only be set to true when to rotate keys, or if the certificates are expiring and the Deephaven cluster is not enrolled in a certificate management infrastructure.
DH_SKIP_CERT_VALIDATION
Set to true to bypass additional truststore / certificate validation performed at the end of an installation. This flag should only be used if you have verified that your truststore and certificates are correctly formatted, or if you will repair your certificates after the installation has completed.
DH_MYSQL_VERSION
The version of the mysql-connector-java jar to use. By default, the installer will search in $DH_LOCAL_DIR for a file named mysql-connector-java-${DH_MYSQL_VERSION}.jar and upload that to Remote Hosts which need it. If such a jar is not found, the installer will attempt to download one from maven central during the installation.
DH_REPO_URL
If a valid tar.gz or rpm installer for the requested $DH_VERSION is not found on each Remote Host or in $DH_LOCAL_DIR on the Installer Host, the installer will attempt to download the requested archive from Deephaven’s jfrog repository, as specified by DH_REPO_URL. It is recommended to supply this file in DH_LOCAL_DIR to avoid unnecessary secret exposure and network IO.
DH_REPO_SEGMENT
The 'repo name' segment to use in conjunction with DH_REPO_URL to calculate download urls, default value is iris/illumon-db/<DH_VERSION>. Ideally, this value is not needed because an installation tar.gz or rpm file has been provided before running the installer.
DH_REPO_KEY
When using DH_REPO_URL to download archives, the DH_REPO_KEY contains the secret password used to authenticate with Deephaven’s jfrog repository. This key is placed into a file and uploaded to reduce secret exposure over the network. This is not needed if the installer has been provided with a tar.gz or rpm file directly.
DH_REPO_KEY_FILE
When using DH_REPO_URL to download archives, the DH_REPO_KEY_FILE contains the secret password used to authenticate with Deephaven’s jfrog repository. This key is copied to the Remote Host, who then downloads the files and then erases the key file once complete. This is not needed if the installer has been provided with a tar.gz or rpm file directly.
DH_DND_VERSIONS
or
A comma-separated list of Core+ versions to install along with the Enterprise system. You must have appropriate keys set up or have already downloaded the Core+ installation tar file (e.g., deephaven-coreplus-0.33.6-1.20231218.432.tgz) that corresponds to the DH_VERSION and Core+ version that you are requesting.
As with the main installation .tar.gz file, the installer expects the installation file to be located in $DH_LOCAL_DIR/deephaven-coreplus-$DND_VERSION-$DH_VERSION.tgz along with the generated installation scripts.
The /usr/illumon/dnd/latest link is set to the first specified version. If you install multiple versions, you must edit your iris-environment.prop file to include appropriate WorkerKind definitions for those versions.
You may also set DH_DND_VERSIONS to the special properties none or auto. When selecting auto, the installer selects the same version of Deephaven Community that was built and tested with your selected version of Deephaven Enterprise. When selecting none, Core+ will not be installed or upgraded.
The recommended setting for this value is auto, and older installations should be changed to use this value when upgrading. Do not specify specific versions unless directed by Deephaven support.
DH_USE_EPEL
Set to false to tell Fedora-based operating systems (centos, red hat) to NOT automatically add the epel-release upstream source.
This is useful when you have your own RPM repositories to supply operating system dependencies and do not wish to include the epel repository.
DH_LINK_HOSTCONFIG
Normally, the hostconfig directory used by Deephaven resides in /etc/sysconfig/illumon.confs/illumon.iris.hostconfig. You can change this location to DH_LINK_HOSTCONFIG, in which case the hostconfig file is a link to your specified location, and it is your responsibility to own the entire hostconfig. It is still strongly recommended for custom hostconfig to source /etc/sysconfig/illumon.confs/hostconfig.system, as this file is updated with new system defaults upon upgrades.
DH_LINK_RESOURCES
Normally, the customer resources directory used by Deephaven resides in /etc/sysconfig/deephaven/illumon.d.latest/resources, and this location is a link to a versioned directory, /etc/sysconfig/deephaven/illumon.d.1.2345678.910/resources. The contents of the resources directory of the previously installed version is copied to a newly installed version on each upgrade.
If a customer wishes to opt out of this resource file management, simply set DH_LINK_RESOURCES to any location desired, and the installation will create a link to your directory.
Generating an installation
Once the DH_LOCAL_DIR has been prepared with tls certificates and DNS has been set up, the cluster.cnf and Installer-${DH_VERSION}.jar can also be placed into DH_LOCAL_DIR and, the installation generator can be run:
This produces the full set of installer scripts from your cluster.cnf file.
By default, the Java program looks in the current working directory for a file named cluster.cnf from which to parse DH_ properties. If DH_LOCAL_DIR is set as an environment variable, the generator instead looks in $DH_LOCAL_DIR/cluster.cnf for your input cluster.cnf file. The installation generator parses the cluster.cnf file, along with your shell environment, to find all the DH* properties and then update them with any computed or default values the user did not specify. A backup of the original cluster.cnf file is created whenever any changes are detected.
If you do not want for your input cluster.cnf file to be updated at all, pass the cluster.cnf= argument like so:
When using cluster.cnf=, the generator reads in the specified file and writes out the final cluster.cnf file to $DH_LOCAL_DIR/cluster.cnf, where it is uploaded to /etc/sysconfig/deephaven/cluster.cnf on all target machines. While this avoids automated updates to your configuration file, it also means any settings picked up from your environment or any default values that Deephaven may one day change are only be present in the output $DH_LOCAL_DIR/cluster.cnf, but not your input file. It is recommended to commit your output cluster.cnf file to source control, or other forms of persistence, to maintain continuity across upgrades.
Note that when using DH_ALLOW_OVERRIDES=true (at the top of your cluster.cnf file or exported to environment), any DH_ properties you have exported in your environment replace any value specified in the cluster.cnf file. Otherwise, if your environment and your input cluster.cnf file disagree, an error is thrown, and you must correct it manually.
Generated scripts
The install scripts, in the order they are run:
master_install.sh- Run this file from the Installer Host and it will install the entire cluster. It will copy the tar.gz or rpm installer to each host, and then run all the other scripts, below, in correct order on the correct machine.dh_root_prepare.sh- This script is copied to each Remote Host and then run on that host. This is the only script that will invokesudo, and only if needed.dh_install.sh- This script is copied to each Remote Host and then run there. It will unpack the Deephaven tar.gz or rpm and run the post_install.sh script.dh_keygen.sh- This script is run on the Installer Host, and will copy or create all necessary certificates to the correct machines and then cleanup all temporary files that might contain certificates or private keysetcd_configure.sh- This script is run on the Installer Host, and will test if the etcd cluster is healthy and correctly configured. If it is not, it will generate and provision all necessary files for the etcd cluster and then test again that the cluster is healthydh_node_finalize.sh- This script is run on the Installer Host, and is responsible for finalizing the cluster setup. It will generateiris-endpoints.prop, import all necessary files into etcd and enable all monit services.dh_log_sync.sh- This script is run on the Installer Host, and will copy all logs from all Remote Hosts to the Installer Host, so it is simpler to debug any failuresdh_node_validate.sh- This script is copied to each Remote Host, and will perform some system validation to ensure that the product is correctly configured.dh_node_cleanup.sh- This script is copied to each Remote Host, and will clean up all temporary files and all logs.
The simplest installation process is to run master_install.sh as the service account, and the entire cluster will be automatically set up.
A more interactive process, or one used to integrate with other automation, is to run individual scripts, provided they are run from the Installation Host or Remote Host, as defined in the above list.
Note
All cluster.cnf values can alternatively be provided as environment variables when running java -jar Installer-${DH_VERSION}.jar; if the file itself does not exist, the installer will try to compose one using DH_* environment variables.
Details of installation prerequisites
Domain names and DNS records
Important
It is strongly recommended to have DNS records set up (a records binding hostname to IP address) for all machines before running the generator. The Installation Host must be able to resolve all IP addresses for all etcde server and configuration server nodes when the installation Generated Scripts are generated. All other nodes will wait to resolve DNS until the generated scripts are invoked.
The cluster.cnf file must include mappings describing each node in the cluster. These mappings may be modified to add or remove nodes from an existing cluster. (See the section on Adding and removing nodes for more details.) Each node must have a unique name and number, N, identified by a cluster.cnf DH_NODE_${N}_NAME=my-name.
For every node in cluster.cnf, say, DH_NODE_1_NAME=infra, the cluster.cnf may also specify:
- (Optional) The hostname:
DH_NODE_1_HOST=my-infra-1- If this is not supplied, the value of DH_NODE_1_NAME will be used.
- Should match the “local” name of the machine, as printed out when executing
hostname.
- (Optional) The domain name:
DH_NODE_1_DOMAIN=my-infra-1.foo.com- The url to access the machine externally, usually a
fully.qualified.domain.name. - If not supplied,
DH_NODE_1_HOSTwill be concatenated toDH_DOMAIN_ROOT, if set, with a dot separator. - In this example,
DH_NODE_1_DOMAINis optional ifDH_DOMAIN_ROOT=foo.com.
- The url to access the machine externally, usually a
- (Optional) The installer route:
DH_NODE_1_INSTALLER_ROUTE=domain-or-ip.com- This property is used to tell the installer what domain or ip to use to connect to this machine during installations
- If not supplied, the default is to use
DH_NODE_1_DOMAIN - Useful in situations where the machine running the installer does not have network access to the domain names used by Deephaven servers.
- Available since version
1.20240517.216
- (Optional) The IP address:
DH_NODE_1_IP=1.2.3.4- If this is not supplied and is needed, it is computed by resolving the domain name.
- Resolved using
host domain.name 8.8.8.8. To use a different nameserver, set DH_DNS_SERVER. - This option is no longer used directly, but serves as a default value for the next option.
- (Optional) The etcd server IP address:
DH_NODE_1_ETCD_IP=4.3.2.1- In cases where your etcd machines listen on a different network interface, you may need to specify an IP address which cannot be resolved from your installation host.
- The default for DH_NODE_1_ETCD_IP is DH_NODE_1_IP which, by default, resolves DH_NODE_1_DOMAIN.
- If your machines use multiple network interfaces, it is recommended to keep the machine IP addresses updated.
- Do not attempt to change etcd IP addresses on a running system without contacting Deephaven support (you may need to snapshot and later restore your etcd database).
- A list of
DH_NODE_1_ROLE_*variables- The barest minimum 1-machine installation needs:
DH_NODE_1_ROLE_INFRA=true and DH_NODE_1_ROLE_QUERY=true
- The barest minimum 1-machine installation needs:
TLS certificates
TLS certificates for use in Deephaven’s web IDE and Client Update Service must be provided as part of the installation prerequisites. Details on how to format these certificates can be found above. In short, these certificates must:
- Be stored as x509 certificates in pem format.
- Be named
tls.crt(certificate) andtls.key(private key). - Must have Extended Key Usage of TLS Web Server Authentication and TLS Web Client Authentication.
- Must have a Subject Alternative Name matching the
DH_NODE_${N}_DOMAINof the machine withDH_NODE_${N}_ROLE_WEB=trueorDH_NODE_${N}_ROLE_INFRA=true. - Must be placed in
$DH_LOCAL_DIR/certssubdirectory of the Installation Host before running the installation generator. - These files will be copied to any node which requires certificates, and then concatenated / restructured into the correct format and location for the web IDE / swing Client Update Service. As such, they must be readable by the user running the installation script(s). Intermediate temporary files will be automatically cleaned up.
sudoers rules
Tip
If DH_MODIFY_ETC_SUDOERS=true, the below rules will be automatically configured.
This can be accomplished by running regenerate scripts, then running dh_root_prepare.sh on remote machines as a privileged user, or even more automatically by allowing master_install.sh to execute dh_root_prepare.sh on the remote nodes.
If DH_MODIFY_ETC_SUDOERS=true is not set, then the below sudoers changes must be configured before starting the installation.
- Setup
/etc/sudoerswith appropriate rules:- sudoers rules may be placed directly into
/etc/sudoers, or it may be desirable to create an/etc/sudoers.d/deephavenfile with all deephaven-related rules contained in that file. Usingsudoers.d, ensure that the main sudoers file contains#includedir /etc/sudoers.d(this is included by default).
- sudoers rules may be placed directly into
Warning
grep before inserting into /etc/sudoers! Only edit sudoers rules using sudo visudo, unless the disk can be detached, mounted elsewhere, and have any mistakes fixed there. Be careful!
- Assuming the installation Service Account is named
dh_service(replacedh_servicewith the actual name of the administrative service account used), the minimum required sudoers rules are:
Note that privileges granted to irisadmin above correspond to the DH_MONIT_USER, and privileges to act as irisadmin correspond to DH_ADMIN_USER. If DH_MODIFY_ETC_SUDOERS=true, then we will create rules as follows:
If you alter DH_MONIT_USER or DH_ADMIN_USER to no longer be the same account, be aware that DH_MONIT_USER must be able to sudo as DH_ADMIN_USER and DH_SSH_USER must be able to sudo as both DH_MONIT_USER and DH_ADMIN_USER. This is set up automatically for you when DH_MODIFY_ETC_SUDOERS=true.
-
The above sudoers rules are absolutely necessary; the rules below can be reduced if the related services are fully set up prior to installation (monit, mariadb and dh-etcd). Details on how to avoid each set of sudoer permissions will be provided inline.
-
Unless
monithas been manually altered to run asirisadminandmonitservice has been configured to be always on, the service account will need permissions to controlmonit. If the service account will be used for system maintenance, it may be desirable to grant these permissions regardless. Ifmonitis already operating correctly asirisadmin, the installer can be directed to not touch anything by settingDH_SKIP_MONIT_CHECK=trueincluster.cnf. This will bypass calls to systemctl. -
MariaDB permissions are only required on the node which has
DH_NODE_${N}_ROLE_INFRA=trueorDH_NODE_${N}_ROLE_SQL=true. These are not needed if MariaDB is already running before installation or ifDH_ACLS_USE_ETCD=true(the default in 1.20231218 and later).DH_SKIP_ACL_INIT=truewill direct the installer to skip any initialization or inspection of the MySQL ACL database (it is recommended to skip ACL check if the MariaDB server is remote from the cluster nodes). -
etcd permissions are only needed on nodes which will become etcd servers. If no etcd servers are specified,
DH_NODE_1will be used an etcd node, and, if there are three nodes available (DH_NODE_1,DH_NODE_2, andDH_NODE_3) these will be configured as an etcd cluster. These nodes cannot be safely removed from the cluster, so it is recommended to explicitly declareDH_NODE_${N}_ROLE_ETCD=true. -
It is also recommended but not required to grant some access to system logs, so the service account can debug any problems.
Adding and removing nodes
Additional servers (nodes) can be added to an existing Deephaven cluster. This can be done to improve fault tolerance of the system or to increase available compute resources. The most typical examples of adding nodes are:
- Adding dedicated servers for query processing or data import processing. This allows scale-out of the system to handle more users and/or larger volumes of data.
- Adding authentication server nodes. Having one or more backup authentication servers allows for continued use of the system in case the primary authentication server is inaccessible.
- Adding configuration server nodes. Having one or more backup configuration servers allows for continued use of the system in case the primary configuration server is inaccessible. etcd provides high availability and fault tolerance for the storage of configuration data, but the configuration server is the interface through which these data are provided to other Deephaven services.
Similarly, servers which are no-longer needed can be removed from a cluster.
Note that this process does not currently support changes to the etcd nodes of a cluster.
The process for adding or removing nodes is basically the same as the initial installation process: the cluster.cnf file is modified to represent the new desired configuration of the cluster, and the installation process is run to effect the changes.
The users and groups will be created by installing the deephaven-enterprise RPM, or when running the dh_root_prepare.sh script when using the no-root installer.
Users and groups
The uid and gids associated with the users and groups need to be created on the shared storage to allow them to read and write to the mounted file systems.
| Group Name | Suggested gid | Members |
|---|---|---|
dbquery | 9000 | dbquery |
dbmerge | 9001 | dbmerge |
irisadmin | 9002 | irisadmin |
dbmergegrp | 9003 | dbquery, dbmerge, irisadmin |
dbquerygrp | 9004 | dbquery, dbmerge, irisadmin |
| User Name | Suggested uid |
|---|---|
dbquery | 9000 |
dbmerge | 9001 |
irisadmin | 9002 |
Caution
Your uid or gid may be different, especially if you create OS users with external tools like active directory. Use the command id to see the real uid and gid used on your system.
Note
Customers can create the users themselves beforehand, with the uid and gid of their choice. However, special care must be taken when using network-provided users, like active directory. monit must not be started until the users exist, so if your users are provided over the network, you must make sure the monit service waits to start until the users have been loaded.
Appendix A: example cluster.cnf
This is an example configuration file for a cluster running the 20210401 release and with three nodes: infra, query1, and query2, each also running etcd.
Appendix B: Reducing Root to Zero
The dh_root_prepare.sh script is the only script that has any need of root privileges, and it will not invoke sudo if you have taken care of the root-requirements before running the script.
Important
If you intend to run dh_root_prepare.sh with a service account that does have root permissions, you do NOT need to follow any of the following instructions.
The following instructions are only for customers who wish to wholly own all root-related permissions. You can reduce the amount of root permissions required by the installer to zero, if you take care of the following items yourself:
-
Follow all Installation Prerequisites.
-
Create Deephaven OS user accounts:
irisadmin,dbquery, anddbmerge.All three accounts must be members of
dbmergegrpanddbquerygrp, as well as secondary membership in a group withgroup name == user name. The user home of each account must be/db/TempFiles/$user_name.Setup user home:
Unless you have network-sourced users, you can simply create local user accounts:
If group membership is incorrect, it can be fixed via
usermodcommand:If you wish to use different user account names, you should set the
cluster.cnfvariablesDH_*_USERandDH_*_GROUP, as explained above. -
Install operating system third party dependencies:
-
Centos7:
-
Ubuntu:
-
-
Install etcd 3.5 with minor version greater than or equal to .5:
If etcd is not already installed, we will attempt to download and unpack https://storage.googleapis.com/etcd/v3.5.12/etcd-v3.5.12-linux-amd64.tar.gz. To pre-build or unpack etcd yourself, pass
DH_OFFLINE=trueto prevent this download. The manual unpacking of etcd looks like this:-
View a
dh_root_prepare.sh scriptfrom any generated install to learn more / borrow setup code. -
If your security team is not comfortable with Deephaven installing a dynamically generated
dh-etcd.servicefile, you must enable thedh-etcd servicebeforehand, but allow your Service Account to/usr/bin/systemctl start dh-etcd. -
Sample
dh-etcd.servicefile: make sure to setDH_ETCD_TOKENincluster.cnf, and REPLACE the$DH_ETCD_TOKENin code below with the actual token (this configuration file is not executed):
-
-
Install a java JDK that matches the java version of your Deephaven Installation.
The reported Java
-versionmust match theDH_JAVA_VERSIONvalue ofjdk1.8,jdk11, orjdk17. In older Deephaven versions, you were required to choose an installation medium compiled to the correct JDK, but modern versions all use a single artifact to support all versions.You must install a JDK. The
javacbinary should be found at the same path asjava. You can verify this by checking the output of thewhichcommand for bothjavaandjavac; for example, the following two commands will print the directory of each program:Example output:
-
Create necessary directories with necessary permissions:
-
Owned by
dbmerge:dbmergegrp: -
Owned by
irisadmin:irisadmin: -
Owned by
irisadmin:dbmergegrp: -
Owned by
dbmerge:dbmerge: -
Owned by
dbquery:dbquery: -
Owned by
etcd:irisadmin(only on nodes running etcd serverROLE_ETCD=true):
-
-
Create necessary soft links (preferably owned by
irisadmin; usechown -h) -
Alter monit system files to run as
irisadmininstead ofroot.Centos7:
- Run
sudo systemctl edit monit. A text editor will open the file/etc/systemd/system/monit.service.d/override.conf(which is created bysystemctl editif it did not already exist). Paste the following into the editor and save the file: - In the following files, replace
/var/log/monit.logwith/var/log/deephaven/monit/monit.log: - In
/etc/logrotate.d/monit, replacecreate 0644 root rootwithcreate 0644 irisadmin irisadmin. - Reload the configuration and start monit using the following commands:
Ubuntu:
- Edit
/etc/monit/monitrcand make the following changes:- Replace
/var/log/monit.logwith/var/log/deephaven/monit/monit.log - Uncomment the four lines of code:
- Replace
- Edit file
/etc/init.d/monit. In the five places thatstart-stop-daemonis invoked, add the following:--chuid irisadmin(replacingirisadminwith your ownDH_MONIT_USER, if specified).
If monit runs successfully as
irisadmin(or your ownDH_MONIT_USER), but some script fails while attempting to callsystemctl, you can setDH_SKIP_MONIT_CHECK=trueincluster.cnfto direct the installation to skip allmonitchecks and trust thatmonitis set up correctly. - Run
-
Ubuntu-only extra steps:
- Disable
lighttpdby running:sudo systemctl disable --now lighttpd - Edit
/etc/mysql/MariaDB.conf.d/50-server.cnfand replace thebind-addressline with:
- Disable
-
Final Step: stop / restart system services (or grant your service account sufficient permission to run these commands):