Data science without big costs: how to have a $3800 Laptop for $20 a month
Why I run on Google Cloud
April 18 2022

.jpg "DALL·E prompt: A floating fluffy cloud inside the aisle of data center between clean perforated metal server racks, Oblivion (2013).jpg")
I like to push the data science I do to the limit - how much data can I shove into that hard drive? How much data can I process? So I need a capable computer. I don't really care if it's a Mac or Linux or Windows (well, I prefer not Windows); to save costs, I'll use any computer with good CPUs and RAM.
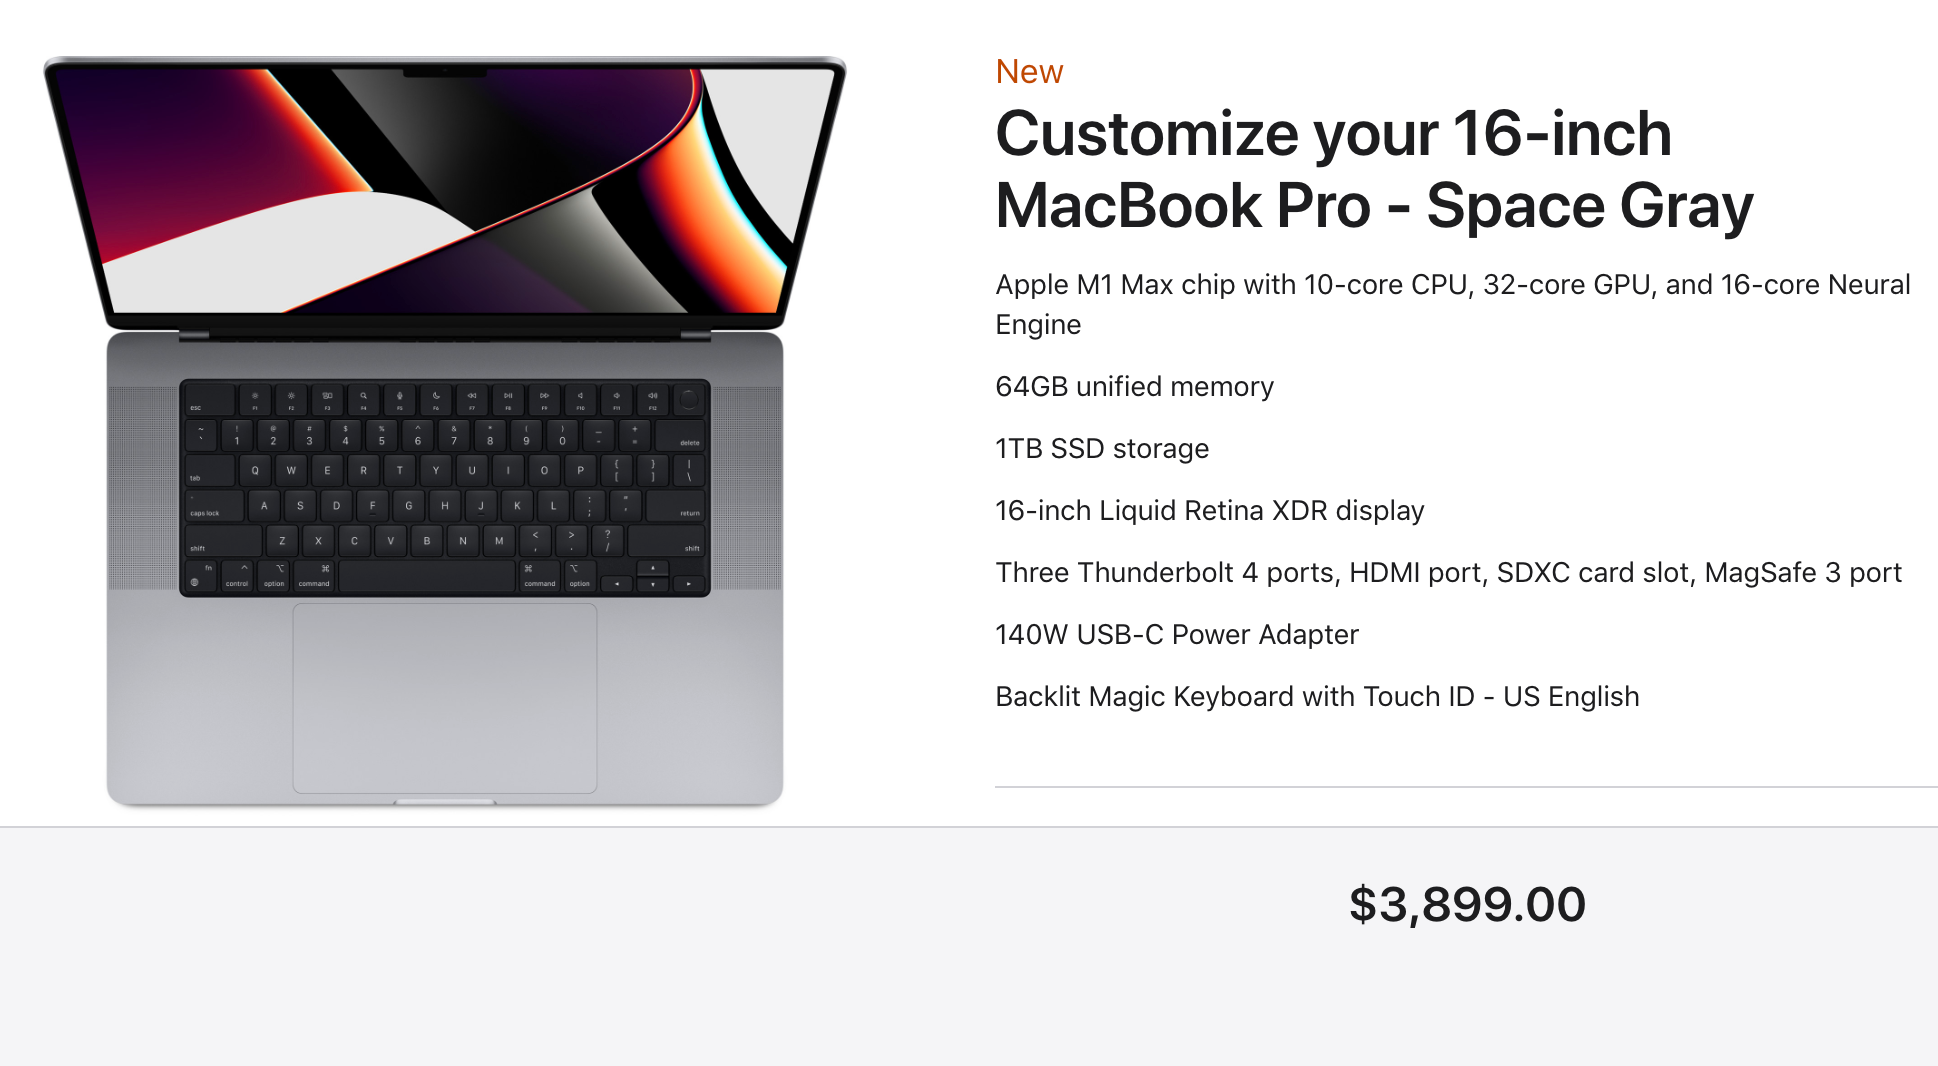
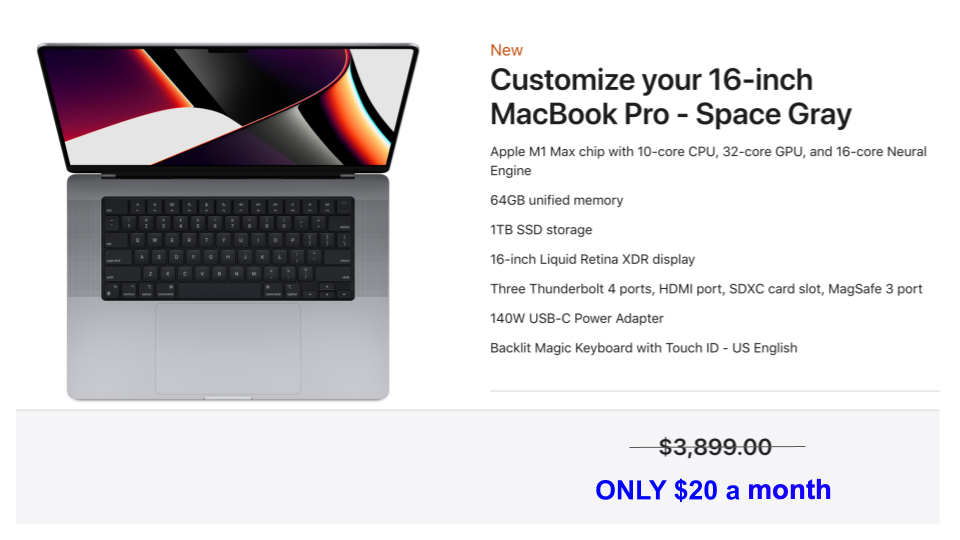
Recently, my laptop performance slowed down tremendously on some of the larger data sets I was handling. It was time for an upgrade anyway, so I started browsing for an option with 64G of RAM and at least 8-core CPU. The new Mac caught my eye...but I had a bit of sticker shock at the price:
Since the computer of my dreams isn't in the budget right now, I needed an alternative. Enter Google Cloud. I only pay $20 a week to get that type of awesome computer. To be clear, I am NOT affiliated with Google in any way. I'm not the only one with the problem of data outpacing my hardware, so I wanted to share my solution here.
Evaluating Google Cloud
At one point, I was working with a 200M row CSV and it was painfully slow and even caused my computer to crash. After looking at the new Macs, I talked to my co-workers who noticed the same trends. When they went to buy computers, there were only two options:
- Computers that are just for web surfing.
- Computers that work but cost more than $3k.
Defeated, I just kept using my current laptop. Then someone suggested Google Cloud.
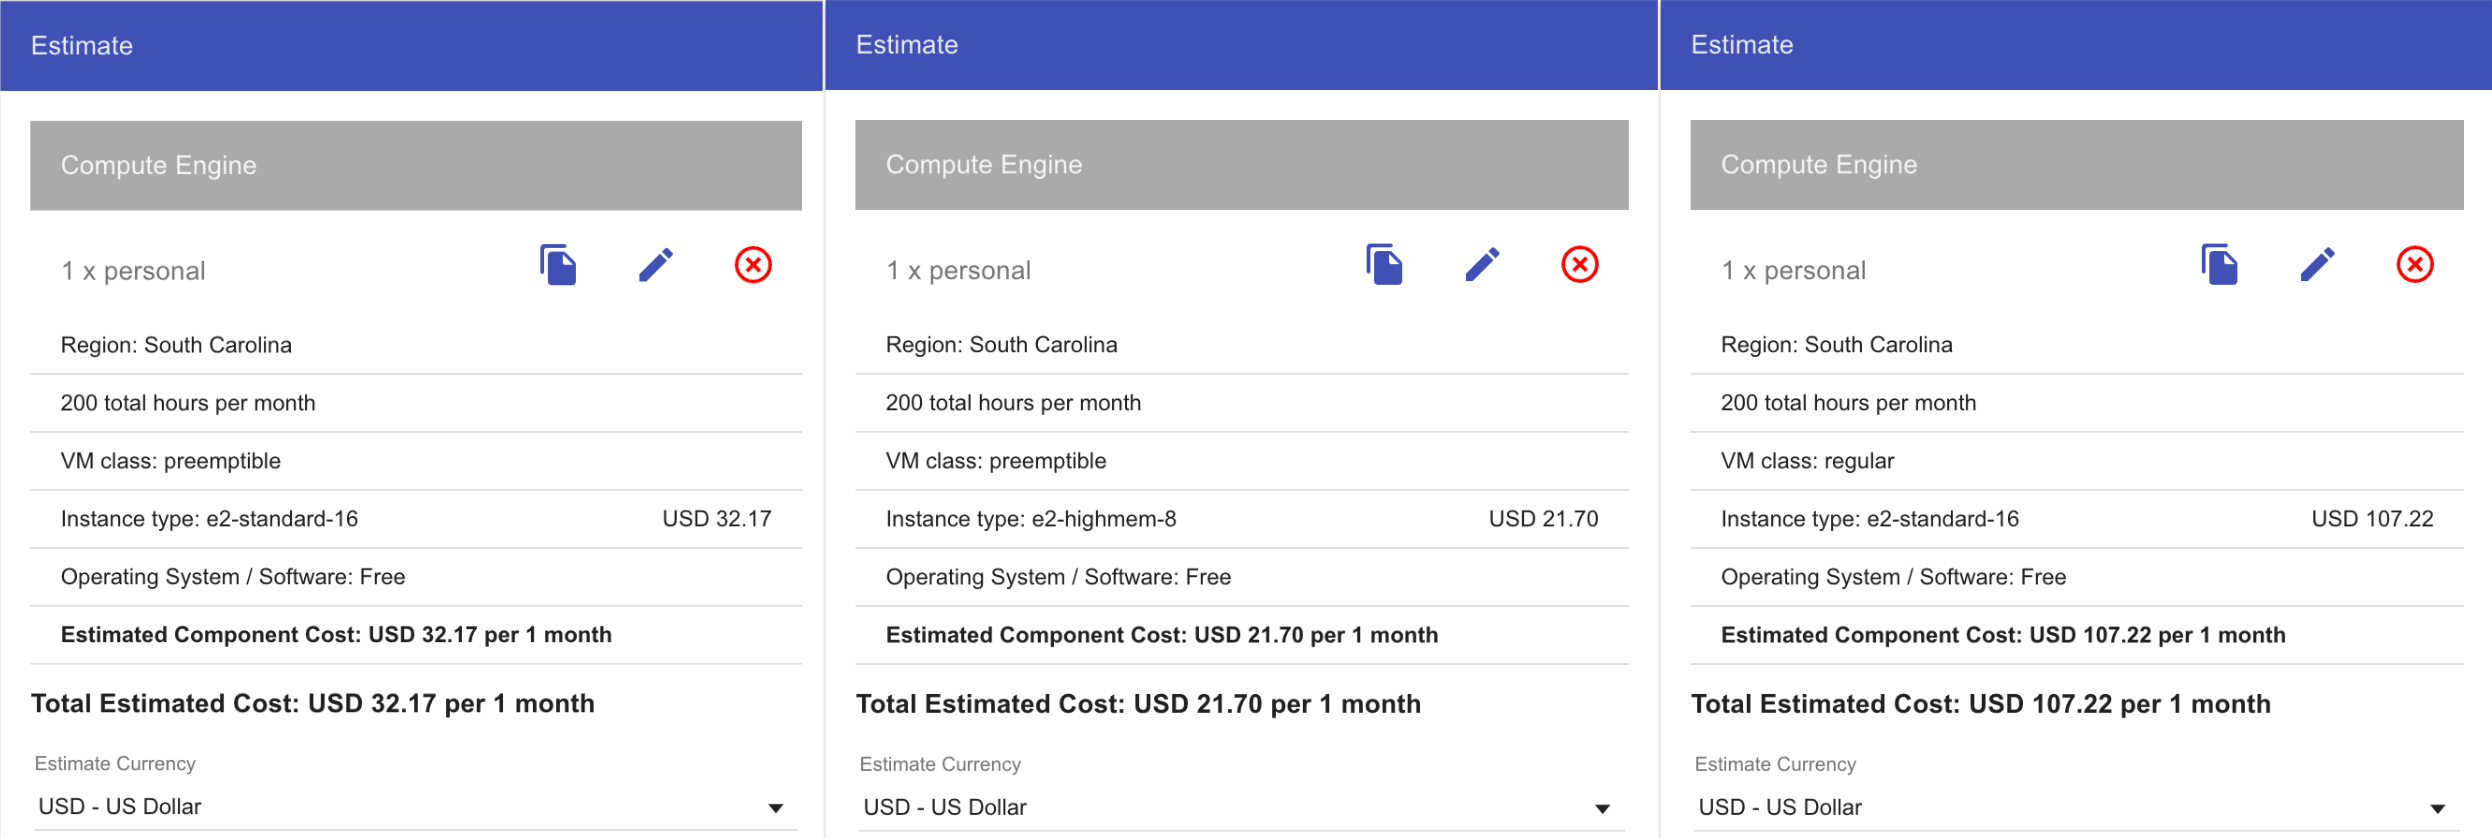
Google Cloud has a nice calculator to estimate costs. Again, I'm not too picky. I'll take anything with 64G RAM and at least 8 CPUs.
My requirements yield three instances for 64G Ram machines. They are:
- e2-standard-16 with 16 vCPU and preemptable for $32 a month
- e2-highmem-8 with 8 vCPU and preemptable for $21 a month
- e2-standard-16 with 16 vCPU but full-time for $107 a month
I like what I see! (Note these are only my results, and since I'm not affiliated with Google, I can't guarantee these prices.)
My work is not mission-critical, so I like to choose the "preemptable" computers as the discount is amazing. If Google decides those resources are needed elsewhere, I'd experience a minor hiccup on the machine, but it would resurface after a minute or so. This is just enough time to pop into the kitchen, make myself a cup of tea, and come back (although this hasn't happened yet after 2 months of full-time use).
Over the moon with these prices, I do a quick back-of-the-envelope calculation.
At 300 on the cloud is free right now!
I'm sold. I go online and start and create the instance.
This was an easy process as it was all click and lots of info on what things mean. The end rate is 39 cents an hour for the 64G of RAM, 8 CPU and 200G hard drive using Ubuntu.
Now I can load that 200M row CSV file fully into memory without any problems!
How I use my Google Cloud VM
Install the Google Cloud CLI
Connecting to the VM via the browser is nice, but I want more speed and customizations. More power is best achieved by connecting to my VM via the command line. Additionally, if I want to open Deephaven running on GCP on the laptop I'm using now, I need to connect via the command line with port forwarding.
To do that, I can use the gcloud compute CLI. The first thing I need to do is install and update the Google Cloud CLI. I follow the steps in the guide and I've got it installed in just a few minutes.
Get authorized
First and foremost, I need to tell Google that I'm me when I connect to my VM via the CLI. Doing so is as simple as:
This takes me to my web browser, where I log into my Google account. With that done, I'm ready to connect to my VM.
Connect to the Google Cloud VM
The gcloud compute CLI uses similar syntax to common Linux commands such as ssh, scp, and others. I'll start with connecting to a VM instance using gcloud compute ssh. The standard syntax for establishing an SSH connection to the GCE via gcloud compute ssh is:
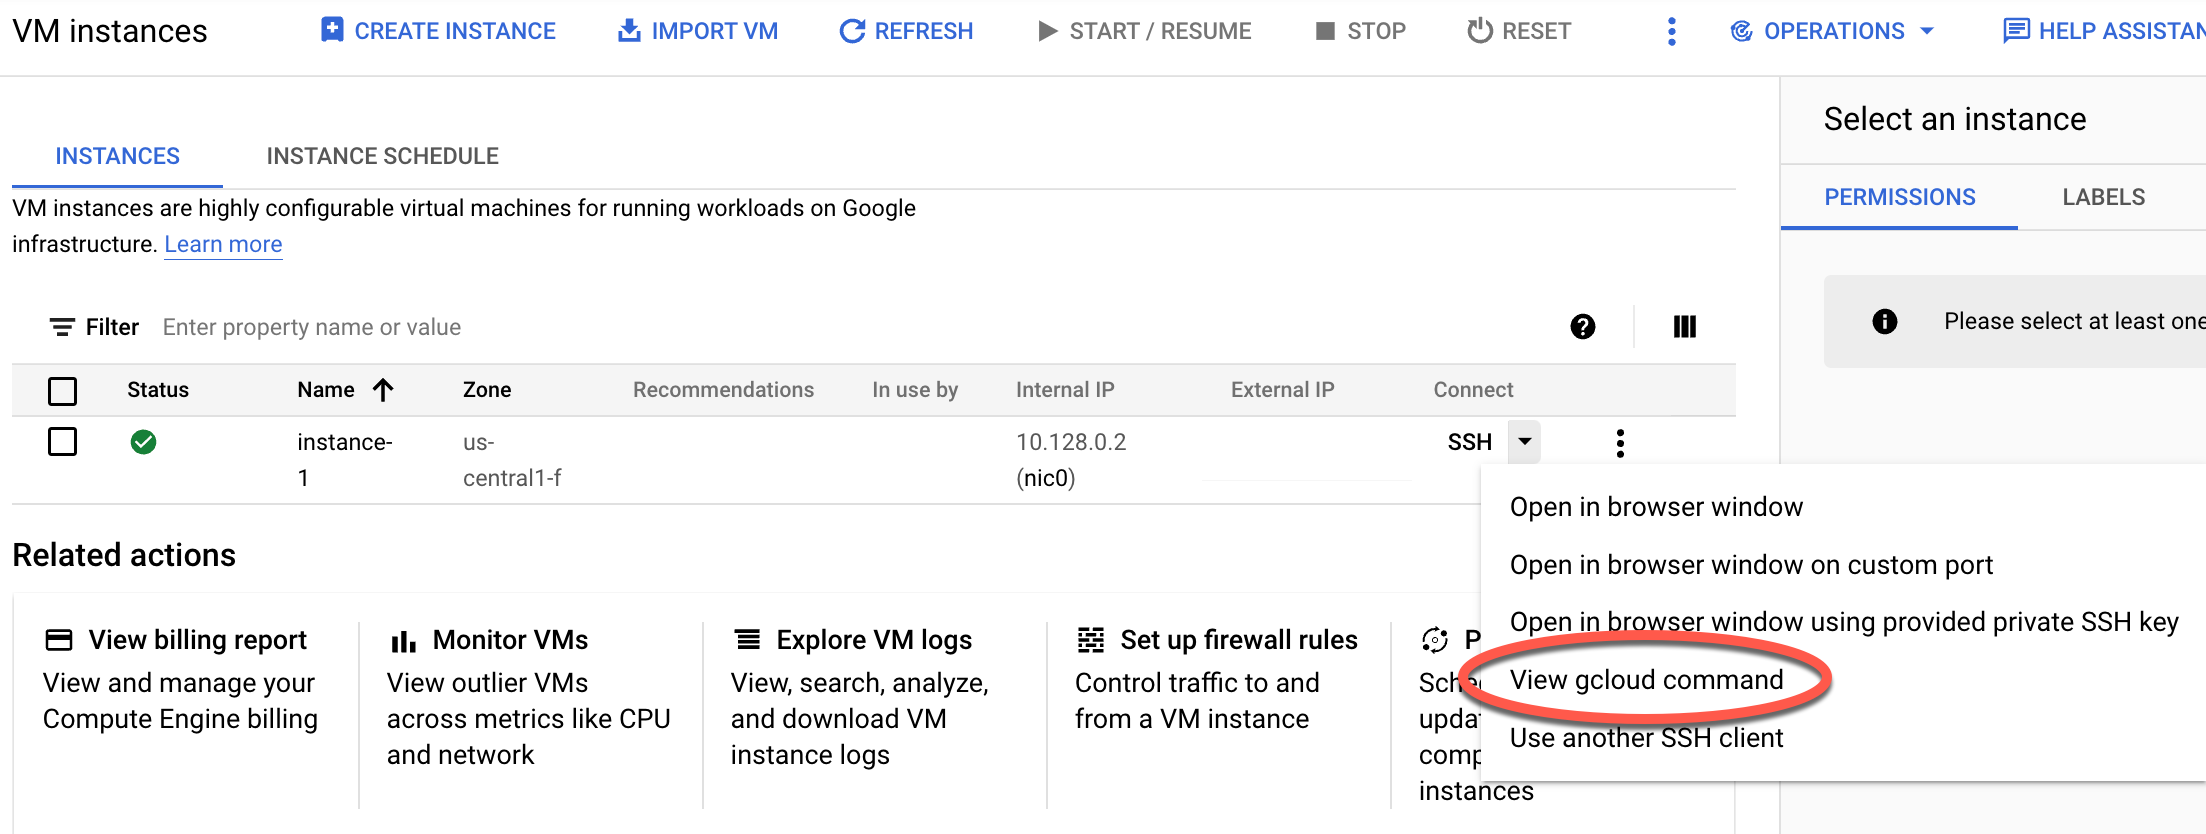
If you don't know what zone, instance name, or project name to use, you can view the full command that will get you connected by clicking View gcloud command in the GCE instance list page.
Install Docker and Deephaven
So now I am on the cloud... how do I use this? In this section, I walk you through the actual implementation details.
I see under SSH that I can just open up a shell. (Note this is not what I do now.)
I do that and start installing everything I need and want to use my favorite tool, Deephaven.
This is easy on the Ubuntu image with the help of some online tutorials. Here are all the commands I used to get Docker up and running:
Docker is installed. Next, docker compose:
With Docker installed, I want to use Docker as a non-root user. I follow the four steps in that guide, and I can now use docker and docker compose without sudo.
Finally, I launch Deephaven:
Copy files to and from the VM
Copying files to and from a Google Cloud VM is equally simple, and can be achieved via the gcloud compute scp command. Say, for instance, I want to copy some local files to my VM. Doing that is as simple as:
Or, for instance, the data folder I have in my local Deephaven installation:
More complete documentation for gcloud compute scp can be found here.
Using Deephaven on the VM
I've already launched Deephaven on my VM, so what else is there to do? Well, Deephaven communicates over a port (typically 10000). Without this communication, I won't get a GUI, which leaves a lot to be desired. In order to access my VM's Deephaven GUIs locally, I need to establish port forwarding by using gcloud compute ssh.
In order for port forwarding to work properly, Deephaven needs to be up and running on the VM. So, I start out by sshing to the VM just as I described above.
I then start up Deephaven with the -d flag.
Now, I exit the VM via either exit, control + d, or however else I please. Despite the fact that I exited the VM, Deephaven is still up and running on it. The port 10000 is still in use by the Deephaven process, and I can enable port forwarding on that particular port via gcloud compute ssh. I do so by adding the following to my gcloud compute ssh command:
Note
If I don't include the & at the end of the command above, my terminal will lock up. It will still work, but this terminal window will be unusable until I'm finished using Deephaven on my Google Cloud VM.
It's time to make sure this worked. I open my web browser, type http://localhost:10000/ide into the URL bar, and voilà! I have Deephaven. Except, in this instance, I'm connected to a remote session with much more computing power than I have available on the laptop I'm using.

This document isn't comprehensive in its usage of the GCE. There is a TON more you can do with it. Google's full reference documentation has all the information you'll need to become a Google Cloud expert.
So far I have been using this VM instance for about a month. I've had no problems, and any cheap, old laptop can work.
Better still - I haven't paid anything so far since the VM starts with a $300 credit, or about 18 weeks of free computing.
With all the savings...I think I'll buy a better chair.
Tips
Make sure you turn off your VM when not in use. You are billed whenever it is on.
If you work reliable hours, you can schedule the VM. You can also launch scripts automatically to automate your workflow.
This is just my set-up and intialization with Google Cloud. If you have thoughts or suggestions, let me know on Slack.