Installing Python
Installing Deephaven Python Packages on the Server
To integrate Python with Deephaven, the following server installations are required. This should only be required once for all users, provided the suggestions are followed. These instructions will be appropriate for a default Centos 7 deployment, and assumes a successful Deephaven rpm install prior to following these instructions.
Versions of Deephaven prior to 1.20211129.060 only supported Python 2.7, 3.6 and 3.7. In 1.20211129.060 we removed Python 2.7 and added Python 3.8.
The deephaven and deephaven_jpy packages are tested for compatibility with Python 3.6, 3.7 and 3.8, and can be installed for use with any or all of these Python versions. Currently, in the Centos repository, only Python 3.6 is available, so out-of-the-box integration is easiest with this version. Ubuntu 20.04 comes preinstalled with Python 3.8, so it is the default version used for Ubuntu. Note that Ubuntu users must supply -Dos=ubuntu when starting each worker to get the correct system paths for Python 3.8. This can be simplified by copying the os=ubuntu stanzas from iris-defaults.prop into iris-environment.prop, and removing the os=ubuntu selector to make these settings the system-wide defaults.
Install Required Python items
Required Python 3.6 components for Centos can be installed by running the following:
For Ubuntu 20.04 or any newer LTS release, you should install the following packages:
Installing Older Python Versions in Ubuntu
Ubuntu users can take advantage of the deadsnakes ppa to get pre-built version of Python 3.6 or 3.7.
Be sure to consult with your IT department before adding ANY ppa to your system!
Manually Installing Python
If you need a version of Python not included in your operating system repositories, you may find it easiest to simply build from source.
These manual installation instructions can be used for any version of python in the python.org ftp directories, but it is recommended to use either 3.6.8, 3.7.9 or 3.8.7, as these versions are tested by Deephaven. Existing tools like pyenv may also be used to accomplish the same thing, just beware that you must produce libpython for jpy integration with Deephaven to work! Tools like pyenv may also put shared libraries in different paths than Deephaven defaults; if you encounter issues with missing libraries when installing from other sources, you may need to use something like find /usr -name "libpython*" to locate your shared python library, and then update your iris-environment.prop file to point to the alternate location.
Auto-Provisioning of Python Virtual Environments
Deephaven users who would like to use a Python worker or a Jupyter notebook will need to set up and configure virtual environments for their Deephaven installation.
Currently, Deephaven has four virtual environments:
/db/VEnvs/python36/db/VEnvs/python37/db/VEnvs/python38/db/VEnvs/jupyter
These environments are not installed by default.
To configure the Deephaven venvs automation, an admin will need to invoke /usr/illumon/latest/install/python/setup_dh_auto_provision.sh on all of the worker boxes. This sets up configuration in /etc/sysconfig/deephaven/python/ that configures the automation of the Deephaven default VEnvs.
The provisioning of virtual environments is done by /usr/illumon/latest/install/python/auto_provision.sh (which looks in /etc/sysconfig/deephaven/python/ for configuration). This step is automatically run during the post-install process of the RPM. (Note: this has no effect if nothing has been configured.)
/db/VEnvs are owned by irisadmin. This cannot be changed as we enforce these permissions on every upgrade. However, if users do not want irisadmin to own their own VEnvs, they can configure them accordingly (see below).
Customer-Configured Virtual Environments
Customers may choose to configure their own auto provisioned virtual environments. This is a more advanced use case, and we recommend contacting customer support directly for detailed instructions.
As irisadmin, invoke:
/usr/illumon/latest/install/python/auto_provision.sh <name> <owner> <env-dir> <requirements-file>
<name>must be a unique identifier for the VEnv.<owner>is the user account who will own the VEnv.<env-dir>is where the VEnv will be created.<requirements-file>will be the requirements.txt used to create the VEnv.
Deephaven ships the following requirements.txt:
/usr/illumon/latest/python/envs/py36/specs/jupyter-notebook-server/requirements.txt/usr/illumon/latest/python/envs/py36/specs/worker-jupyter/requirements.txt/usr/illumon/latest/python/envs/py36/specs/worker-standard/requirements.txt/usr/illumon/latest/python/envs/py37/specs/jupyter-notebook-server/requirements.txt/usr/illumon/latest/python/envs/py37/specs/worker-jupyter/requirements.txt/usr/illumon/latest/python/envs/py37/specs/worker-standard/requirements.txt/usr/illumon/latest/python/envs/py38/specs/jupyter-notebook-server/requirements.txt/usr/illumon/latest/python/envs/py38/specs/worker-jupyter/requirements.txt/usr/illumon/latest/python/envs/py38/specs/worker-standard/requirements.txt
Note that all such Virtual Environments will be automatically updated whenever Deephaven is upgraded.
Properties (JPY JVM Flags)
These properties are meant to be set on any given query worker to select a particular Python virtual environment. The locations of these properties match the paths that are setup when /usr/illumon/latest/install/python/setup_dh_auto_provision.sh is run. These virtual environments, once setup, will be automatically updated whenever the Deephaven product is updated. This results in zero-effort maintenance of Python virtual environments that can be selected by setting a single prop:
jpy.env
The JVM flags mentioned in the examples below follow:
jpy.programNamereferences the path to the Python executable for your Python environment.jpy.jpyLib referencesthe jpy dynamic library from your Python environment, which comes from thedeephaven_jpypackage in your environment.jpy.jdlLibreferences the jdl dynamic library from your Python environment, which also comes from thedeephaven_jpypackage in your environment.jpy.pythonLibreferences the dynamic library associated with your Python executable.
Examples
All configuration below are prop-files,
which you can edit using dhconfig properties export/import.
Values shown below are system defaults that are set in iris-defaults.prop
To select a VEnv by passing -Djpy.env=python36:
To select a VEnv by passing -Djpy.env=python38:
To select a VEnv by passing -Djpy.env=jupyter:
Important
It is worth reemphasizing that the Python version used on the client must match the Python version used on the worker, which is a requirement imposed for working serialization by the dill module.
Testing the Python Server Installation
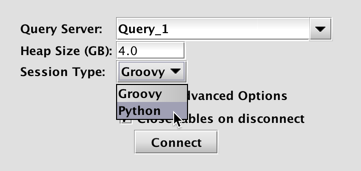
To test the Python installation, open a Deephaven console. To the right of Session Type, click the drop-down list and select Python as shown below. Then, under Advanced Options, supply the appropriate jvm flags for the desired Python virtual environment, then click Connect.
Once the console has connected to the server, execute the following statement in the console:
If this does not result in an error, then your Deephaven environment should be properly configured. To verify you are using the intended Python version, execute the following:
For a more functional test, try the following:
If the table below appears in the lower portion of the console window, Python is ready to use in the Deephaven console.
Python client workstations
Warning
The following client installation instructions are only required if you plan to execute Python queries outside of a Deephaven console or persistent query. The "local client - remote worker" scenario requires that Python objects are serialized and deserialized via the dill module, which relies on using the pickle protocol, which is not compatible between different versions of Python. It is a requirement that the same version of Python is being used by the local client and remote worker.
In order for a Python client to be able to talk to a Deephaven server, it must start a Java Virtual Machine (JVM) using the libjvm shared library. In order to do this, you must tell the client where to find libjvm.so (or .dll/.dylib for windows/mac). This can be achieved through jpy configuration, or (on unix systems) by adding the path to the directory containing libjvm.so to the system native library path variable, LD_LIBRARY_PATH.
Whenever starting a JVM from Python, it is highly recommend to always preload the libjvm shared library:
Java Environment Variable Configuration
For Python integration to function properly, the jpy module requires that the environment variable JDK_HOME is properly set for your JDK installation and that PATH is defined to contain the appropriate Java library files.
Windows
Mac
Linux
Python Packages
The deephaven_jpy package is used to translate between Java and Python, and must be installed as a bridge between the Python interpreter and Deephaven's Java infrastructure. The deephaven_jpy has no Python package dependencies, requires that the Java setup noted above is correct. It can be installed from PyPI for 64-bit Windows and OS X, and a .whl is available for direct download for Linux from https://github.com/illumon-public/illumon-jpy/releases. The deephaven package depends on deephaven_jpy, dill, wrapt, numpy, and pandas.
Package Installation
There are many ways to setup and maintain a Python environment - far too many to cover here. However, the following provides simple guidance for a few different options:
Windows Guidance
Anaconda is probably the simplest way to setup and maintain a Python environment on Windows, and the necessary packages are in the conda repository. After installing the desired Anaconda version (which also supplies pip), simply perform the command (for 64-bit Windows):
Deephaven packages can be installed by executing the following:
Mac OSX Guidance
A stripped down version of Python comes installed with osX, but there are many fewer complications observed when avoiding the use of this OS X system Python. It is recommended that the user use Anaconda (same as Windows instructions), Homebrew, or Macports. Anaconda and Macports segregate all packages from the Mac OS X native libraries, and makes it easier to avoid problems and conflicts with system packages. Homebrew is based on integrating with the system packages, which seems more problematic specifically for Python usage.
For Macports, after basic Macports configuration, execute the following:
where <version> indicates the desired Python version (currently 36, 37 and 38 are supported by Deephaven). Note that Macports supports installing and using multiple versions. After the install completes, follow with the dependencies. Assuming you are installing <version>=37, execute the following:
Note, perform the suggested port select --set pip pip<version> to make the desired version of pip the default. Otherwise, directly use the appropriate pip command for the desired version; i.e., pip-3.6 or pip-3.7. Then run the following,
Linux Guidance
Use the package manager, as appropriate for your Linux distribution, to install the appropriate version of Python and associated pip. It is likely that associated numpy and pandas packages also exist in the package manager, as may wrapt and dill. Otherwise, these packages will installed by pip as dependencies of the deephaven package.
The deephaven_jpy is available for download from https://github.com/illumon-public/illumon-jpy/releases, with easy to follow instructions for installation provided there.
The deephaven package can then be installed from PyPI by using pip:
jpy Configuration Repair
If your deephaven_jpy wheel was built on a machine with a different version of Java, then the loader will not find the appropriate libjvm when you try import jpy from the Python prompt. First, try to update the JDK path used by deephaven_jpy by running the following:
where <python> indicates the appropriate Python binary for your environment. Note: this requires that JAVA_HOME or JDK_HOME environment variable is set (as directed above) and write permission in the site-packages directory where the jpy.so is located. If this requires root access (i.e., for system site-packages), then remember to forward the environment variables:
Examples of the resulting error follow:
ImportError: libjvm.so: cannot open shared object file: No such file or directory
or
ImportError: jvm.dll: cannot open shared object file: No such file or directory
If the libjvm is NOT discovered by the above, then you will likely also have to set the library path (LD_LIBRARY_PATH environment variable) for the loader to include the libjvm dynamic library (jvm.dll on Windows). On all systems, this should be the /server/ directory beneath your JDK location.
For OSX, this can be accomplished via
This is only because the jpy dynamic library was built versus a different version of Java was and the RPath directive in the library is hard-coded to the incorrect libjvm location. On OSX, setting the LD_LIBRARY_PATH will still not work if system Python is used (i.e., installed via Homebrew), because Apple System Integrity Protection (SIP) precludes redirection of the loader for System resources. This should not be an issue if the deephaven_jpy wheel is built with the Java version present on the user's machine.
For Linux, this is accomplished (for most distributions) by defining the following:
Setting Up The Deephaven Environment
Bootstrapping The Deephaven Environment
To use Deephaven from a client workstation, the Python packages discussed above must be installed. However, virtually all of the functionality of the deephaven Python package requires that the jvm is initialized through jpy, with the Deephaven Java infrastructure appropriately initialized inside the jvm. Finally, the Deephaven data capabilities will most sensibly be used by connecting to a remote server that is running the appropriate Deephaven processes.
The local Deephaven configuration assumes a particular file structure for a collection of jar and configuration files. Setting up this structure is most easily accomplished through a bootstrap process directly using the remote server. This bootstrap process can be accomplished with the Python script in bootstrap.zip.
Deephaven workspace
The Deephaven workspace, as the name may suggest, will be the root of the assumed Deephaven file structure. Before executing the bootstrap process, the desired location (something like <user home>/deephaven/workspaces/remote) should be set in the environment variable DEEPHAVEN_WORKSPACE and the directory need not exist. That is, execute the following statement:
To make this value persistent (and automatic), put this statement in your .profile or .bashrc file. This is the root for the overall Deephaven workspace, and can be used for more than one remote server, if desired.
Deephaven devroot
The Deephaven devroot contains all jar and configuration files in an expected file structure. This should be generically be located at <DEEPHAVEN_WORKSPACE>/.iris/<instance>. Here <instance> is some user chosen instance name, and the contents are directly tied to the specific remote server used to bootstrap/connect. Before executing the bootstrap process, set the environment variable DEEPHAVEN_DEVROOT to the desired location, and the directory need not exist.
In the case that more than one remote server may be used, you can setup more than one devroot, as in <DEEPHAVEN_WORKSPACE>/.iris/<instance_1> and <DEEPHAVEN_WORKSPACE>/.iris/<instance_2>, where <instance_1> and <instance_2> are named appropriately. Switching between the two amounts to setting the environment variable DEEPHAVEN_DEVROOT as appropriate.
Important
The entire contents of DEEPHAVEN_DEVROOT will be affected (deleted or modified) by executing the bootstrap process.
Executing Bootstrap process
Extract the bootstrap archive to the desired working location. Ensure that you have set the JDK_HOME, DEEPHAVEN_WORKSPACE, and DEEPHAVEN_DEVROOT environment variables as directed above. With the working directory the extracted bootstrap directory, execute:
Where <host address> is a viable Deephaven host of the form:
http://<address>[:<port>]/iris or
https://<address>[:<port>]/iris
This will create any missing directory structure as necessary, and sync all appropriate files beneath DEEPHAVEN_DEVROOT from the server indicated by --host argument.
Deephaven propfile
The Deephaven propfile is an important way of passing properties for initialization of the remote worker (i.e., on the server). It is assumed to be located in directory <DEEPHAVEN_DEVROOT>/resources/ and the default is iris-console.prop. This file will not exist until after the bootstrap process, but plays an integral role in the local client/remote worker execution model.
Before trying to perform any local client/remote worker processing, set the environment variable DEEPHAVEN_PROPFILE=iris-console.prop. If desired, make a copy of iris-console.prop and set DEEPHAVEN_PROPFILE to this new location.
Important
The DEEPHAVEN_PROPFILE is required to be in <DEEPHAVEN_DEVROOT>/resources/. The entire contents of DEEPHAVEN_DEVROOT will be affected (deleted or modified) by executing the bootstrap process. Specifically, any changes that you make in to the DEEPHAVEN_PROPFILE will be overwritten.
For this discussion, the most important role of DEEPHAVEN_PROPFILE is that this is where you will provide the appropriate jpy directives to tell the remote worker which Python version to use. Inside the DEEPHAVEN_PROPFILE file, whose full path is <DEEPHAVEN_DEVROOT>/resources/<DEEPHAVEN_PROPFILE>, insert the line:
RemoteQueryClient.extraJvmArgs=-Djpy.programName=<value> -Djpy.pythonLib=<value> -Djpy.jpyLib=<value> -Djpy.jdlLib=<value>
where these values are determined by the Python environment on the server. See the JPY Flags section above for the specific values.
Important
It is worth reemphasizing that the Python version used on the client must match the Python version used on the worker, which is requirement imposed for working serialization by the dill module. Additionally, the version of the dill module itself may need to be the same be the same version between the worker and the client.
Testing the Python Client Installation
After following the bootstrap instructions, the testDeephaven.py script below has an example of creating a remote query client and a remote database, and executing remote queries: