Schema Editor
Note
The Schema Editor is only available in Deephaven Classic.
The Schema Editor utility greatly simplifies the process of creating and editing schemas in Deephaven. In addition to the convenience of the graphical user interface, the Schema Editor validates characteristics like column names and ensures correct formatting of the schema file. This means problems with schema definitions can be found and fixed immediately, or avoided entirely, rather than requiring multiple cycles of attempted import and additional editing. The utility also allows for preview of data parsing, and testing of data import, which again allows for faster and easier schema development.
The Schema Editor provides a number of options for working with schema files and batch data, such as editing and cloning an existing schema, inferring a new schema from example data, and creating import queries to automate the import of data with a schema.
The Schema Editor can be accessed by clicking the Advanced button found at the top of the Deephaven Console.
Caution
The Schema Editor is only available to users who are listed in the iris-schemamanagers ACL group in Deephaven. If the Schema Editor option is not shown in the drop-down menu, you are not a member of that group, and not authorized to use the editor.
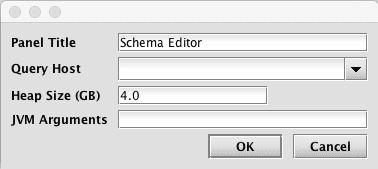
After selecting Schema Editor in the drop-down menu, a dialog window will provide options for renaming the Panel Title, selecting a Query Host (required), adjusting the Heap Size, or providing additional JVM Arguments:
Warning
It is important that you select "Merge Server" from the Query Host drop-down menu. The Schema Editor populates a list of available servers based on the server class. This is driven by the property: SchemaEditor.serverClasses=MERGE.
After you make your selections, click OK and the Schema Editor window will open.
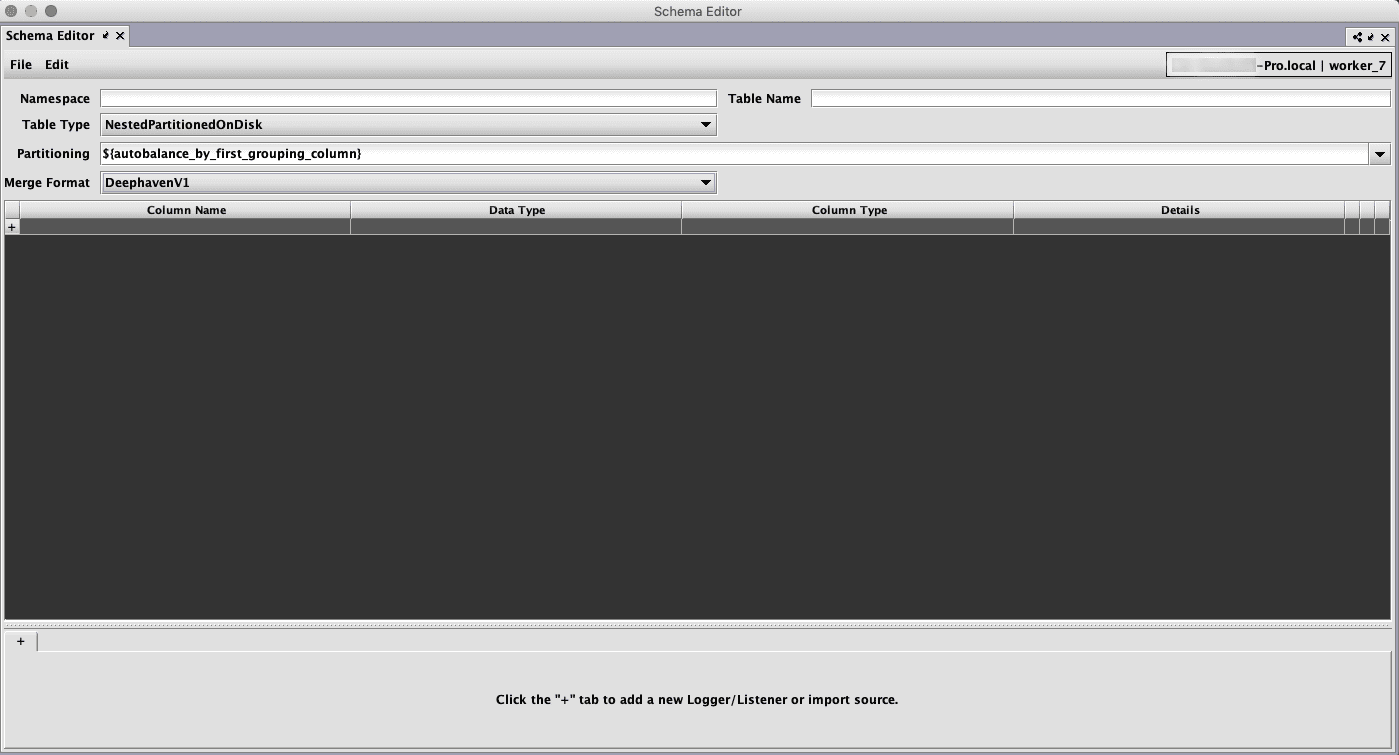
The following options are available for every table.
- Table Type - specifies the way the table is stored on disk.
- NestedPartitionedOnDisk - the table is stored in nested directories, each of which contains a specific partition. Most tables will be of this type.
- SplayedOnDisk - the table is not stored in a partitioned directory structure. This type of table has limited functionality and will not generally be used.
- Partitioning - specifies how the table is partitioned when it is merged to historical partitions. This can be an arbitrary partitioning string, but two common options are provided.
- ${autobalance_by_first_grouping_column} - the table will be split across all available internal partitions based on the values in the first grouping column
- ${autobalance_by_all_grouping_columns} - the table will be split across all available internal partitions based on the values in the all grouping columns
- ${autobalance_single} - partitioning will be automatically determined by the system based on internal logic
- Merge Format - specifies the format in which the table is stored when merged to historical partitions.
- DeephavenV1 - the historical data will be written to files in a Deephaven proprietary format
- Parquet - the historical data will be written in Parquet format
- Codec - if the merge format is Parquet, a list of available compression codecs will be displayed in a dropdown menu. If none is chosen the system default (SNAPPY) will be used, unless overridden in the merge command. See the Parquet Codecs section for further details.
- Data Indexes - Specifies additional groups of columns by which the table will be indexed during merges. See the Data Indexes section for more details.
The File menu includes the following options:
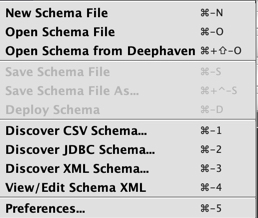
- New Schema File enables users to create a new schema from scratch, with all properties manually entered.
- Open Schema File enables users to open and then edit or clone an existing schema file.
- Open Schema from Deephaven enables users to open and then edit or clone an existing schema that has already been deployed to a Deephaven installation.
- Save enables users to save a new or edited schema to a file.
- Save As enables users to save a new or edited schema to a file with a specific name.
- Deploy enables users to install and deploy the schema on the server.
- Discover CSV Schema… enables users to review the schema layout information from a sample from a CSV-based data file.
- Discover JDBC Schema… enables users to review the schema layout information from a sample data set from a JDBC-based source.
- Discover XML Schema… enables users to review the schema layout information from a sample XML-based data file.
- View/Edit Schema XML enables users to view or manually edit the XML file generated for a schema.
- Preferences… opens a User Preferences dialog.
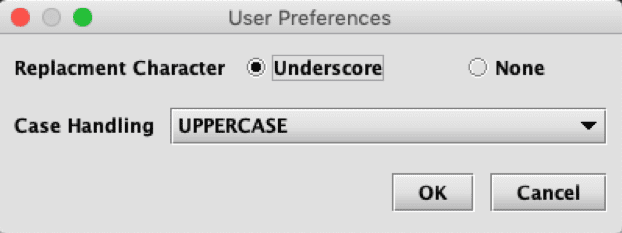
- Users can choose an underscore or none to replace hyphens and spaces, and to specify case handling.
- CasingStyles are UpperCamel, lowerCamel, UPPERCASE, lowercase, and None.
- None leaves the casing unchanged.
- Once your selections are made, click OK and the current workspace will be saved. The replacement and casing preferences are then available from the workspace to be fed to the schema creator classes.
Data Index Configuration
Data Indexes are sets of columns for which Deephaven will generate and store an index of key values to their locations within the merged tables on disk.
Users can add a Data Index group by clicking on the Add Item button ( ).
).
Once clicked, users are presented with a drop down menu of checkboxes, sorted alphabetically to select a set of columns:
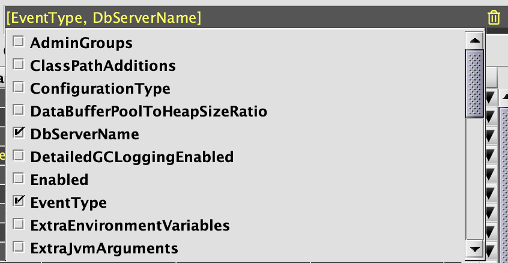
Data Indexes are order-sensitive: that is, a Data Index by (EventType, DbServerName) will be sorted first by EventType and then DbServerName, while a Data Index by (DbServerName, EventType) will be sorted
by DbServerName and then EventType, even though the domain of keys are the same.
Note
While the popup menu is open, keystrokes will be used to filter the list in order to assist in finding columns. The backspace or delete key can be used to remove characters from the search string, while Ctrl-Backspace is used to clear the entire filter string.
Users may click on the trash can icon ( )to remove entries.
Table and Column Properties
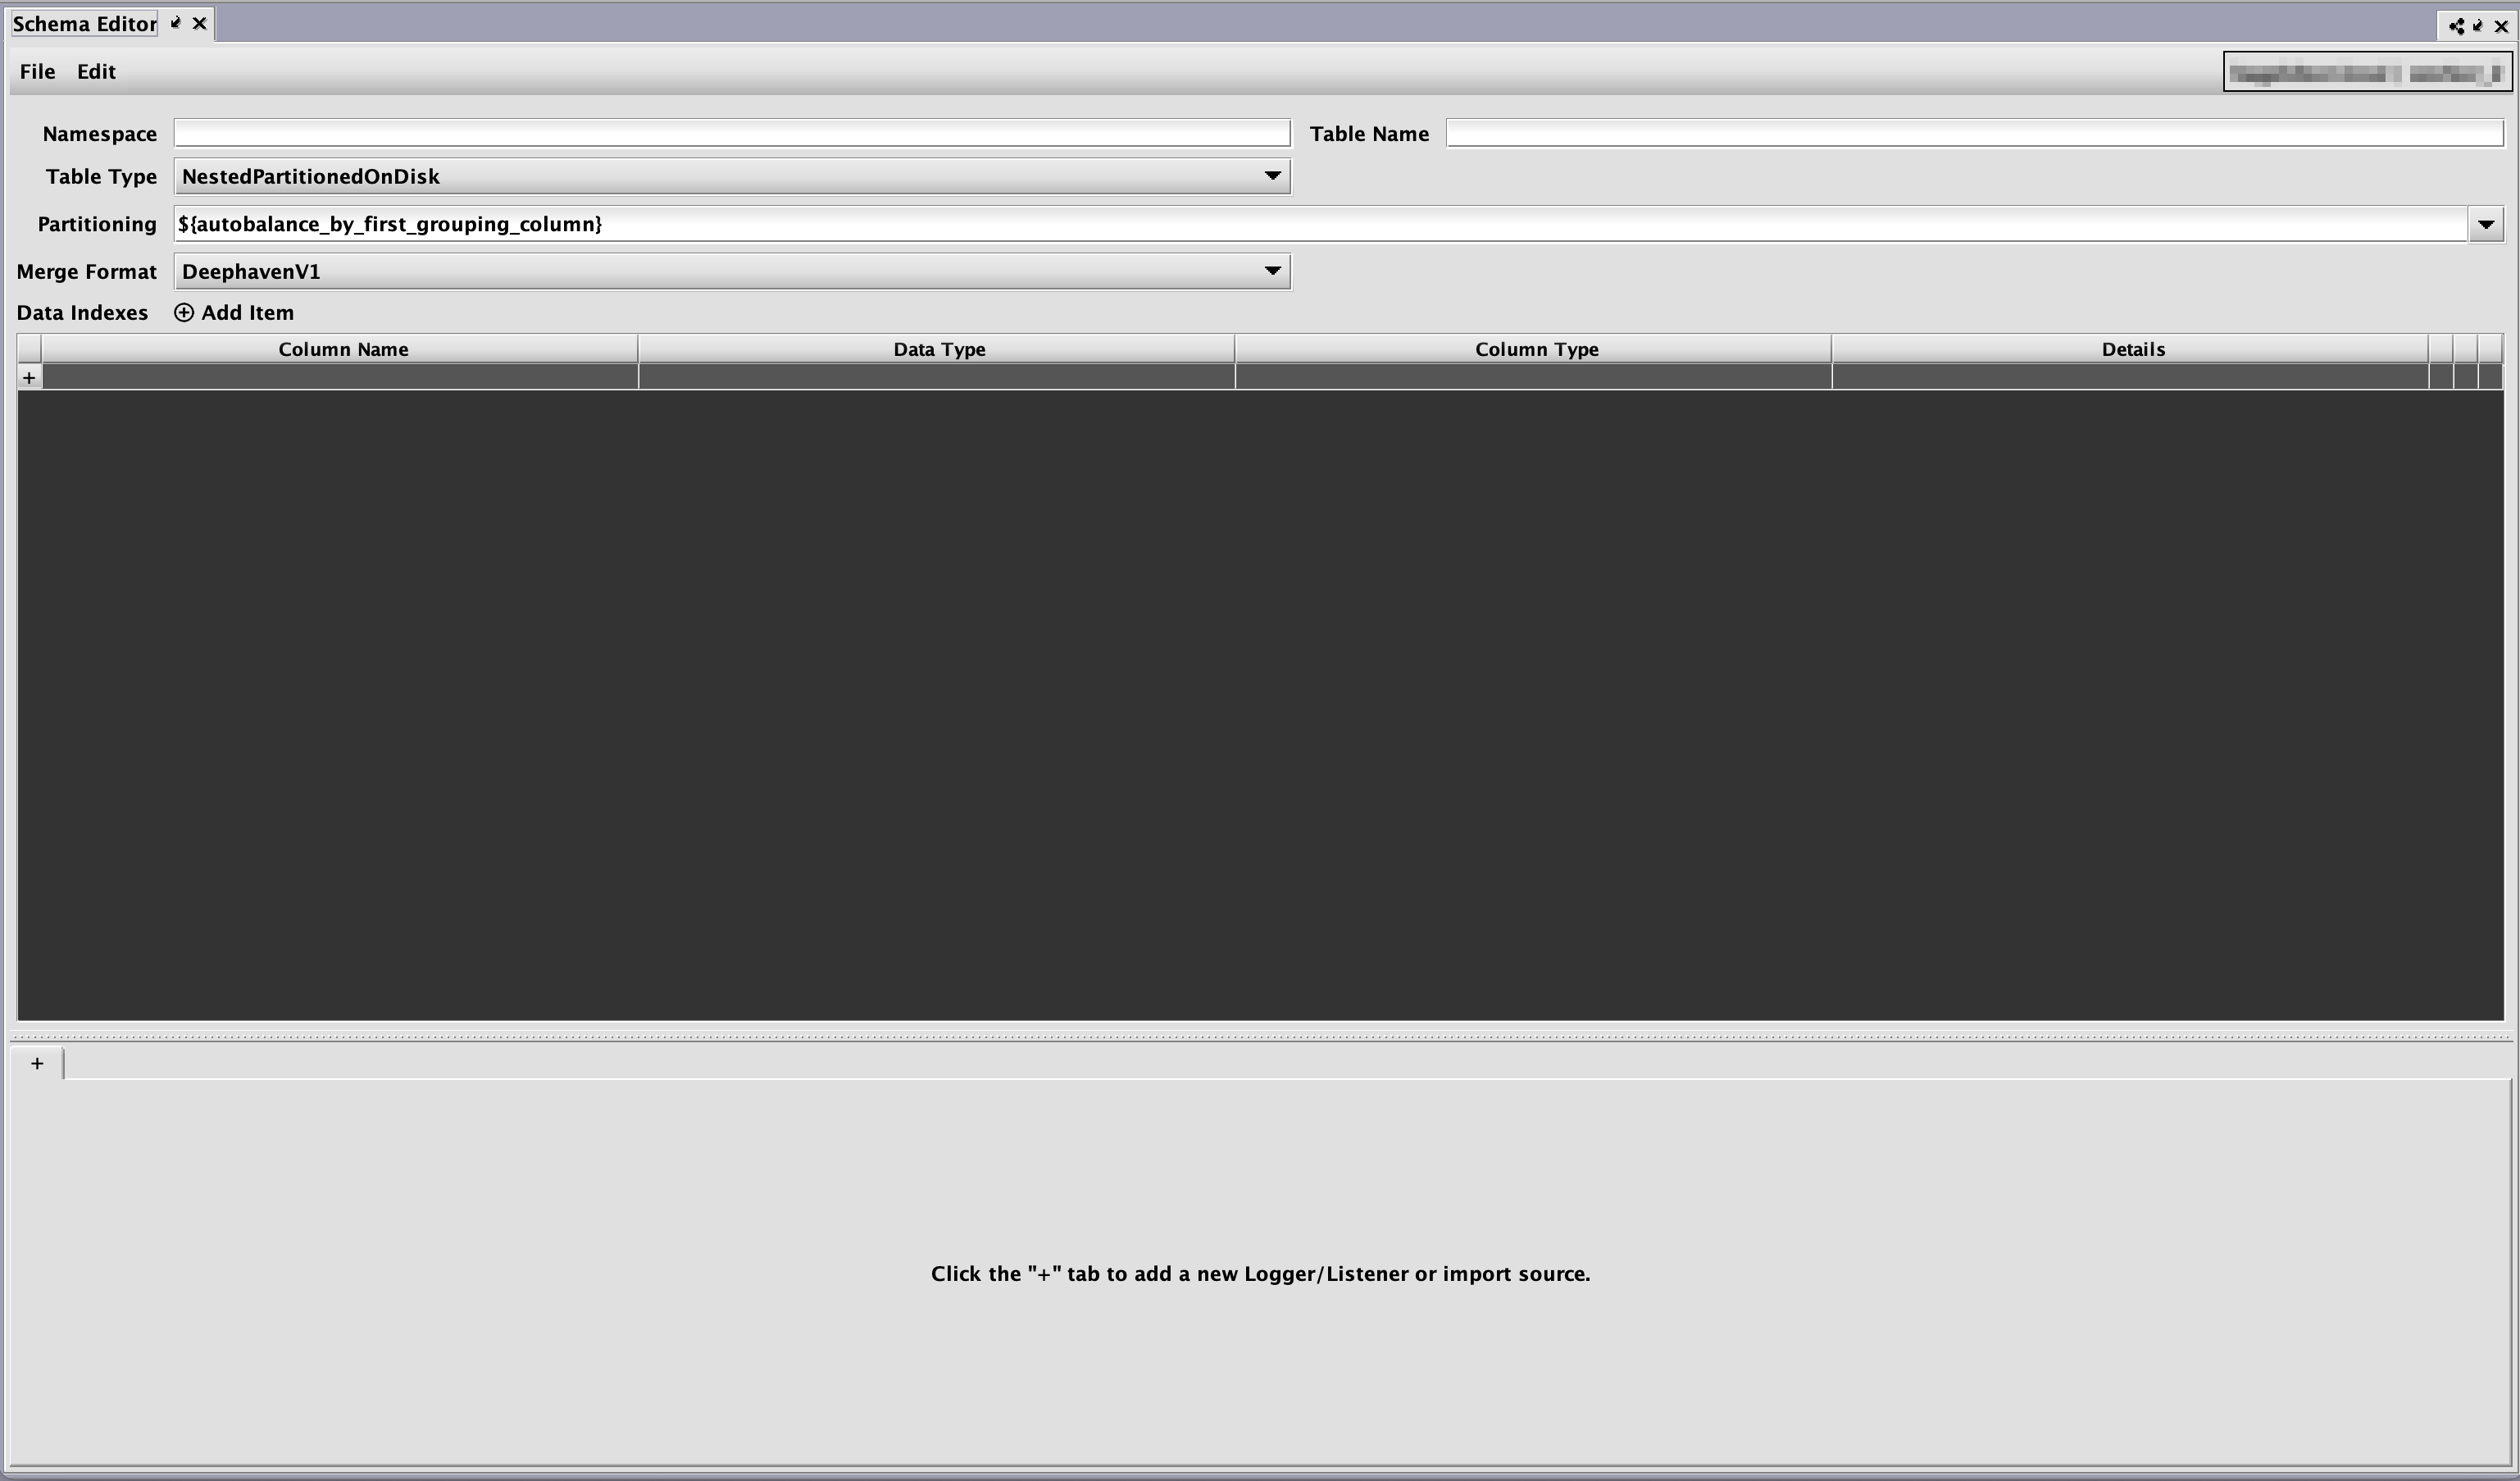
Once a schema has been loaded in the editor, the Schema Editor window presents a set of core table properties followed by a grid of column properties, and then a tabbed set of sections at the bottom. The bottom part of the form is for optional sections of the schema such as ImportSources and Logger/Listener details.
For example, the following image shows a fairly complex schema in the Schema Editor after opening the PersistentQueryConfigurationLogV2 table from the DbInternal namespace:

Each row in the top section represents a column in the table, with its name, data type, column type, and other attributes displayed.
- Special attributes, such as character set encoding for String columns, can be edited by clicking the ellipsis button (
 ) at the right of the row.
 - The other attributes (name, data type, and column type) can be edited directly in the grid by typing or by selecting from drop-down lists.
- Properties such as column names are validated immediately when they are entered, while other properties, such as the requirement for a partitioning column, are checked when a schema is saved or deployed.
- The up/down arrows (
 ) at the right can be used to change the order of the columns in the schema file. (Note: this positioning will be reflected in queries of the table that do not provide other column ordering information). Columns can also be reordered by dragging and dropping their rows with a mouse.
 - The X button (
 ) on the left will delete the column in that row. Undo/redo is supported for most operations in the Schema Editor, so accidental deletions or edits of columns can be easily reverted.
 - To add a new column to the table, click the plus sign button (
 ), which can be found on the left side of the Table Properties table after the last row. The row for the new column will be added with a name like
 NewRow(with a numeric suffix, if there is already aNewRowentry). The new row can then be renamed, moved to a different location, and have its data type and other properties edited. - For a String column, pressing the ellipsis button at the right of the panel brings up the Edit Column dialog. For example, clicking on this for the
ScriptCodecolumn shows the following options:

Note
If a class other than the built-in Deephaven data types is to be used for a column data type (or elsewhere in the Schema Editor, such as for a Logger SystemInput), that class will need to be available in the class path of the server where the Schema Editor is being run. Ideally, this should be done by adding the correct JAR file(s) to /etc/sysconfig/illumon.d/java_lib, so the class will also be available later when the schema is used.
This dialog allows the user to change a column's attributes:
- Name - this is the column name; changing it has the same effect as changing the Column Name by editing it directly in the panel.
- Data Type - this is the column's data type; changing it has the same effect as changing it directly in the panel.
- Column Type - this is the column's type; it provides the same options as clicking it directly in the panel.
- Symbol Table - this provides the option to select the symbol table attribute. If changed, the attribute will appear in the column panel's Details section.
- Encoding - this provides the option to select the encoding attribute. If changed, the attribute will appear in the column panel's Details section.
Logger, Listener, Logger/Listener, and ImportSource Properties
The tabs in the bottom section of the Schema Editor dialog contain information found in the Logger, Listener, Logger/Listener, and ImportSource blocks of the schema XML. If a new schema is discovered from CSV or JDBC, an ImportSource section is automatically added in the lower section of the interface. To manually add one or more of these sections, click the + tab at the left of the tab set in the lower area of the form as shown below.

Like the upper portion of the Schema Editor, selecting a tab in the lower section enables you to view and edit the properties associated with that schema component.

- The X button () can be used to delete an entry.
- The ellipsis button () can be used for editing details.
- The buttons with the up/down arrows () can be used to reorder the rows (as can drag-and-drop). However, order of columns is not significant for the Logger, Listener, or ImportSource sections of schema files.
- The plus sign button () in the last row of the table in the lower section is used for adding new entries.
Entries in ImportSource, Logger, and Listener sections of schema files can have more, and more complex, details than those of the columns themselves, so most editing in the lower section is performed after clicking the ellipsis button, with different dialogs providing the attributes that are valid for the selected entry.
For instance, the screenshot below shows the details for the Owner column used earlier:
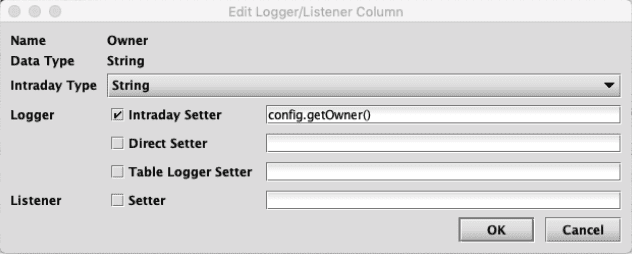
In this case, the check boxes for Direct Setter and Setter are not selected because these attributes are not needed and not specified for the Owner column. It is common in the dialogs for editing these types of details to include many optional attributes whose use is controlled by check boxes.
Within the ImportSource tab, there are also fields used by the CSV and JDBC importers. These are used to test the import process and when creating scheduled import jobs.
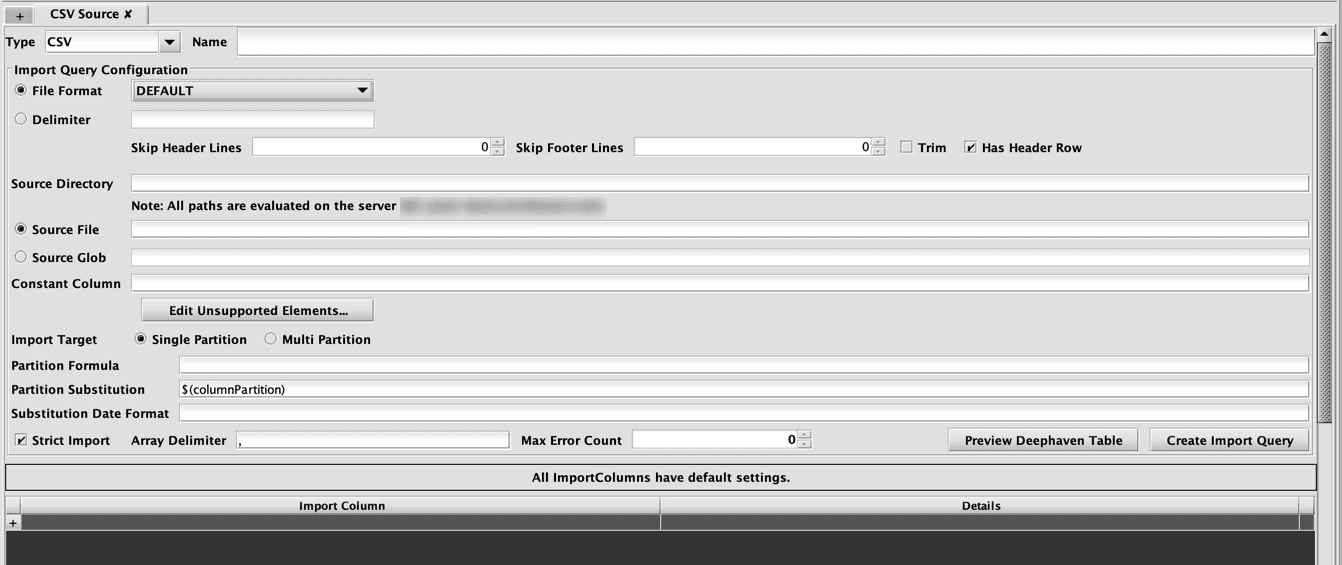
- The Edit Unsupported Elements... button allows the user to directly edit the XML for any elements inside the import block that aren't handled by other controls. For unknown types, this includes everything other than ImportColumn elements. The Schema Editor will accept arbitrary XML as long as it is well formed.
- The Preview Deephaven Table button will create an in-memory table in Deephaven and import the data from the selected source using the current schema. This allows validation of the schema and import settings without having to deploy the schema and without having to create table data files on the server. The import preview is generated on the Deephaven server, so any files, classes, or database connectivity required for the import must be available from your Worker. This is because imports run on the server, and this makes the preview more consistent with the eventual import job.
- The Create Import Query button allows the entered details to be used to create scheduled import jobs in Deephaven. This is equivalent to creating a new Import - CSV, Import - JDBC or Import - XML query in the Query Config panel of the Deephaven Classic console.
Discovering Schema Layout from Example Data
The "Discover" options from the Schema Editor's File menu provide access to the CSV and JDBC schema generator classes. They allow the user to select a data source that contains example data representative of the data that will be stored in the table whose schema is being created.
The "Discover" actions add to the schema generator classes by providing interactive dialogs where the arguments needed by the classes can be entered, and by automatically populating the output of the schema generation classes into the schema document being edited.
Discover Schema from CSV
Selecting Discover CSV Schema… from the Schema Editor's File menu generates the Discover Schema from CSV dialog window:
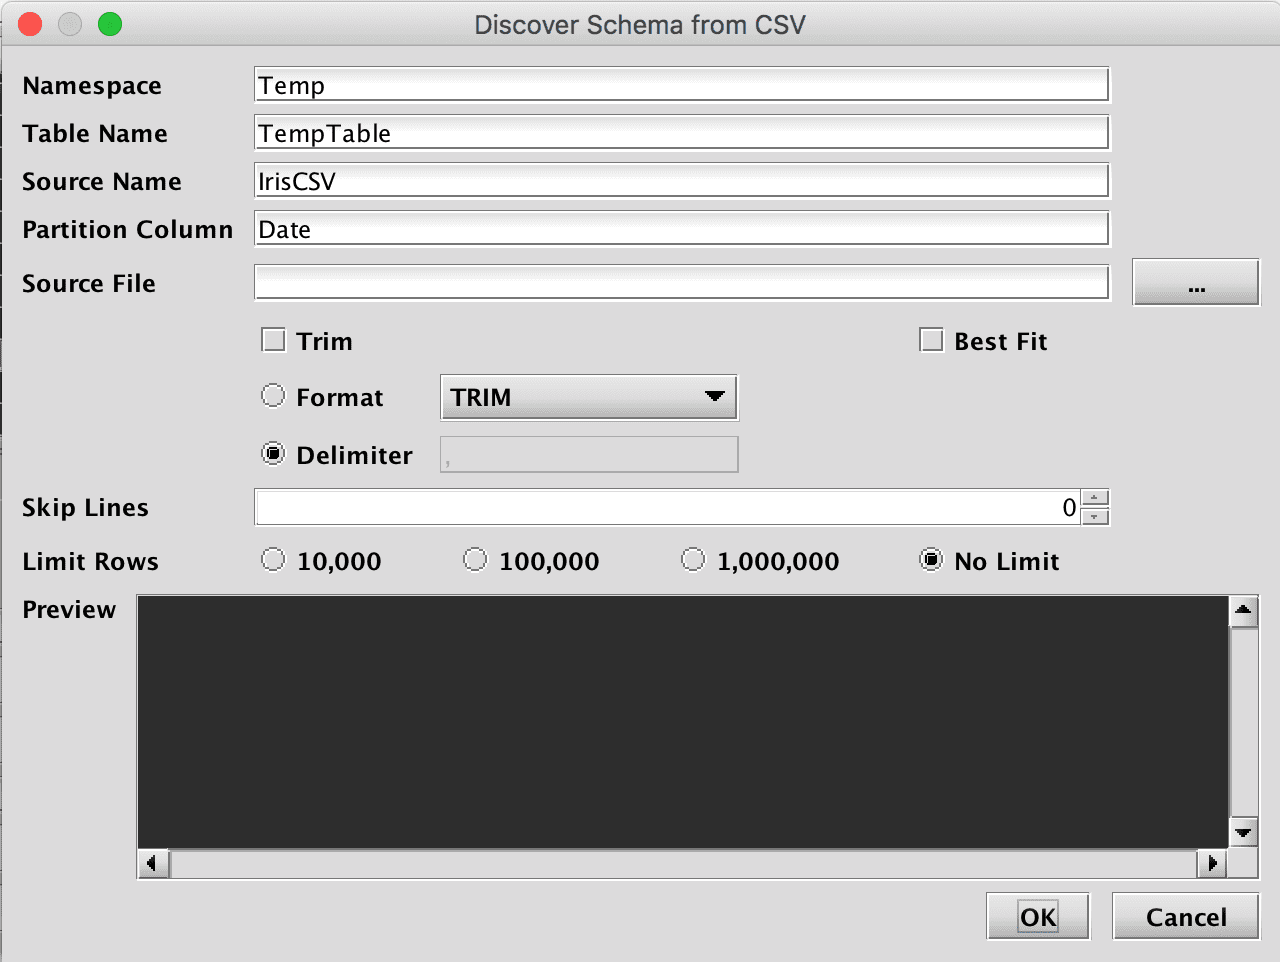
This window provides attributes needed to execute the CSV schema generator class. When launched, default values are generated for most fields. The namespace and table name properties can be entered here, or later in the main Schema Editor pane.
- The only required entry to proceed is the Source File that will be parsed and analyzed. This file name can be typed in, or manually selected after clicking the ellipsis button.
- The Preview panel allows the user to quickly see whether properties such as the file format, delimiter, and number of lines to skip, are correct for this file. The Preview panel initially reads a few rows from the file, and will load more rows as the user scrolls to the bottom of the grid.
- The Best Fit checkbox influences data type. When unselected, a larger data type is always chosen. For example, even if all values can fit within an int, long will be used. When selected, Deephaven will attempt to fit the data into the smallest data type. For example, if all values in the column can fit in an int, int will be used.
- The Limit Rows setting can be used to speed analysis of CSV data when the sample file is large. However, this requires the values found in the first rows of the table are sufficiently representative of those found later in the data set.
Discover Schema from JDBC
Selecting Discover JDBC Schema… from the Schema Editor's File menu generates the Discover Schema from JDBC dialog window:
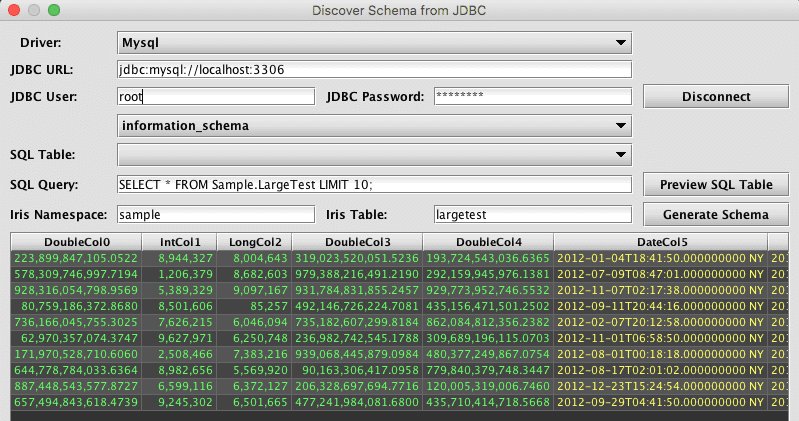
This window provides an interactive way to use the JDBC schema generator. Like the JDBC schema generator class, this dialog requires parameters such as a JDBC Driver to use and the JDBC connection URL. The username and password are also required.
Unlike the discover process for CSV, the Discover Schema from JDBC process actually connects to the data source. This allows the schema editor to interactively browse the tables, which subsequently makes import query creation easier.
Once the user clicks Connect and successfully connects to the data source, other fields will be enabled, which allows the user to view catalogs and tables that are available from that data source. For example, when MySQL is selected as the Driver, the user will then be presented with a list of databases using the unlabeled drop-down menu above SQL Table. The user can then see tables available from the selected database in the SQL Table list. Note: these lists are only for reference, and do not change what database or table is "current" for the JDBC connection. In the case of MySQL, for example, either the database to use must be specified in the URL, or the query would need to include the database name(s) as a prefix to any tables referenced in the query.
The import query can be added to the SQL Query field and then tested/previewed by clicking Preview SQL Table. If the source table is large, preview will be faster if the query includes a row-limiting clause, such as LIMIT for MySQL or TOP for SQL Server. However, it is important this limit be removed from the actual import query used when creating a JDBC import job.
After completing one of the discovery dialogs, the Schema Editor will populate the main form with table properties, column details, and an ImportSource section returned by the schema generator class. These properties should then be reviewed and adjusted as needed (e.g., correcting data types, renaming columns, etc).
Discover Schema from XML
Selecting Discover XML Schema… from the Schema Editor's File menu generates the Discover Schema from XML dialog window:
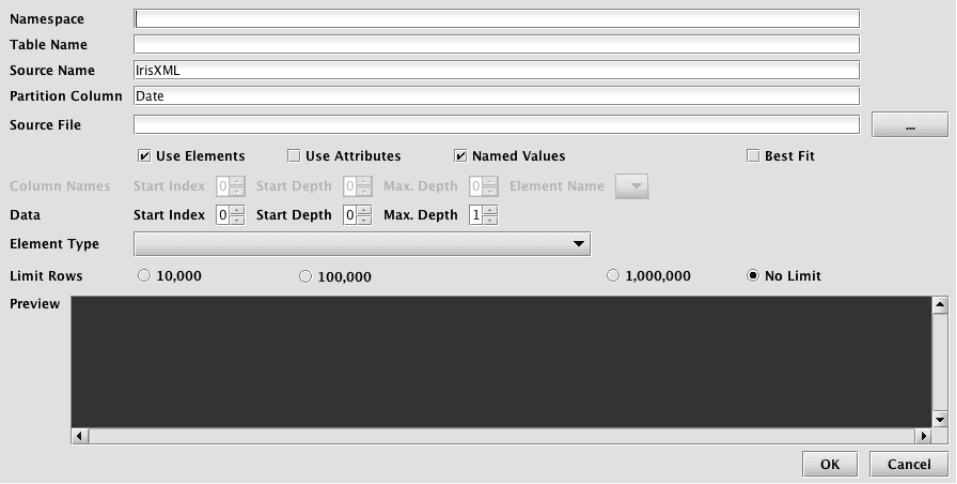
This window provides attributes needed to execute the XML schema generator class. When launched, default values are generated for most fields. The namespace and table name properties can be entered here, or later in the main Schema Editor pane.
- The only required entry to proceed is the Source File that will be parsed and analyzed. This file name can be typed in, or manually selected after clicking the ellipsis button.
- Once selected, the Preview panel allows the user to quickly see whether parsing properties are correct for this file. Note: The Preview panel initially reads a few rows from the file, and will load more rows as the user scrolls to the bottom of the grid.
XML itself is simply a container format that provides various ways to store data. As such, only certain uses of XML lend themselves to generic import by the Deephaven XML importer. The XML parsing settings of this dialog allow tuning of the XML importer to handle a variety of common XML data organization formats. In order to be importable by this tool, an XML file must have data that can be loaded into a single table, and that has unique field names per record. A data file can have field names included with the data (named elements or named attributes), or can use positional fields, with a separate section of the document providing the field names.
Parsing Settings
- Named Values - When checked, field values within the document will be named; e.g. a value called Price might be contained in an element named Price, or an attribute named Price. When cleared, field names (column names) will be specified somewhere in the document separate from the data, and the data values will be stored positionally. (See below for an example of data that uses positional values.)
- Element and/or Attribute values can be used when importing data. At least one must be selected.
- Use Elements - When checked, field values will be taken from element values; e.g.,
<Price>10.25</>. - Use Attributes - When checked, field values will be taken from attribute valued; e.g.,
<Record ID="XYZ" Price="10.25" />.
- Use Elements - When checked, field values will be taken from element values; e.g.,
- Column Names - This section is enabled when Named Values is cleared.
- Start Index - Starting from the root of the document, the index (1 being the first top-level element in the document after the root) of the element under which column names can be found.
- Start Depth - Under the element indicated by Start Index, how many levels of first children to traverse to find an element that contains column names.
- Max Depth - Starting from Start Depth, how many levels of element paths to traverse and concatenate to provide a list that can be selected under Element Name.
- Element Name - The name or path of the element that will contain column names.
- Data - This section is for selecting the data elements themselves to be traversed when importing data, inferring column types, and, when Named Values is checked, finding column names.
- Start Index - Starting from the root of the document, the index (1 being the first top-level element in the document after the root) of the element under which data can be found.
- Start Depth - Under the element indicated by Start Index, how many levels of first children to traverse to find an element that contains data.
- Max Depth - Starting from Start Depth, how many levels of element paths to traverse and concatenate to provide a list that can be selected under Element Name.
- Element Name - The name or path of the element that will contain data.
Example
An example of a portion of a positional XML file follows:
This file has column names under dataset\column-names\column-name elements, and data values matched positionally under dataset\data\datum\datum elements.
Its import settings look like this:
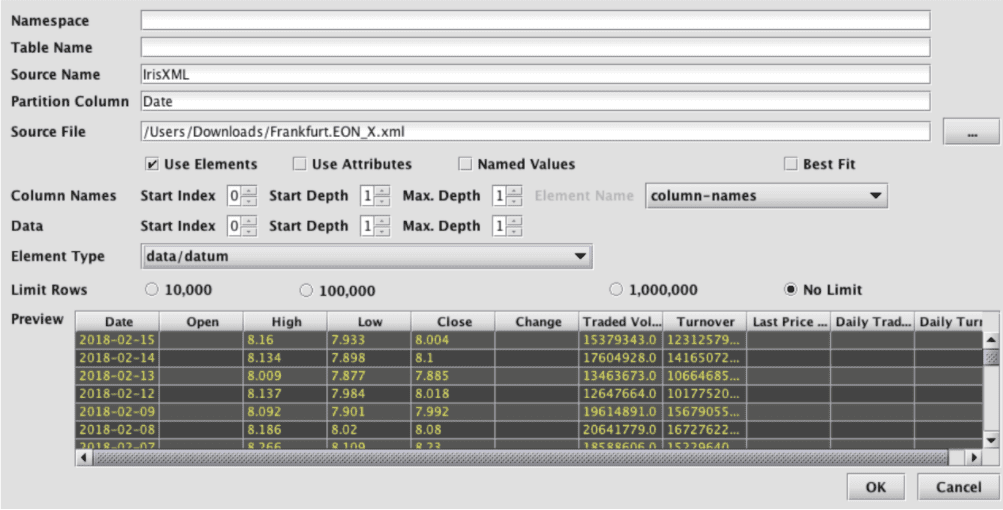
In many cases it will be easiest to experiment with XML parsing settings, and view the preview results, to find the correct settings.
The Limit Rows setting can be used to speed analysis of XML data when the sample file is large. However, this requires that the values found in the first rows of the table are sufficiently representative of those found later in the data set.
Saving and Deploying the Schema
Once the schema has been created or edited into a desired state, it can be saved or deployed.

- Like many editing tools, the Schema Editor allows Save and Save As. If Save is selected, but the file has never been saved before, the Save As dialog will be displayed instead. Schema files are saved or loaded on the machine where the Schema Editor is running.
- The Deploy option is the equivalent of using the
dhconfig schema importcommand. It will install the schema on the server so that the table will be available for import, logging, and querying activities.
Manually Modifying Schema Files
In the earlier example, the schema file produced was suitable to deploy and use for importing data. However, in some cases, it may be necessary to modify a schema file before using it. Some reasons for modifying a generated schema file include:
- Multiple grouping columns – The schema generators allow for the option of specifying a column to be marked as
columnType="Grouping". If multiple grouping columns are needed, this change can be easily made by editing the generated file. - Empty source columns marked as String – if a sample file has no data for a column, it will be created as a String column. If the type is known, it can be changed by editing the generated file. Note that it will probably be necessary to also add an
ImportColumnwith adefault="null"to ensure import continues when it encounters the empty fields. String fields can be empty, but a field being parsed into a numeric type must have a default if the source has any empty values. - Boolean types – The schema creators do not recognize Boolean types.
- Y/N will be marked as char.
- 1/0 will be marked long or short, depending on settings.
- True/False will be handled as String.
- Customization of the schema would be needed to make the column a Boolean column when these are known to be Boolean values.
- BigDecimal types – The CSV schema creator uses long or double as its largest numeric types. If BigDecimal is needed for storing data accurately, the column data types should be changed manually.
- Renaming or reformatting names for the Deephaven columns – If the legalized column names from the source are not ideal for the Deephaven table, the names can be changed in the schema file.
ImportColumnentries will also need to be created or updated to correctly map source names to target names. - Adding formulae for other special types (e.g., date/time values in unrecognized formats) – If a date/time or other special field is in a format that does not match any of the existing converters, that field will be marked as String. The schema file could then be edited to change the column type and add an ImportColumn entry with a formula to convert these data during import. See below for details on adding custom converters for other special data conversions.
- Adding derived columns – In some cases it may be desirable to parse or reformat a column during import, or even combine multiple columns when calculating the value for new column (e.g., if a date/time value is in one field, and its time zone is in another). Such custom formulae, column mappings, and use of custom field writers must be manually added to the generated schema file.
- Support for languages other than Java is minimal. To create useful schemas for other languages such as C#, manual editing will likely be required.
Note
See: Refer to Batch Data Imports for details on definitions, and creating custom formulae, transforms, or field writers to extend the capabilities of generated schema files.