Importing Data Examples
The following example schemas demonstrate the various capabilities of Deephaven table schemas.
Example 1 - Logger and Listener elements
This example combines the logger and listener elements defined in the previous examples.
<Table name="TestTable" namespace="TestNamespace" storageType="NestedPartitionedOnDisk">
<Partitions keyFormula="__PARTITION_AUTOBALANCE_SINGLE__"/>
<Column name="Partition" dataType="String" columnType="Partitioning" />
<Column name="Alpha" dataType="String" columnType="Grouping"/>
<Column name="Bravo" dataType="int" />
<Column name="Charlie" dataType="double" />
<Column name="Delta" dataType="double" />
<Column name="Echo" dataType="StringSet" />
<Listener logFormat="1" listenerPackage="com.illumon.iris.test.gen" listenerClass="TestTableFormat1Listener">
<ListenerImports>
import com.illumon.iris.db.tables.libs.StringSet;
</ListenerImports>
<ListenerFields>
private final String echoValue = "reverberating";
private final StringSet echoValueStringSet = new com.illumon.iris.db.tables.StringSetArrayWrapper(echoValue);
</ListenerFields>
<ImportState importStateType="com.illumon.iris.db.tables.dataimport.logtailer.ImportStateRowCounter" stateUpdateCall="newRow()" />
<Column name="Alpha"/>
<Column name="Bravo" />
<Column name="Charlie"/>
<Column name="Delta" dbSetter="5.0" intradayType="none" />
<Column name="Echo" dbSetter="echoValueStringSet" intradayType="none" />
</Listener>
<Logger logFormat="1" loggerPackage="com.illumon.iris.test.gen" loggerClass="BarTestLogger" >
<LoggerImports>
import com.abc.xyz.Helper;
</LoggerImports>
<LoggerFields>
private final Helper helper = new Helper();
</LoggerFields>
<SystemInput name="Alpha" type="String" />
<SystemInput name="Bravo" type="int" />
<SystemInput name="CharlieSource" type="String" />
<Column name="Alpha" dataType="String" />
<!-- The BarTestLogger will perform different input transformations than the TestLogger. -->
<Column name="Bravo" dataType="int" intradaySetter="Bravo + 1"/>
<Column name="Charlie" dataType="double" intradaySetter="helper.derive(Double.parseDouble(CharlieSource) * 2.0)" directSetter="matchIntraday" />
<!-- This column exists in the schema, but not in the V1 log. Missing columns are not allowed, therefore it must have an intradayType of none. -->
<Column name="Delta" dataType="double" intradayType="none" />
<Column name="Echo" dataType="StringSet" intradayType="none" />
</Logger>
<LoggerListener listenerClass="TestTableListenerBaz" listenerPackage="com.illumon.iris.test.gen" loggerPackage="com.illumon.iris.test.gen" loggerClass="TestTableLoggerBaz" logFormat="2">
<SystemInput name="Alpha" type="String" />
<SystemInput name="Bravo" type="int" />
<SystemInput name="Charlie" type="int" />
<ListenerImports>
import com.illumon.iris.db.tables.libs.StringSet;
</ListenerImports>
<ListenerFields>
private final String echoValue = "reverberating";
private final StringSet echoValueStringSet = new com.illumon.iris.db.tables.StringSetArrayWrapper(echoValue);
</ListenerFields>
<Column name="Alpha" dataType="String" />
<Column name="Bravo" dataType="int" />
<Column name="Charlie" dataType="double" intradayType="Int" dbSetter="(double)Charlie" directSetter="(double)Charlie" />
<Column name="Delta" dataType="double" dbSetter="6.0" intradayType="none" />
<Column name="Echo" dataType="StringSet" dbSetter="echoValueStringSet2" intradayType="none" />
</LoggerListener>
</Table>
Example 2 - Table, Logger, and Listener element combination
This is a combined example where the table, logger, and listener elements are combined in one definition.
<!-- Simple test schema for backwards compatibility. -->
<Table namespace="TestNamespace" name="TestTable3" storageType="NestedPartitionedOnDisk" loggerPackage="com.illumon.iris.test.gen" listenerPackage="com.illumon.iris.test.gen">
<Partitions keyFormula="__PARTITION_AUTOBALANCE_SINGLE__"/>
<SystemInput name="Alpha" type="String" />
<SystemInput name="Bravo" type="int" />
<SystemInput name="Charlie" type="int" />
<SystemInput name="Foxtrot" type="double" />
<Column name="Partition" dataType="String" columnType="Partitioning" />
<Column name="Timestamp" dbSetter="DBTimeUtils.millisToTime(Timestamp)" dataType="DateTime" columnType="Normal" intradaySetter="System.currentTimeMillis()"/>
<Column name="Alpha" dataType="String" />
<Column name="Bravo" dataType="int" />
<Column name="Charlie" dataType="double" intradaySetter="(double)Charlie + Foxtrot" directSetter="matchIntraday" />
<Column name="Delta" dataType="double" dbSetter="1.5" intradayType="none" />
</Table>
Example 3 - Batch Data Import Using the Schema Editor and Query-based Importing
The following example is presented to show the common steps in setting up schema and an import job for a new CSV batch data source.
The example uses U.S. Federal College Scorecard data from www.data.gov. To follow along with this walk-through exactly, please download and unzip the CollegeScorecard_Raw_Data.zip file from: https://catalog.data.gov/dataset/college-scorecard.
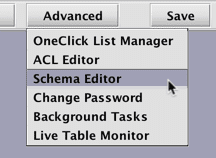
Click the Advanced button at the top of the Deephaven Console and then select Schema Editor.
Note
The Schema Editor menu item is only available if you are a member of the iris-schemamanagers
group.
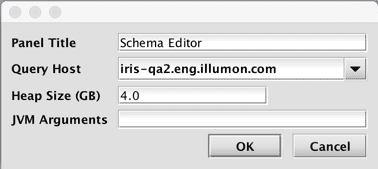
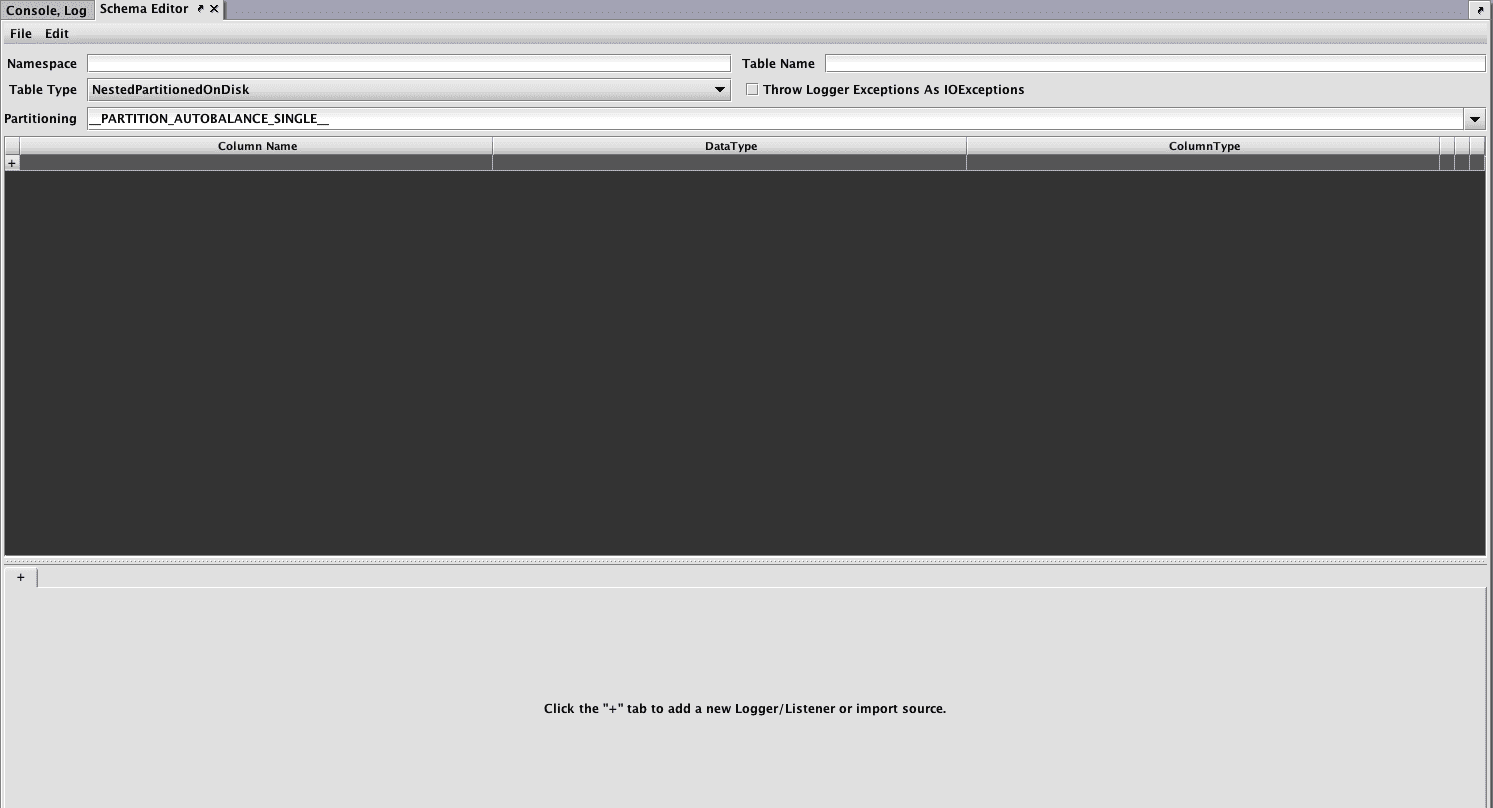
After accepting the defaults, the Schema Editor panel will open:
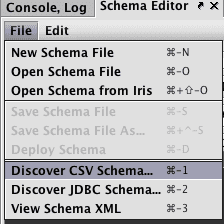
Click the File menu and the select the Discover CSV Schema... option:
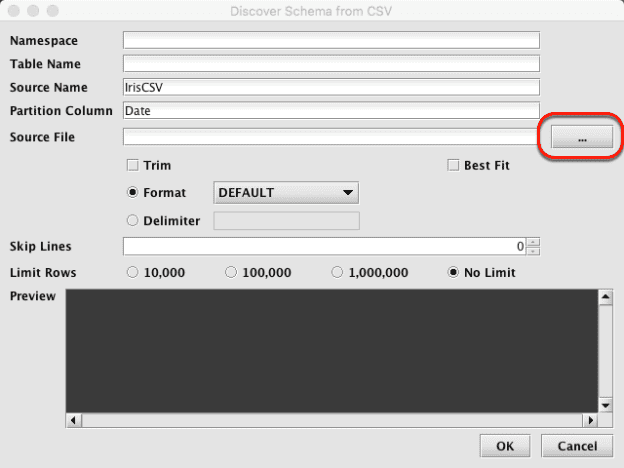
When the Discover Schema panel opens, select the ellipsis button (circled below) to the right of the Source File field:
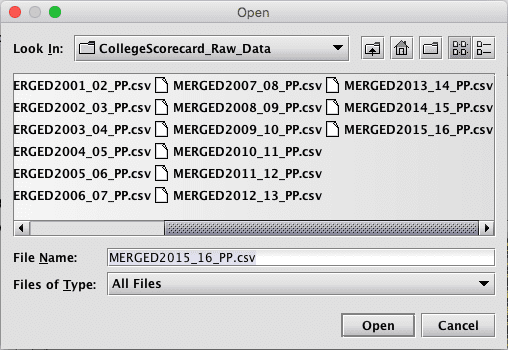
Browse for the CSV file you downloaded earlier:
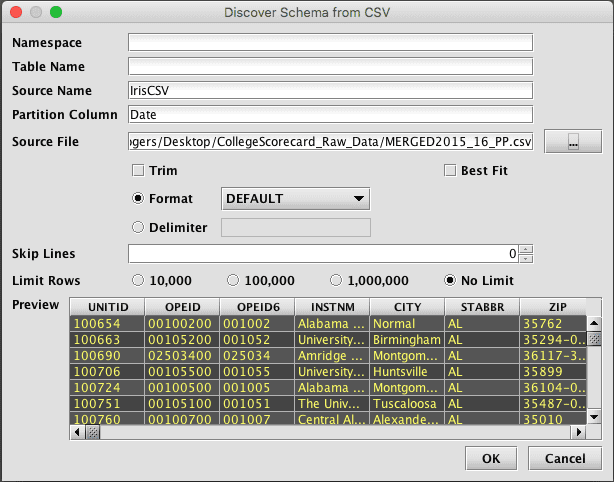
After selecting the file, enter the name of the Table Name and Namespace. (It can also be entered in the main Schema Editor window in the next step.) Format, Skip Lines, and Delimiter should be set here to result in a good preview of the data. For very large files, it may be desirable to limit how many rows are analyzed to infer the data types of the columns. The entire file does not need to be scanned, as long as there is enough representative data in the selected top lines of the file.
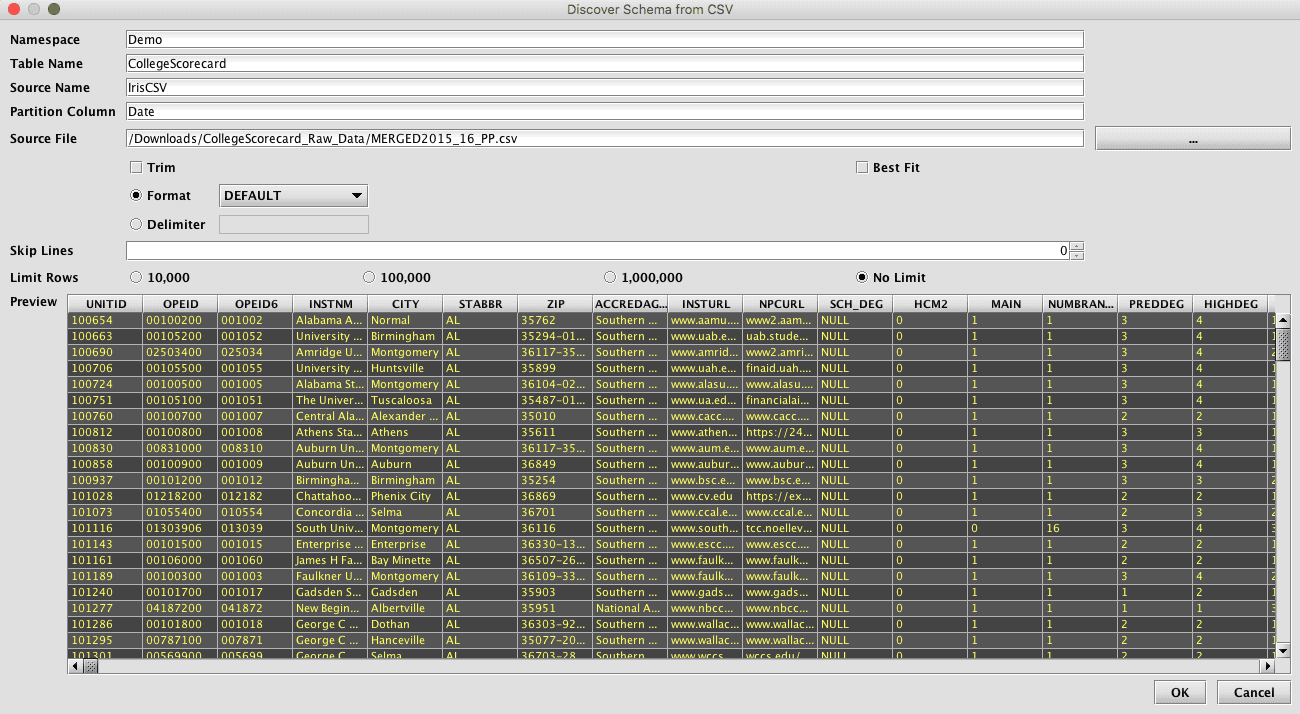
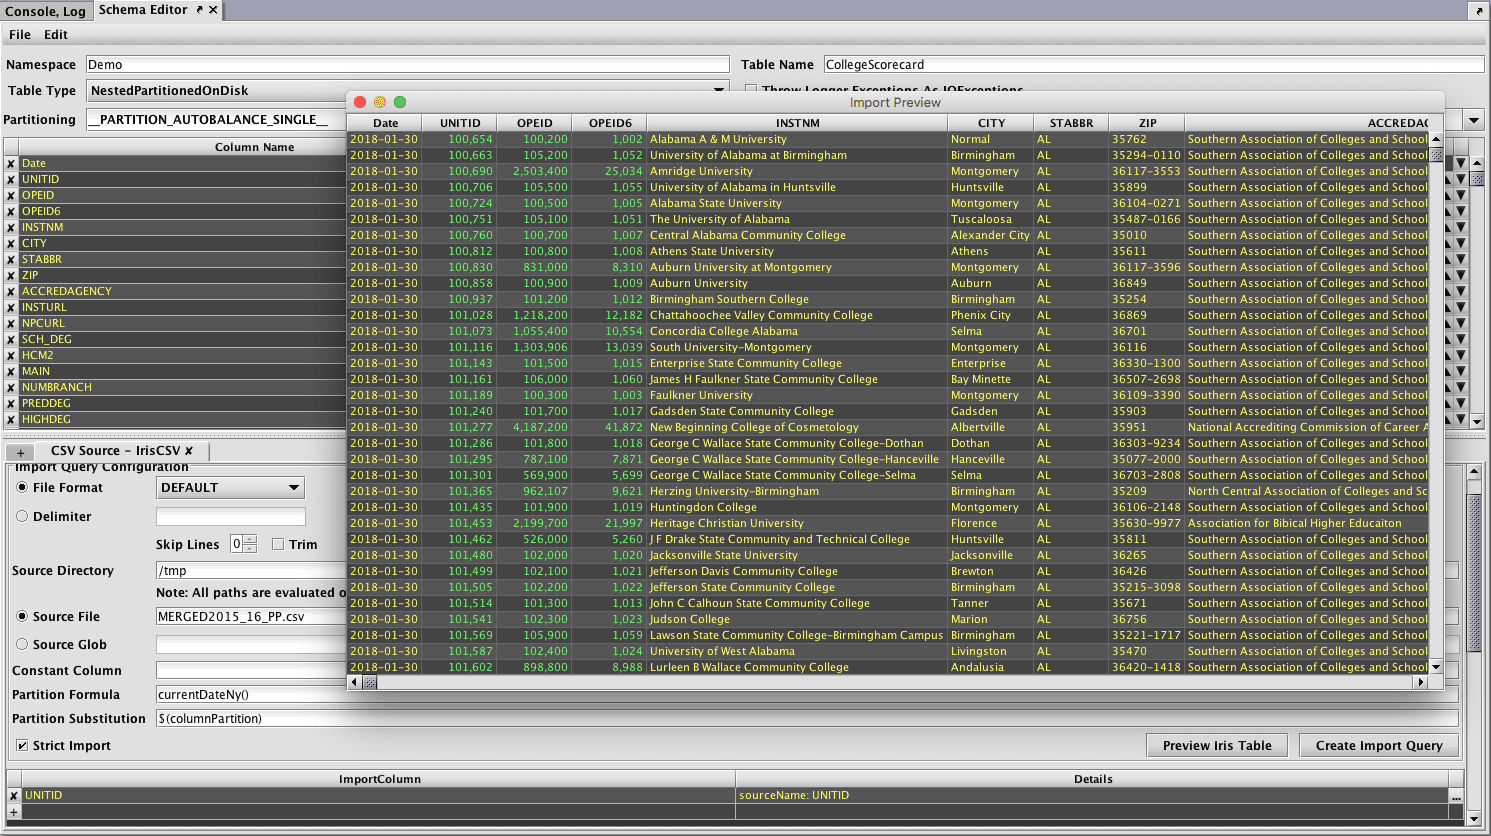
Click OK once the preview looks correct. Depending on the size of the file, it may take several seconds or longer to process the file. A progress bar will be shown at the bottom of the window during processing.
Once processed, the schema details will be shown in the main Schema Editor window. The schema can then be edited from here to change column names, types, order, and import processing, as needed or desired.
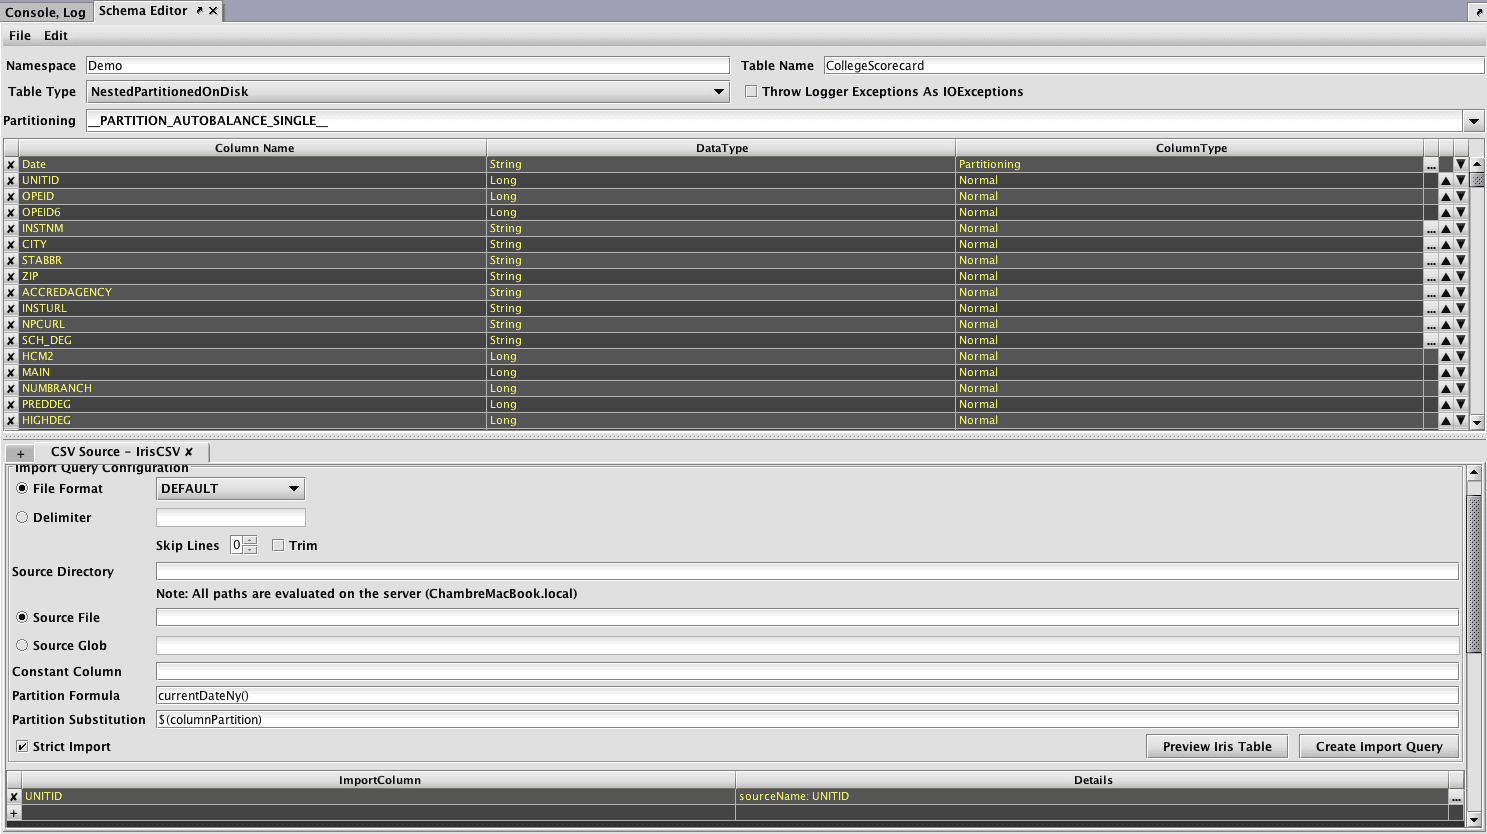
The expected results of an import to Deephaven can then be previewed using the Preview Table button. This action requires that the Source Directory and Source File or Source Glob be completed for a path to source files relative to the query server where the Schema Editor is being run.
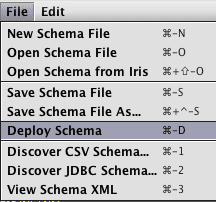
Once the schema and results of a test import are as desired, the schema can be deployed to Deephaven to create a new table definition.
Open the File menu again, and select the Deploy Schema option to deploy the new table to Deephaven. Optionally, the schema file could instead be saved to disk for later use or manual deployment.
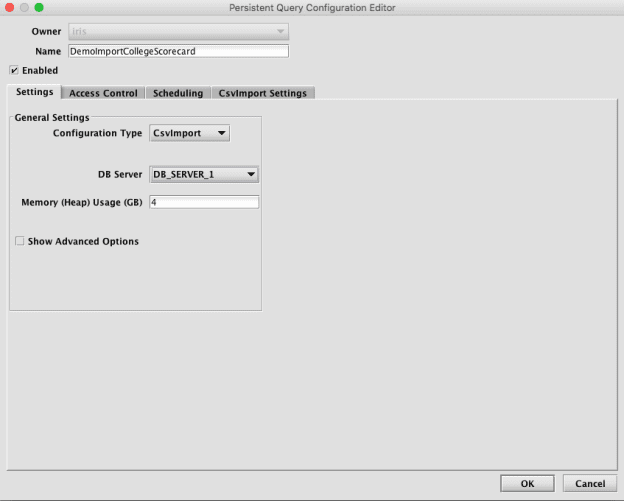
Once the schema is deployed, an Import Query can be created using the Create Import Query button. (You can also use the Create Import Query button to deploy the schema.)
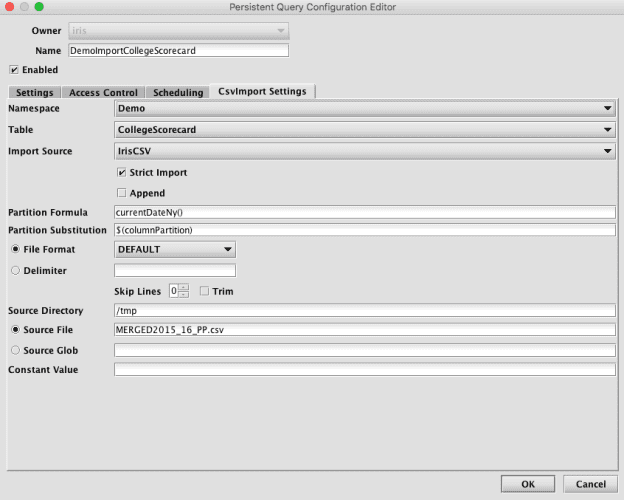
Alternatively, an Import Query can also be created later from the Query Config panel of the Deephaven Classic console. It will be necessary to set basic settings on the Settings tab, at least a timeout on the Scheduling tab, and details of the source file path and name on the CsvImport Settings tab.
After completing this process, the new Import Query will be displayed alphabetically in the Query Config panel. It can then be run as desired.