Launch the Swing UI with the Deephaven Launcher
To download and install the Deephaven Launcher, see Installation guide for users.
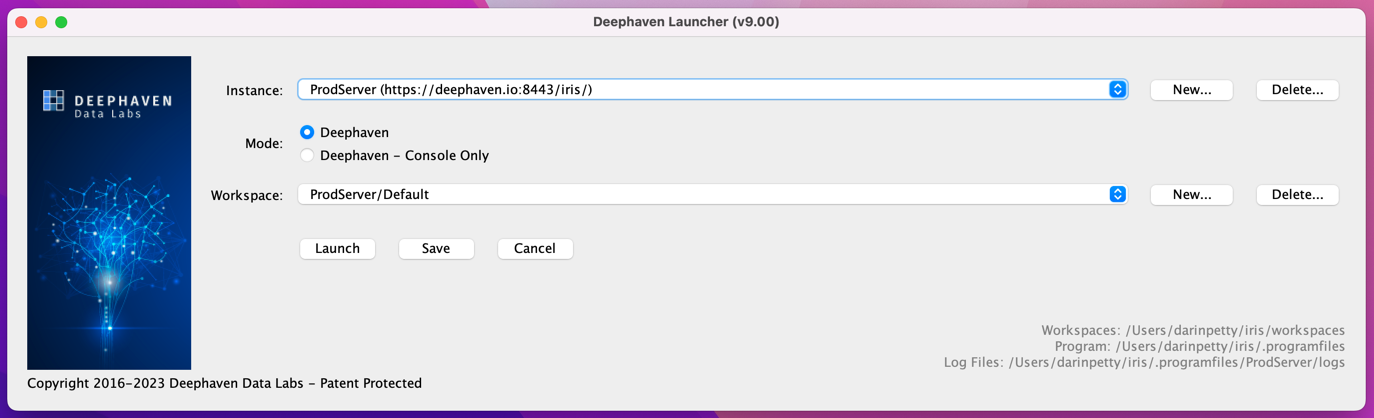
Once you have the Deephaven Launcher installed on your client system, creating one or more instances and starting the UI is easy.
The Launcher supports multiple Deephaven installations (called Instances in the Launcher UI), which may be different versions. Each instance can have multiple Workspaces, where each workspace is an independent configuration of the Swing UI. Instances and Workspaces are displayed in the Instance and Workspace combo boxes, and they can be created and removed with the buttons along the same horizontal line.
Once you have selected an Instance and Workspace, start the UI with the Launch button. The Save button saves the current selections to a .iris file. On a Windows client, double-clicking the file on the desktop or in Windows Explorer will launch the selected instance and workspace. On a Mac or Linux client, pass the .iris file to the launch script; e.g., ~/DeephavenLauncher/DeephavenLauncher.sh ProdServer-Default.iris.
The Deephaven Launcher manages files in three locations:
- Program files (also known as instance files) - These are the executable and configuration files needed to operate with a Deephaven instance. Each time you launch the UI, these files are synchronized and downloaded.
- Workspace files - These files are workspace settings, backups, and history files.
- Log Files - These are the logs generated by the UI, primarily useful for diagnosing problems.
The actual location of these files for the current instance are displayed in the lower right of the UI. You can copy the paths to your clipboard by right-clicking the text.
Configure an instance
To create the first or additional instances, click the New button next to the Instance combo box.
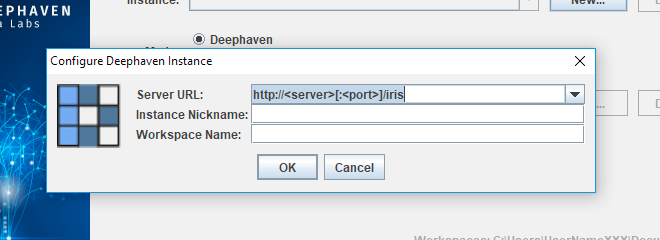
Fill in the URL to the Client Update Service on your Deephaven server. The URL will have the form https://deephaven.server:8443/iris. The port might be different depending on the actual configuration.
Fill in a nickname for this server. The Instances combo box will be sorted by this name. Optionally, fill in a Workspace name. You can add workspaces later.
When you click OK, the Deephaven Launcher will connect to the Deephaven Server to download several files and determine that the URL is valid.
The Client Update Service can be configured to require credentials. If that is the case, you will be prompted for a username and password.
Launch an instance
Once you select an instance and workspace, press Launch to synchronize files and run the Classic UI. When you next run the Deephaven Launcher, this instance and workspace will be selected by default.
Mode
Deephaven can run in two different modes:
- Deephaven: This mode is the "full" version of Deephaven. When Deephaven opens in this mode, every applicable feature and user function is presented in the user interface.
- Deephaven – Console Only: This mode includes only the console portion of Deephaven. It uses the same query language, offers the same analytical engine, and provides the same performance. However, the console-only mode provides users with the option to work with Deephaven without the extra features of the user interface.
Save
The Save button allows you to save a file representing the current instance and workspace. On Microsoft Windows clients, opening this file (e.g. by double-clicking) will start the selected instance, skipping the Deephaven Launcher dialogs. On other systems, the filename can be passed to the DeehavenLauncher.sh script for the same effect.
Context menus
There are several context menus that provide additional configuration options. These are all accessed with a right-click.
On the Instance combobox (on the drop-down button on Windows):
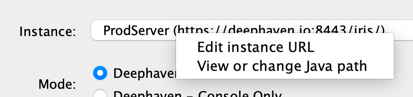
- Edit instance URL is helpful if the Deephaven server's name or address changes. For example, if a testing instance is upgraded to production. The UI will attempt to validate the new URL before saving it.
- View or change Java path is useful when specifying a certain JDK for running this instance. A Deephaven server can specify a required JDK version. If you attempt to launch an instance with an incompatible JDK, you will have an opportunity to select a compatible one. The UI will attempt to validate the JDK version with the server before proceeding.
Anywhere in the UI:
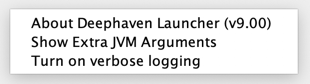
- About Deephaven Launcher shows a list of features and when they were introduced.
- Show Extra JVM Arguments adds a text field. Any arguments added here will be used when starting the Deephaven UI (e.g.,
-Djavax.net.debug=all). This can be useful when troubleshooting issues with Deephaven support. - Turn on verbose logging generates more logging. This can be useful when troubleshooting issues with Deephaven support.
Certificate/TLS/HTTPS support
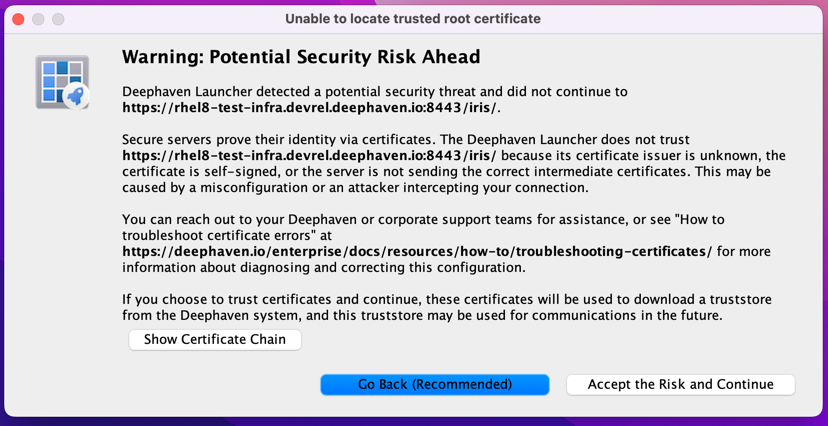
When creating or updating an instance, the Deephaven Launcher must contact a web service on the instance, which is usually a secure (HTTPS) connection. The certificate securing this connection might be issued by a well-known authority (CA), by a corporate CA, or even be self-signed. The Launcher will attempt to verify this certificate using the default cacerts file of the JDK, the client system trust store, the trust store downloaded from the Deephaven server, and optionally a trust store configured for the Deephaven Launcher program. See Deephaven Launcher and Client configuration for more information.
If all automatic attempts to establish trust for the certificate fail, a warning dialog will be shown. This dialog has options for viewing the certificate chain. Optionally, the displayed certificates can be temporarily accepted during the initial connection. Typically, the Launcher can download a trust store from the Deephaven server, and this trust store will be used in the future. See Troubleshooting certificates for more information about possible problems. See PKI-issued certificate usage in Deephaven for more information about certificates.