Deephaven Active Directory Integration Service configuration
Deephaven can be configured to permit single sign-on (SSO) for Windows users on a properly-configured Active Directory domain. To enable this, three additional components are required. These are delivered in a single package:
- The Deephaven Active Directory Integration (DHADI) service, which will be installed and run on a computer within the Active Directory domain to be validated against (
DHADIServer). - A plugin for the Deephaven Authentication Service (
PluginServer). - A plugin for the Deephaven client on the end user's computer (
PluginClient). There are two versions of this plugin. The first is used when performing a console-based login. The alternate plugin is used when performing a non-console-based login, as from an automated script that does not interact with the user interface.
These components all draw from a central library, DHADICommon.
Data flow / component interaction
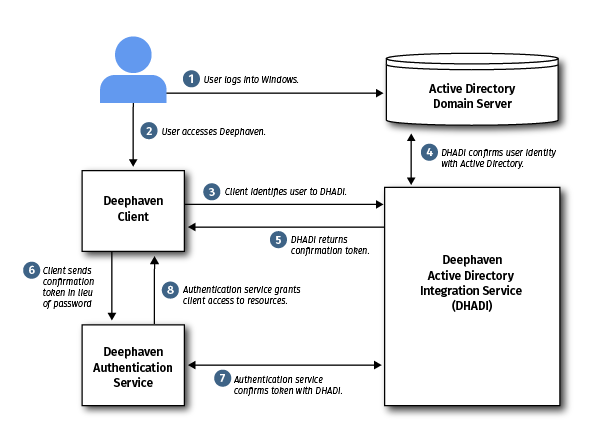
When a user logs on with the Deephaven Active Directory authentication panel enabled in their client system, the client will make a request to authenticate the user based on the user name associated with their current Windows session. At this time, DHADI only allows direct user permissions, with no use of groups.
Once authenticated with Active Directory, the Deephaven authentication server will attempt to match the username (not including the domain name) with a user who has been granted access to Deephaven (See: Adding Users in the ACL Editor). Note that this user must be created in the system as per any other Deephaven user account, with the name exactly matching the Active Directory name of the user, in lower case, without domain information. For example, a Windows user of DOMAIN\USERNAME would need to have the Deephaven user 'username' created. When authenticating via Active Directory, the Deephaven account's password is not used. You may wish to use a random password generation tool to create a difficult-to-guess password for that account. Do not share that password. Also note that it is also possible to use the same account via direct password login or Active Directory authentication, in which case the Windows password is used for Active Directory authentication and the Deephaven password is used for direct password login.
If a match is found, the user is logged in to Deephaven using that account. If no match is found, or if the Windows session credentials cannot be authenticated with Active Directory, the user can still select to log in to Deephaven using other authentication methods, such as a username and password. Active Directory authentication is considered an interactive login, so if interactive login is disabled, Active Directory authentication also cannot be used.
Internally, the Deephaven authentication server will attempt to contact a DHADIServer process running on a Windows AD Domain member machine. This service hosts an endpoint running a secure WebSocket server (wss). A web server certificate, signed by an issuer that is trusted by all parties (clients and the authentication server) will be needed by the DHADI server to enable necessary encryption for the sessions set up during the authentication process.
Integration service setup
The DHADI server consists of two executables, a file of libraries, an install script, an uninstall script, and a properties file. The build process automatically puts everything except the properties file into a directory; this directory can be easily zipped up for delivery. The properties file should be created separately, as it will have custom values for each installation.
To set up the Integration Service:
- Install Java 8 (version 1.8.0.162 or later) on the machine where this will run.
- Set
JAVA_HOMEas a system environment variable pointing to the location of the Java JDK install path, or, if the JRE is installed, setJRE_HOMEto point to its install path, such asC:\Program Files\Java\jre1.8.0_191. The Windows service will use these environment variables to find the Java runtime when it starts.
- Set
- Place the directory with the executables et. al. in a desired location. Due to a limitation of an underlying component, this location should not include any spaces in the path name (such as
Program Files. The recommended location isC:\DHADIS. - Place a
dhadi.propertiesfile in the same directory asDHADIServer.exe. - Generate a keypair for use when the plugins try to communicate with DHADI. Note: the keystore created must be a JKS keystore.
- For information on how to generate a Java keystore and keypair, please see the official Java documentation.
- In particular, see the instructions on generating a keystore in JKS format and the instructions for generating a keypair.
- You may also wish to review how to create and import certificates. If using a Windows Certificate Authority, you may need to use the following command to sign the certificate:
certreq -attrib "CertificateTemplate:webserver" -submit <csr file name>
- Edit the
DHADI.propertiesfile to specify:authentication.activedirectory.server.port- the port number that the DHADI server will listen to. If this property is not specified, the default is port 9051.tls.keystore- the path to the keystore file on the server. Paths must use forward slashes or doubled backslashes as path separators, such asC:\\Logs\\Logfile.txt.tls.passphrase- the Base-64 encoded representation of the bytes of the passphrase for the keysauthentication.activedirectory.server.logfile- an optional property that may be set to produce log files reporting server startup and shutdown. If this property is omitted or left blank, or if the specified file (including path) is not accessible by the service, then no log files will be generated.
- Lock down access to the DHADI.properties file to only permit the authorized user(s) and the DHADI server itself to read or write the file.
- Execute the
DHADIServer-install.BATscript to register the server as a service. - Ensure any firewalls, including the Windows or other desktop firewalls, allow connections to the selected port (normally 9051).
- Ensure your Deephaven users have the same usernames as their Windows logins.
A sample server properties file follows:
Authentication Service Plug-in setup
This is a standard Deephaven plugin. To use the Authentication Service plugin:
- Include the Plug-in jar file (
DHADIAuthModule-1.0.jar) in the Authentication Service classpath. The README file that is automatically generated with the plugin includes detailed instructions on how this works (primarily, extract the tarball to/etc/sysconfig/illumon.d/plugins). - Set the
iris-authentication-serverproperties in theservice.name=authentication_serverstanza ofiris-common.prop:authentication.server.customauth.enabledmust betrue.authentication.server.customauth.class.<name> must be set to the full name of the plugin (io.deephaven.dhadi.pluginserver.ActiveDirectorySSO`).authentication.server.customauth.<name>.prioritymust be set to some integer value indicating the priority for this authenticator. The priority indicator defines the order in which the available authentication mechanisms will be checked. The lowest priority goes first.activedirectory.dhadi.addressmust be set to the name of the server (such asdhadi.exampleserver.com) where the integration service is installed. This may also be a comma-separated list of names, in which case each server in the list will be checked until either one returns a positive result, or all of them have either failed or returned a negative result. This must match the full name field of the DHADI service's certificate.activedirectory.dhadi.portmust be set to the port number that can be used to access the integration service (usually the same value as configured on the server underauthentication.server.port). If this property is not specified, the default is port 9051.activedirectory.dhadi.validDomainsis an optional property that may be set to a list of valid domains. If this is not set, then any valid Active Directory login will be allowed.authentication.securePasswordMethodmust be set toDHbecause the tokens used for AD integration are too long for the default RSA.activedirectory.dhadi.networktimeoutis an optional property that may be set to an integer value: the number of seconds that the authentication server should wait while trying to authenticate an Active Directory login.
Client Plug-in setup (console-based)
The console-based login client plugin extends the concept of plugins to the client interface. Previously, plugins were only permitted for the server-side modules.
Note the following:
- This plugin only works on a Windows computer that is part of a domain.
- The minimum Java version on the client computer must be 1.8.0.162. Java versions prior to this may not be able to complete the authentication process.
- If invoked on anything other than a Windows computer that is part of a domain, this plugin will silently be ignored when the client loads.
To configure a client to use the plugin:
- Extract the files from the
.tgzfile and copy everything from the/etc/sysconfig/illumon.d/plugins/DHADIS/global directoryinto/etc/sysconfig/illumon.d/plugins/DHADIS/client. This will automatically retrieve these files when the client is downloaded. - Set the following properties for the client in the
service.name=iris_consolestanza ofiris-common.prop:activedirectory.dhadi.addressmust be set to the address of the server where the integration service is installed. This may also be a comma-separated list of addresses, in which case each server in the list will be checked until either one confirms the user's identity, or all of them have either failed or returned a negative result.activedirectory.dhadi.portmust be set to the port number that can be used to access the integration service (usually the same value as configured on the server underauthentication.server.port). If this property is not specified, the default is port 9051.authentication.client.customlogin.class.<name>must be set to the full class name of the classes to use for custom login. For example,com.illumon.iris.console.utils.WAuthenticationClientLoginMethodPanelfor the standard username/password combination, orcom.illumon.iris.console.utils.WAuthenticationActiveDirectoryLoginMethodPanelfor the AD-integrated SSO login. The standard username/password combination will always be included as a final login option, even when custom login classes are being used.authentication.client.customlogin.priority.<name>must be set to a unique priority number for each class being used for custom login. A class with no priority listed will be treated aslast. Only one such class may exist. The lowest numbers will be listed first in the login method dropdown.authentication.securePasswordMethodmust be set toDHbecause the tokens used for AD integration are too long for the default RSA.authentication.client.customlogin.activedirectory.networktimeout(optional) may be set to the number of seconds to wait for the authentication process.IrisConsole.automaticLoginMillismay be set to an integer value > 0 to enable auto-login. When this is set, users will automatically be logged into Deephaven after the set length of time, unless they cancel or quit first. If this value is absent or is less than or equal to 0, then no auto-login will take place.
Client Plug-in Setup (Non-Console)
Some clients may wish to enable external systems to access data from Deephaven automatically, without a human needing to log in. For this purpose, you can use the non-console client plugin. Using the non-console client plugin is only needed if you are explicitly writing code (such as Java, Python, or R) that needs to retrieve data from Deephaven, and will be running under a Windows domain account. To use the non-console plugin, you will need to follow the configuration steps listed below.
Note the following:
- This plugin only works on a Windows computer that is part of a domain.
- The minimum Java version on the client computer must be 1.8.0.162. Java versions prior to this may not be able to complete the authentication process.
- If invoked on anything other than a Windows computer that is part of a domain, this plugin will silently be ignored when the client loads.
- If a keypair has already been configured, or if a keyfile is provided in the call to
defaultAuthentication, the keypair exchange will always be attempted instead of plugins.
To configure a client to use the plugin:
- Extract the files from the
.tgzfile. You will need to include the files from the global` directory in your project, along with the Deephaven JAR files required for Deephaven integration. For information on integrating your application with Deephaven, please see Integrating Deephaven with Python or with R. - Set the properties in your project to specify the following (along with all of the properties required to run the rest of Deephaven):
activedirectory.dhadi.addressmust be set to the address of the server where the integration service is installed. This may also be a comma-separated list of addresses, in which case each server in the list will be checked until either one confirms the user's identity, or all of them have either failed or returned a negative result.activedirectory.dhadi.portmust be set to the port number that can be used to access the integration service (usually the same value as configured on the server underauthentication.server.port). If this property is not specified, the default is port 9051.authentication.manager.customlogin.class.<name>must be set to the full class name of the class to use for custom login:io.deephaven.dhadi.clientauth.DHADIClientAuthMethod.authentication.manager.customlogin.priority.<name>must be set to a unique priority number for each class being used for custom login. A class with no priority listed will be treated aslast. Only one such class may exist. The lowest numbers will be tried first.authentication.securePasswordMethodmust be set to DH because the tokens used for AD integration are too long for the default RSA.authentication.client.customlogin.activedirectory.networktimeout(optional) may be be set to the number of seconds to wait for the authentication process.
Configuring certificates
Note
See: For introductory reading, please see Microsoft's documentation on Certificates and Public Keys. For further reading, see Microsoft's instructions on installing Microsoft Certificate Services on a Windows server.
Since this integration will be used in Microsoft Windows Active Directory environments, it may be convenient to use a Windows Certificate Authority to issue the DHADI server certificate.
If configuration of DHADI is being performed in a production Domain, then an existing root or intermediate Windows Certificate Authority can be used to sign the DHADI server certificate. If DHADI is being set up in an isolated test environment, Certificate Services can be installed on the test Domain Controller.
Note
Running Certificate Services on a production Domain Controller is not recommended, as it increases the attack surface of the Domain Controller and makes future reconfiguration of the environment less flexible.
Windows machines have their own certificate management structure, and Domain member machines will normally, for Windows applications, trust their internal PKI (public key infrastructure) with no additional configuration needed. Java, however, maintains its own structure for certificate management. For DHADI, and other Java applications, to trust certificates issued by the Windows PKI, some additional configuration may be needed.
Setting up DHADI to trust the certificate authority
This information in this section only applies if you are using your own internal Certificate Authority (CA), as with Active Directory Certificate Services. If you are using a public CA such as Verisign or Digicert, or are using a CA that is itself authenticated by a well-known root CA, then you may proceed to section Configuring the DHADI service certificate. Java is able to verify the trust chain of well-known root CAs using the certificates already included in the cacerts truststore that is installed with the JRE.
If the CA that will issue the DHADI server certificate is an intermediate CA whose own certificate is issued by a well-known root CA (Verisign, Entrust, Digicert, etc), or the service certificate was directly issued by one of these authorities, Java will be able to verify the trust chain using the root CA certificates already included in the cacerts truststore that is installed with the JRE.
If the issuing CA is not externally verifiable, then its certificate must be imported into the Java truststore.
A Windows CA certificate can be obtained in a number of ways.
- If web enrollment is enabled, then
http://server-name/certsrvcan be used to access a certificate services portal. One action in this portal allows download of the CA's certificate. - Another option is to run certutil on the CA server:
certutil -ca.cert [YOUR_CER_FILE].bin(with[YOUR_CER_FILE]replaced by the name for the certifying authority, such as ADTest)- Then convert the binary file to a Base-64 encoded certificate file with
certutil -encode [YOUR_CER_FILE].bin [YOUR_CER_FILE].cer
- A third option is to use the Certificates MMC snap-in and find and export the CA's certificate as a Base-64-encoded cer file.
Copy the CA's certificate file to systems where DHADI server or client components will run; these include all client systems, authentication servers, and servers where the DHADI service will be run.
To import the CA certificate to Java keystores, use the keytool utility:
CA_Aliascan be any unique friendly name by which to identify the CA certificate.- The
cacertstruststore is delivered as part of the Java installation. It will be the file namedcacertsunder lib/security in the Java installation path. - The default password for the
cacertsrepository ischangeit.
If keytool is not in the path, it will need to be fully qualified. For example:
Or, on Windows systems:
Configuring the DHADI Service Certificate
The DHADI service certificate is used to set up authenticated and encrypted connections when the authentication server or the DHADI clients connect to the DHADI server. This is actually a web server certificate being used to set up SSL for secure WebSockets. This certificate uses a keypair that is generated in the DHADI keystore, and then issued as a signed certificate by a trusted CA.
- Generate the keypair with the JDK Keytool:
- The 'first and last name' must be the name to be used from both clients and the Deephaven authentication server when contacting the DHADI server. This can be a short alias or a fully-qualified name. This name must contain only alphanumeric characters, periods, and hyphens.
- The 'country' code must be exactly two characters.
- The alias is a unique friendly name to identify the keypair. It will also be used when importing the signed certificate in step 4.
- Generate a certificate request with the JDK Keytool:
- Submit the csr file to the CA to obtain a signed certificate.
- Import the signed certificate to the DHADI keystore:
Issuing a Signed Certificate from a Windows CA
- Open certsrv on the CA.
- Right-click on Certification Authority (local) and choose All Tasks -> Submit new request.
- Select the file with the certificate request.
- Expand the CA name.
- Click on Pending Requests.
- Find the new request. Right-click on that request and choose issue.
- Go to Issued Certificates. Find the issued certificate from the request and double-click it. Choose details and then copy to file. Save it as a Base64-encoded file.
An alternate method, which may be needed on some Windows CA servers, is to use the certreq command line tool:
Name resolution
If this is a local system (not externally accessible) you may need to make DNS entries or entries in the local HOSTS file to make sure the same name can be used for both the DHADI server and the connection (i.e., not using IP address). This applies to both Deephaven authentication servers and client systems.
Troubleshooting DHADI
Verifying connectivity
Connectivity to the DHADI server can be verified from the Deephaven server where the authentication server is running with nc. The nc tool may first need to be installed with yum or apt.
For example:
Note that DHADISERVER here is the name configured in Deephaven properties files to use for AD authentication. Using the same name verifies that the name is resolvable at the same time as connectivity to the configured port is verified.
Verifying the certificate and ciphers
The certificate and keypair being used by the DHADI server can be verified from the Deephaven server where the authentication server is running with OpenSSL:
This should return a lot of information about the SSL certificate being used by the DHADI server. Particular areas to note are that the issuer be a CA that is included in the cacerts truststores of Java installations being used for Deephaven server and client components, and that SSL ciphers are available to the certificate.
Cipher details can be seen below.
Verifying client certificate authorities
To view and verify what certificates and truststores are being used by the Deephaven client, add the following to a jvmargs.txt file:
Then, after launching a fresh instance of the client, the launch.stdout.<PID number> file can be opened from <devroot>\logs (devroot is shown at the top of the Deephaven console window). This file will show the path and name of the CA truststore file, as well as the certificates contained in it. The certificate for the CA that signed the DHADI server certificate must be included in the truststore used by the client Java installation.
Log files with additional DHADI component information
Other details about the client authentication process when attempting to validate a user with Active Directory can be viewed in the IrisConsole-<PID number>.log.<date time> file in the same <devroot>\logs directory. This file normally cannot be opened on Windows until the client session has been closed.
The main server side log files to check for more information about communications or authentication failures are:
/var/log/deephaven|authentication_server/AuthenticationServer.log.currenton the authentication server machine.%SystemRoot%\System32\LogFiles\Apacheon the DHADI server machine for log files related to service management and the WebSocket server process.<DHADI log file>for details about startup and errors in the DHADI server process itself.