Input Tables
Input Tables are user-modifiable database tables. Much like a spreadsheet, Input Tables are used to store user-provided data, which can then be used to drive calculations. Data in Input Tables can be added, changed, or removed instantaneously, either manually in the user interface or automatically via the Java API.
Input Tables consist of an append-only Deephaven table that contains the raw data, and the Input Table modified by the user in the console. Each time the Input Table is modified, new rows are added to the underlying live table. (If a row is removed, then an empty row is appended for that key, and the key is marked as deleted.) Queries that view the Input Table only use the last row for each key (using the lastby() function), and filter out the rows marked as deleted (using where()).
A mapping table called Tables, which is saved in the __DbConfig namespace, is a user table that the system uses to keep track of Input Tables. It must exist before any Input Tables can be created, and is automatically imported since version 1.20221001.406. For older versions, you many refer to the Troubleshooting section for instructions on manually importing the __DbConfig.Tables schema.
Note that Input Tables created by users cannot have any of the following column names as these columns already exist in the underlying table of raw data, and are dropped when the query is displayed in the console columns:
- Date
- _Deleted
- _ChangeTime
- _ClientHostName
- _ServerHostName
- _WorkerName
Note
Only users with the appropriate permissions can create or edit Input Tables. Permissions must be set in Deephaven Classic. See: Setting Input Table permissions
Create Input Tables
The query to create an Input Table requires two parts:
- the first creates the underlying Input Table object
- the second shows the actual table you can edit in the user interface
The following syntax creates the InputTable object, which will not show up in the console:
itObj = InputTable.newInputTable(db, "Namespace", "TableName", cKey("ColName", Class)..., c("ColName", Class)...)
You must define your key columns when creating the Input Table. For example, a table storing different settings for each user would have one key column (e.g., Username). A table with settings for each stock ticker and stock exchange would have two key columns (e.g., Symbol and Exchange):
- the
cKey()method is used to create create key columns - the
c()method is used to will create value (non-key) columns
Note: the available classes for column type include String, double, Boolean, byte, char, int, short, long, and float. A drop-down list of values relevant to that column can also be added to any column type using the EnumValues method. For example, c("YearOfBirth", int, new EnumValues(1990, 1991, 1992, 1993)) will generate a drop-down list of four dates in the "YearOfBirth" column.
Next, to actually access and edit the Input Table in the user interface, the following syntax is used:
it = itObj.getTable()
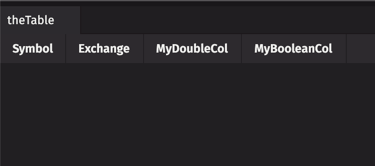
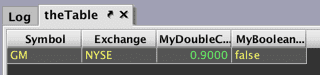
When the new Input Table, theTable, opens, there is no data yet to display, as shown below:
Open an Input Table
To open an existing Input Table in Deephaven, use the following syntax:
theTable = InputTable.inputTable(db, "InputTableTest", "TestTable")
To get the InputTable object, use the following syntax:
inputTableObj = theTable.getAttribute("InputTable")
Add to the Input Table
There are two ways to add to the Input Table:
- typing directly into an empty row
- using the
add()method in the query language
From the UI
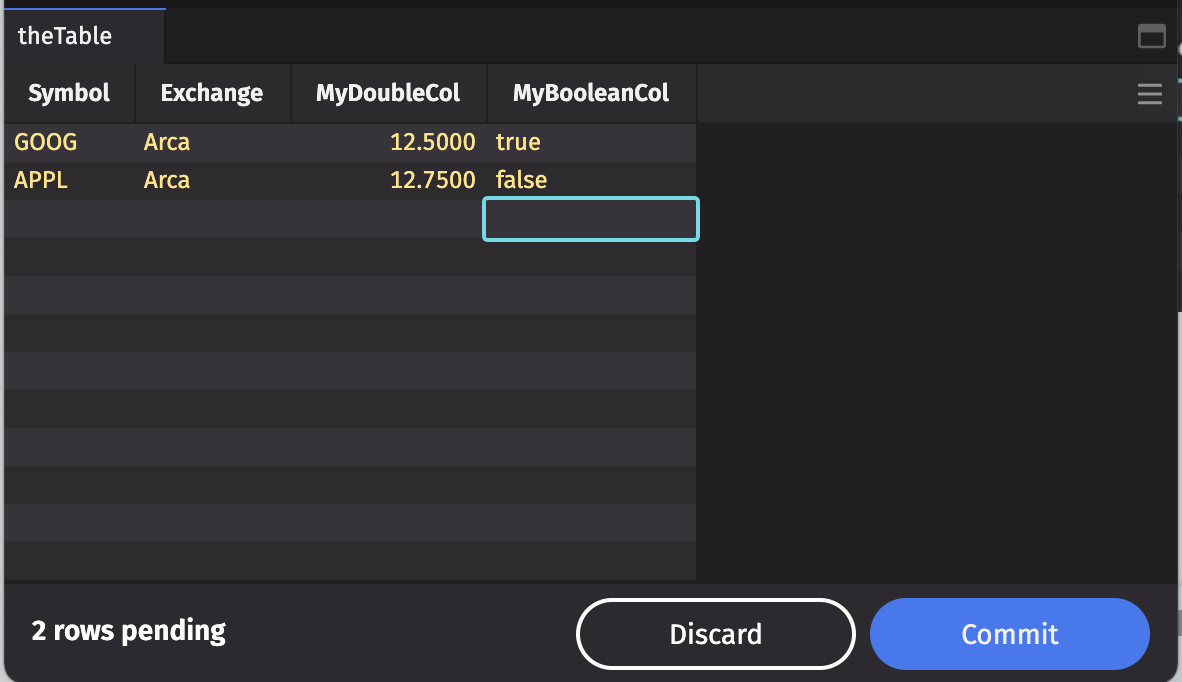
Input tables will automatically contain a number of empty rows. Click on a cell to start editing, and type the desired values directly into the cell:
Note that the value entered will appear in red if the value is invalid.
Click the Commit button at the bottom of the table to save pending changes, or the Discard button to discard pending changes.
You can also copy and paste values into single or multiple cells. In the example below, a row has been copied from another spreadsheet, and pasted into Deephaven.
- Paste into the first cell of a row to populate that entire row, or select the entire row.
- Note that the range of values must be the same, and the values must be valid. Otherwise, relevant error messages will appear.
- As before, click Discard or Commit to discard or save pending changes.
Via query
You can add to the Input Table by passing a table with the new rows to the InputTable.add() method.
Note
If the Input Table already has rows for any of the keys in the new table, the new rows will replace the old ones.
To add one row to the table, use the following syntax:
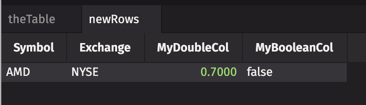
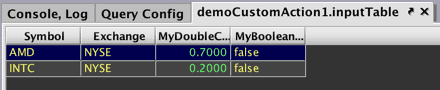
Let's say we add another new row, for the Symbol GOOG:
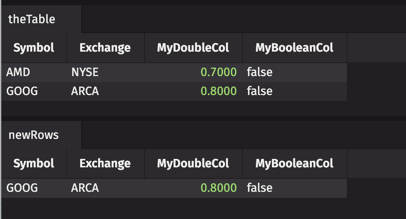
Remember that key column values must be distinct. If we add a new row for the Symbol GOOG, on the same exchange (ARCA), the new information in the value columns will actually replace the current GOOG row:
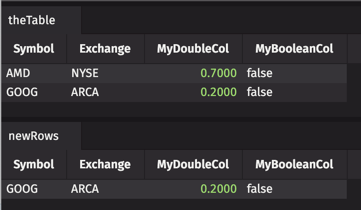
When the table loads, it still has two rows. However, the value in MyDoubleCol has changed from 0.8 to 0.2.
Working with Input Tables
Input tables can be edited directly using your cursor or keyboard shortcuts, as discussed below.
Select cell(s)
You can select one or more cells in an input table. Click on a cell and drag your cursor to select a range, leaving the cursor in the focused cell where the selection began.
| Keyboard shortcut | Action |
|---|---|
| Shift+Click | Extends the current selected range, leaving the cursor where the selection began. |
| Ctrl/Cmd+Shift+Click | Keeps all existing selections, and extends the last made selection, leaving the cursor in place. |
| Arrow keys | Moves the cursor, leaving only a single cell selected. |
| Ctrl/Cmd+Arrow key | Moves the cursor to the end of the table in that direction. |
| Shift+Arrow key | Extends the current selection, but leaves the cursor where it started. |
| Ctrl/Cmd+Shift+Arrow key | Extends the current selection to the end in that direction, but leaves the cursor where it started. |
Edit cell(s)
Double-click a cell to start editing. Typing within an existing selection edits the focused cell. Pressing Enter commits your changes and moves the cursor to the next cell.
Note
Only value cells can be edited. Double-clicking within key column cells is disabled.
| Keyboard shortcut | Action |
|---|---|
| Arrow keys | Move within text in the focused cell. |
| Backspace / Delete | Clears the cell. |
| Enter | Commits change. |
| Escape | Cancels change. |
Copy cell(s)
After making a selection, cells can be copied to the clipboard by:
- Ctrl/Cmd+C
- Right-clicking within the table
Caution
Copy fails if multiple ranges are selected that are invalid (e.g., a different number of rows/columns).
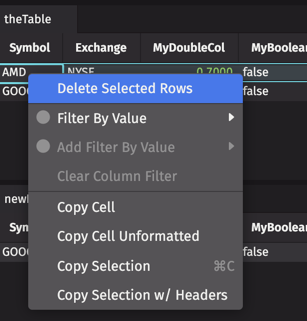
Delete rows(s)
Entire rows can be deleted by right-clicking within the table:
Input Table Log
To access the underlying live table from the database directly, use the following syntax:
rawInputTable = db.i("InputTableTest", "MyTable").where()
This table includes the full audit log of the Input Table:
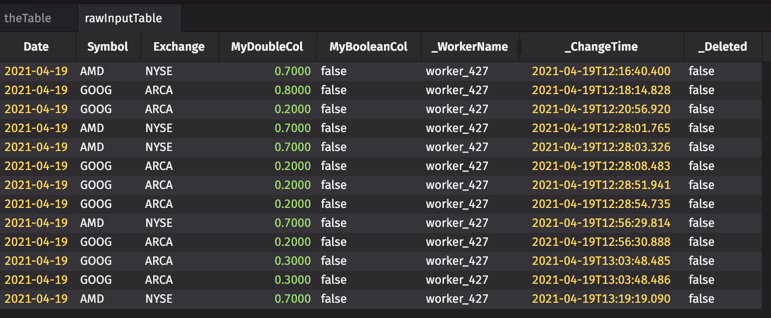
Note: _ServerHostName and _ClientHostName columns have been manually hidden.
The raw data creates an audit trail for the Input Table, and tracks any changes made. rawInputTable shows the rows added, edited, and deleted in the examples above.
Add value columns
To add or remove columns to/from an existing Input Table, the table's schema needs to be modified. Note: key columns cannot be replaced or removed.
There are two methods available that must be applied to the InputTableObject:
.addColumns(["Col1", "Col2", "Col3"] as String[], [int.class, String.class, boolean.class] as Class[]).addColumns(Map <String, Class>)
To demonstrate these methods, first let's open the Input Table we created earlier:
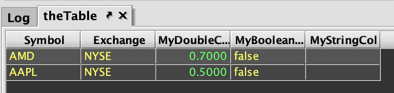
The following example adds a fifth column, MyStringCol to TestTable using the first method noted above:
The .addColumns method defines the name of our new column as String and its type.
Then we need to reload the table:
The second method noted above creates a map and then adds the map to the Input Table. For example, we can define two new columns, then add the map to InputTableObject as follows:

Remove value columns
To add or remove columns to/from an existing Input Table, the table's schema needs to be modified. Note: key columns cannot be replaced or removed.
The following method permanently removes a column from an Input Table:
.removeColumns("colName")
For example, to remove MyBooleanCol from TestTable, we again need to modify the InputTableObject and reload theTable:

After tables are modified with any of the methods shown above, they will no longer be compatible with earlier versions of the table. Users should take care to create back-ups of their existing Input Table data in IntradayUser, and the Config table in IntradayUser/_DbConfig/2. To do so, tar/gzip the directories that contain them.
Custom Actions
A Custom Action is a block of custom code (a Groovy closure) that can be run from a table's context menu. Because Custom Action code runs in the Deephaven console, it is aware of the rows the user has selected, and can prompt for additional inputs. This is especially useful for updating Input Tables where combining the user's selection, the user's input, and query data allows sophisticated settings and calculations stored in Input Tables to be easily adjusted on the fly. The values in the Input Table, in turn, can drive further analyses.
Note
See: Custom Actions
Warning
Custom Actions must be added to a persistent query.
Examples
Add rows
The following example enables a Custom Action to add rows to the Input Table:
- The first line of the query above opens the Input Table we created earlier: MyTable in the InputTableTest namespace.
- The next line defines the Custom Action called myAction.
- Inside the closure, the query includes the syntax to add a row to the Input Table.
addCustomActionthen adds the action to our Input Table and names it "AddRows."
Once the Custom Action is added to the persistent query associated with an Input Table, it will be included in the right-click table data menu:

Select AddRows and the row specified in the Custom Action appears in the table:
Delete rows
You can add more than one Custom Action to your persistent query. The following syntax can be joined to our first example persistent query, and enables a user to delete rows in the Input Table.
After running the persistent query, select the rows you wish to delete from the Input Table and right-click within the table data. The context menu now includes DeleteRows:
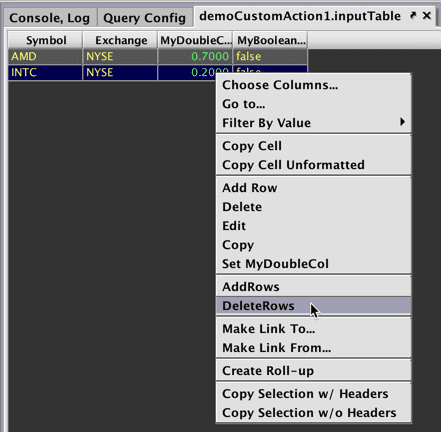
Select DeleteRows and the highlighted row(s) will be removed from the table.

Check Threshold
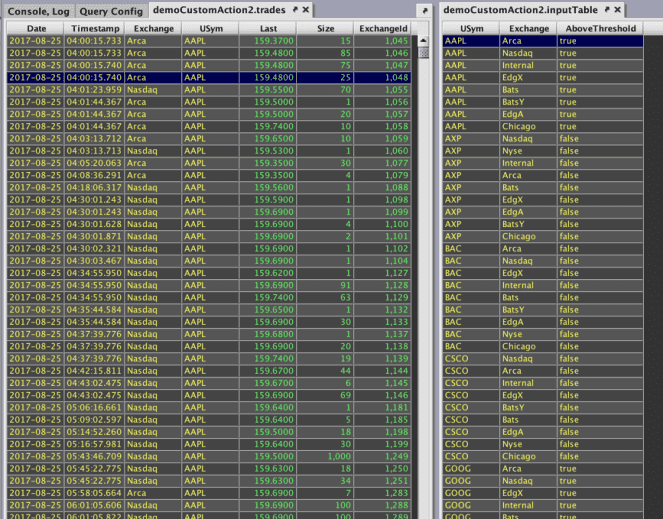
The following Custom Action example query modifies the Input Table based on another Deephaven table. The Custom Action checks whether or not each USym on each Exchange reached a price threshold that a user specifies, and sets "true" or "false" appropriately in an Input Table.
- The first line of this query imports
JOptionPane, which contains methods for user input, and is required for the Custom Action to function properly. - The second line of the query creates the trades table.
- Next,
CustomActionTableand its associatedinputTableObjectare created in the InputTableTest namespace. This table will include two key columns, USym and Exchange, and one value column, AboveThreshold, that will show either "true" or "false". - The fifth line of the query creates inputTable in the console.
- The sixth line of the query defines the Custom Action. As mentioned earlier, JOptionPane contains the method
.showInputDialog, which creates a dialog window prompting users to enter a value ("Threshold:"). The Custom Action will check whether or not each row in the table has reached the threshold entered by the user. This formula is contained in the variable usymExchangeCheck, and added as an attribute to the Input Table. - Finally, the Custom Action named "Check Threshold", which does not require a selection in the table, is added to the trades table.
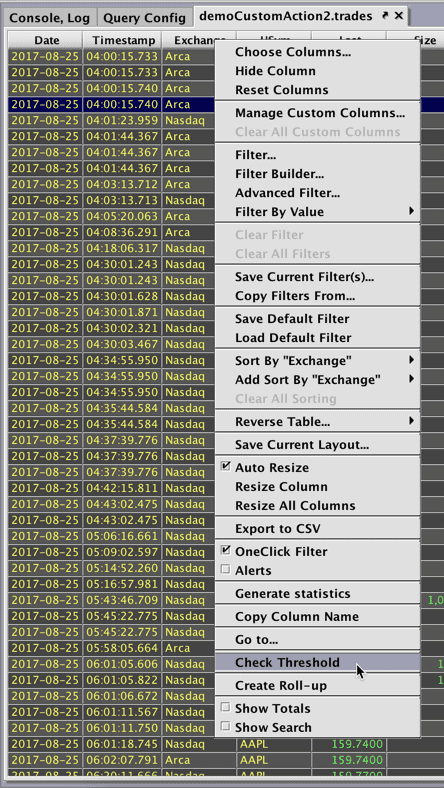
The Custom Action Check Threshold is available in the right-click column header menu for the trades table:
Select Check Threshold. The Input dialog window opens prompting users to enter a value in the Threshold field.
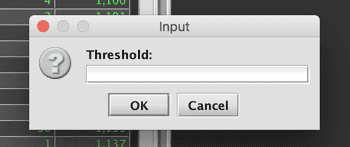
To test the function, let's enter 100 into the Threshold field and click OK. Deephaven will then check if each row in the trades table is above the value entered, and add the results to inputTable. For each USym on the distinct stock exchanges in the table, the AboveThreshold column indicates "true" when above the specified threshold, or "false" when equal to or below that threshold.
Replace the Input Table
It is possible to replace the entire table at once using the InputTable.replace() method in a query. Any keys that are currently in the Input Table, but not in the new dataset, will be removed.
This query replaces the data in MyTable in the InputTableTest namespace as follows:
Delete Input Tables
In order to delete all the data from an Input Table, the following syntax is used:
This removes the data, schema, and InputTable configuration.
Warning
When deleting or modifying tables that are referenced by active queries:
- Data Integrity: Changes to table data or schema may cause DIS (Data Import Server), TDCP (Table Data Cache Proxy), and/or worker mismatches.
- Runtime Errors: Queries using modified tables may fail with errors about column type mismatches or missing rows.
- Best Practice: Always ensure tables are not in use by active queries before deleting or modifying them.
- Recovery: If errors occur, the system administrator may need to restart the affected queries, TDCP, and/or DIS to restore consistency. Only restart the TDCP if restarting queries is insufficient, and only restart the DIS if restarting the TDCP is insufficient.
In-Memory Input Tables
Standard Input Tables are centrally written by the Deephaven system, are shared, and persist across query restarts. In some cases, it is desirable to have an Input Table that is editable from the Deephaven UI without storing it permanently. The KeyedArrayBackedMutableTable class provides such functionality.
To create the KeyedArrayBackedMutableTable, you must provide a table of initial values or a TableDefinition and the desired key columns. In this example, the "Symbol" column is used as the key:
The table can be edited from the UI and any changes are reflected in downstream table operations. For example, the following example counts the number of rows, sums the Boolean and MyDoubleCol columns, joins that together with the original table and calculates the percentage of the total each row represents, as well as whether the "Boolean" column represents the majority.
When using the Deephaven Classic Swing UI, the percentAndMajority table would be suitable as input for the LiveInputTableEditor widget.
Input Table Snapshotter Utility
The InputTable Snapshotter utility is used to reduce fetch-time for Input Tables with a large number of partitions. In effect, the utility will do a .lastBy() against the table, and store the latest “version” in today's partition. This ensures that we do not have to read back through all partitions when running a query against an Input Table.
In order to snapshot an InputTable, the table must be listed in:
/etc/sysconfig/illumon.d/resources/input_table_snapshotter_tasks.txt
The Namespace/TableName for each table to be snapshotted is listed; for example,
The process may be run simply as:
Each table listed within the input_table_snapshotter_tasks.txt configuration will identify if the table has been successfully snapshotted or skipped (e.g., no data since last snapshot, does not exist, etc.).
Troubleshooting
If you receive the following error:
then you may need to run the following command as DH_ADMIN_USER (default irisadmin):