Access control lists
Deephaven enables fine-grained access control to data, queries, and reports. This is accomplished through the individual authorization of users and groups, access control lists (ACLs), and account information.
There are two aspects to access control in Deephaven:
- Authentication is the verification of a user's identity.
- Authorization is verification of what permissions the user has within the system.
Authentication can be handled internally, by storing a password validation hash in the ACL store, or externally, by configuring Deephaven integration with an external identity provider. Commmon external authentication integrations are LDAP (for Active Directory or OpenLDAP), SAML (for OAUTH2 systems such as Okta), and key-based authentication using key pairs. If external authentication is in use, a new user with access to Deephaven must to be configured both in the external system and in Deephaven before they can log in and access Deephaven features.
Authorization for Deephaven is handled entirely internally. Deephaven data access rights and system privileges can be granted to individual users or groups. Groups in Deephaven are internal to the Deephaven product. Groups in external authentication systems are not currently used by Deephaven, therefore, when group-based permissions are used in Deephaven, it will be necessary to add new users to appropriate Deephaven groups regardless of what group memberships they may have in systems such as Active Directory. When using SAML, the groups from the identity provider may be synchronized to Deephaven on login.
ACL Storage
Deephaven currently has two options for managing the storage of ACL data:
- etcd, using the same etcd instance that is used to store other system configuration data.
- SQL. Either MariaDB or MySQL.
As of Vermilion+ (1.20231218), new installations default to etcd. Existing installations continue to use MySQL, unless cluster.cnf is updated. See the Customize the installation topic for details on reconfiguring a system between the two options.
Editing ACLs from the Command Line
Authorized users can edit the access settings and permissions by using the DB ACL Editor tool in the console, or through the command line tool, iris_db_user_mod. The following command will run the tool:
Running the tool with no arguments will show usage information.
The main arguments are:
--interactive- launches the tool in interactive mode. Useexitto end the session.--file <file name>- reads instructions from a file.--direct <file name>- connects directly to the back-end ACL database and reads properties directly from etcd while applying changes from a file. This is normally used when initializing basic entries for a new installation.
Most commands, e.g. -create_user, can also be run as single-line executions, non-interactively. This example will create a user named test5, assuming that user doesn't already exist, and that the system is using the default irisadmin account:
Caution
When using iris_db_user_mod, the syntax of row and column ACL filters is not validated when added or updated via the command line. Therefore, administrators should validate these ACLs by operating as an affected user and confirming the expected results.
Import and Export
The iris_db_user_mod tool can also be used to export the full ACL DB to a file, for migration or backup purposes, or import the full set from a file. The corresponding actions are -export_all_acls and -import_all_acls. These actions require a file name to be provided with the -acl_file argument.
When importing data which may already exist, the -overwrite_existing argument should be added to each line that should succeed regardless of whether there might already be a matching entry in the ACL DB. This can also be used with the -import_all_acls action. Alternatively, the -import_all_acls action can be called with the -replace_existing option.
Note
When the -import_all_acls action is executed with the -replace_existing option, all existing ACL data will be deleted before importing the new data from the file. Only the --direct option is allowed for performing imports using the -replace_existing option.
Only one of -replace_existing or -overwrite_existing can be specified in conjunction with -import_all_acls; if both are provided the command will be rejected.
Note
Actions which include argument values that contain embedded spaces cannot be submitted as single-line executions. They must use --interactive, --direct, or --file. In addition, the entire argument value must be enclosed in single ticks. This is most commonly the case for the -add_acl action, which often has a Java expression as its filter value.
Setting a Password
To set a password for a user, run the following command which reads the password from the console:
To set the password for a user without requiring console input:
Warning
If you specify a password on the command line, it is likely stored in a command history file.
Removing a user's password from the ACL database requires them to use an external authorization provider like Active Directory or SAML for password authentication:
Importing a Public Key
Deephaven allows users to authenticate with challenge-response authentication. To authenticate using challenge-response, the user must have a private key file, and the authentication server must have the corresponding public key. To generate a key file run:
You will have made two files: pub-username.base64.txt and priv-username.base64.txt. You must make sure the private
key file is not readable by other users -- it is the same as having a password to the Deephaven system.
To add the public key to the authentication server, run:
Note
You must use a full path name to the public key file for it to be found by iris_db_user_mod. After adding
the public key to the authentication server, configure your client with private key file.
Web ACL Editor
The easiest way to configure permissions in Deephaven is through the ACL Editor. To create a new ACL editor, click New at the top of your Deephaven IDE, and then select the ACL Editor from the Advanced tab:

You're now ready to start configuring permissions. Permissions can be set at two basic levels: group permissions and table Access Control Lists (ACLs).
User configuration
The Users tab at the top left of the ACL editor contains options for creating users and groups. Permissions can later be set for either individual users or groups in the Table ACLs tab.
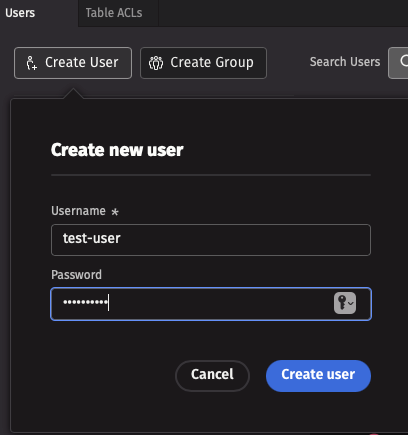
Add a user
To create a new user profile, navigate to the Users tab at the top left of the ACL editor, then click the Create User button and input a username and password.
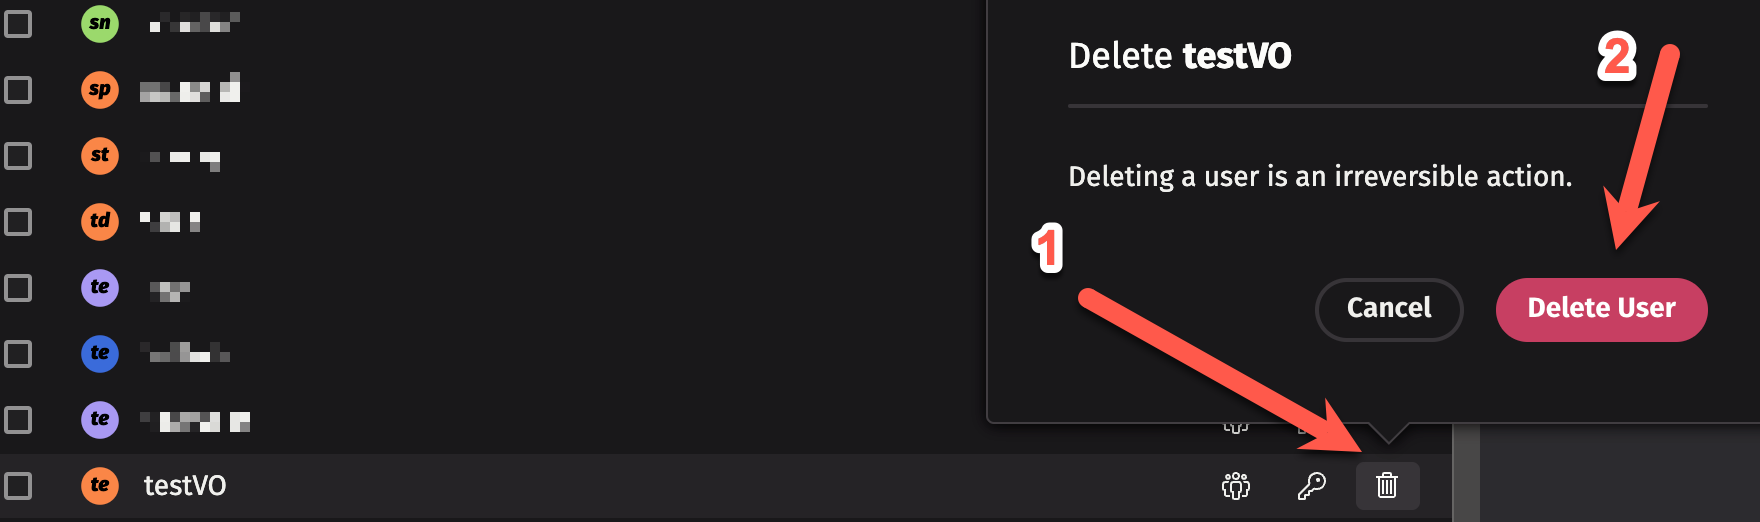
Deleting users
To delete a user, click the trash can icon next to the user's name, and then click "Delete User".
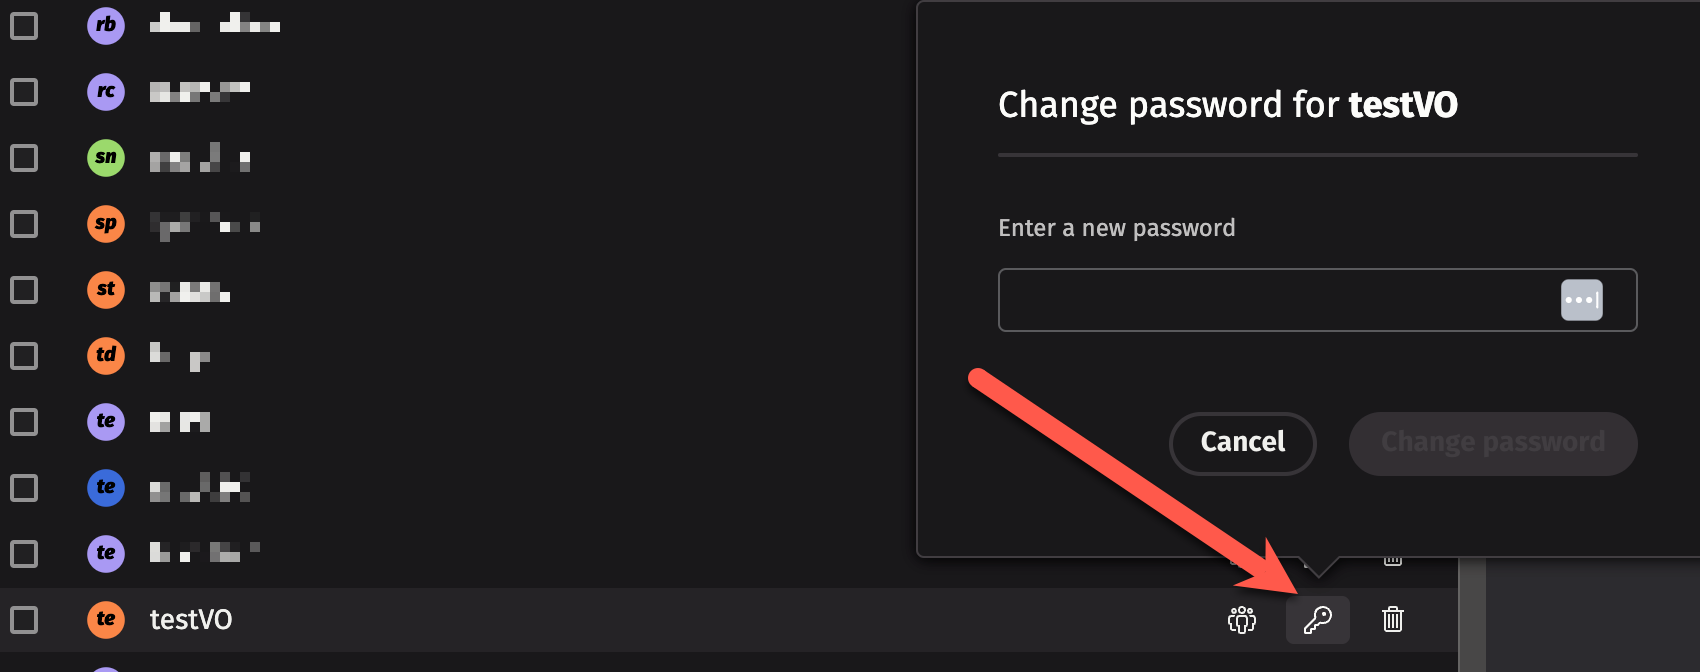
Changing passwords
Deephaven's default system configuration stores passwords (hashes) for users. In this case, if your current user profile has the authority, you can change a user's password by clicking on the key icon next to the user's name and then typing in a new password.
Note
Many installations of Deephaven do not use local passwords, but rather integrate with an Active Directory service or SAML; in these cases, changes to passwords must be made in the external system. See our guides on configuring LDAP and configuring SAML for more information.
Groups
As the name implies, a group is a collection of users. Groups are useful for assigning permissions to multiple users at once (however, you can still customize individual permissions for specific users in the group).
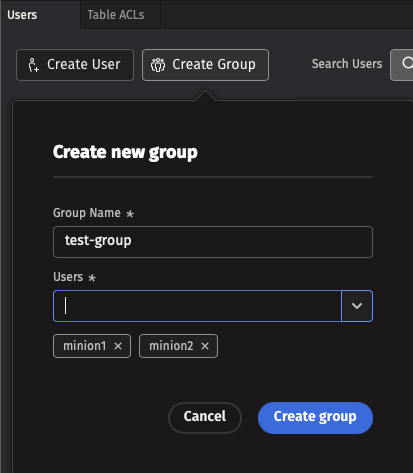
Add a group
To create a new group, click the Add Group button at the top left of the ACL Editor, and input a group name and at least one constituent user. Groups with no users cannot exist.
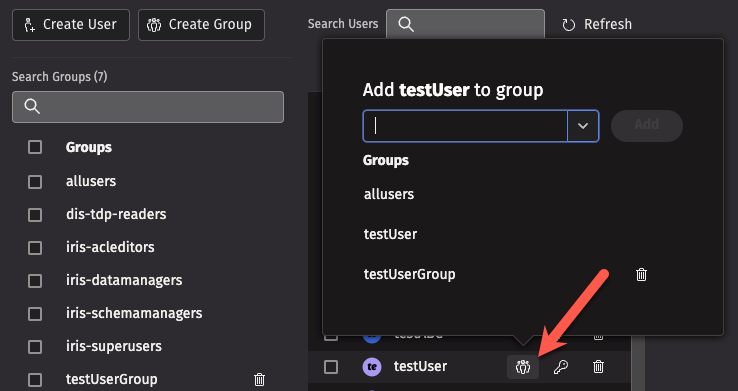
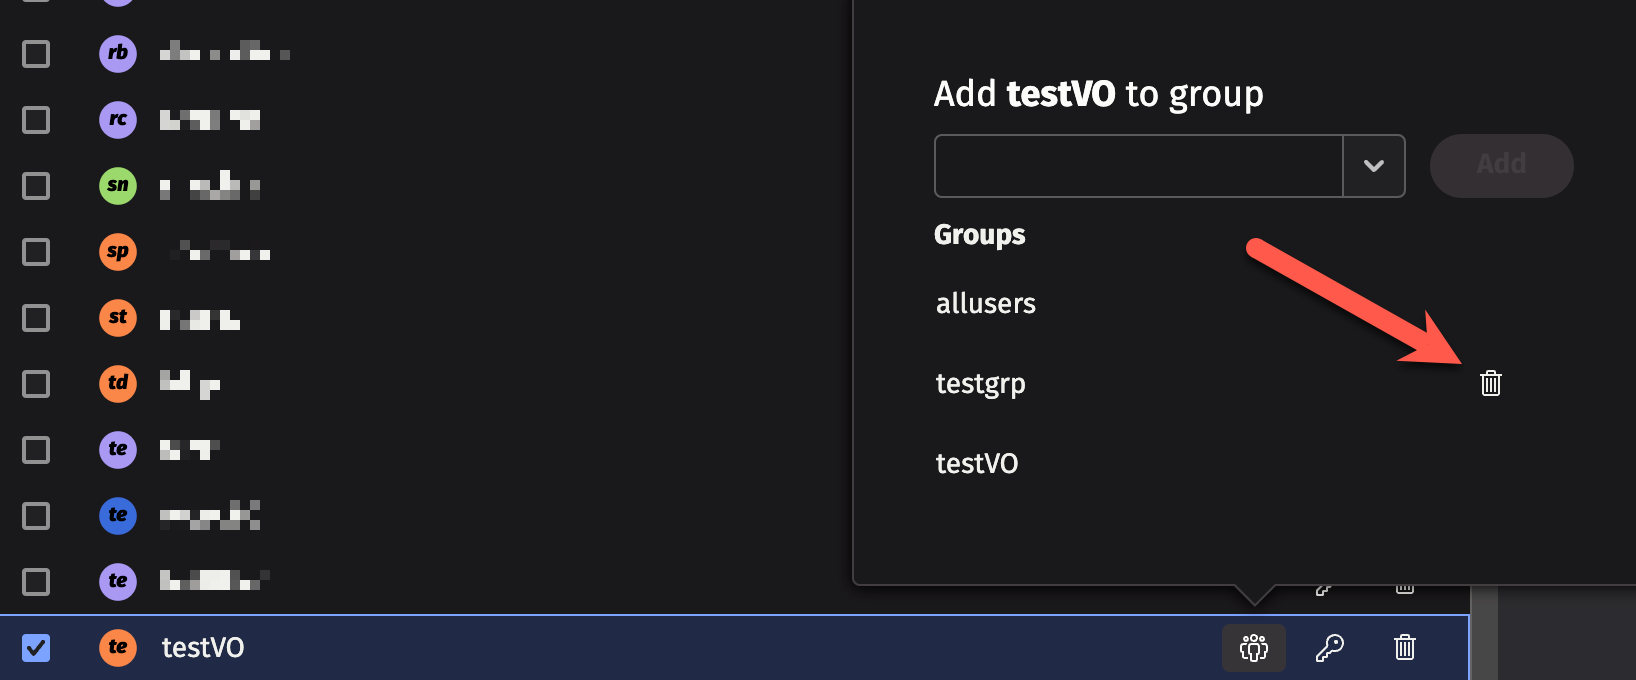
To add an existing user to a group, click on the group icon next to the user's name, and then select a group from the dropdown menu. You can also create a new group this way: just type the new group's name into the text field at the top of the dropdown menu, and then click Add.
Deleting groups
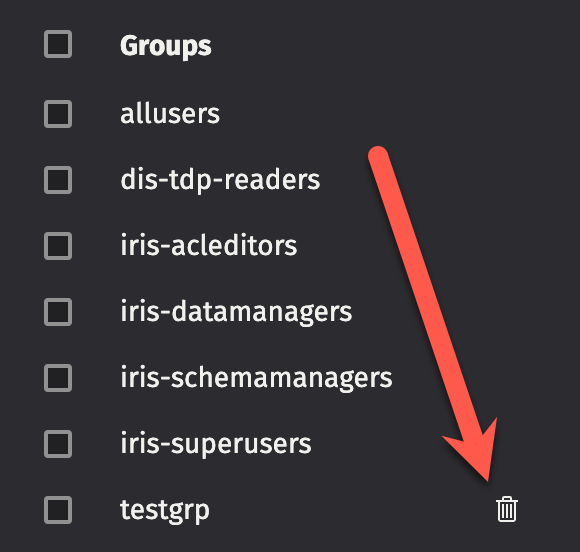
To delete a group, click the trash can icon next to the group name. Note that some special groups, like allusers, cannot be deleted.
Deleting a user from a group
To delete a user from a specific group, click on the group icon next to the user's name, and then click on the trash can icon next to the group name from which you want to remove the user.
Special groups
Deephaven installations come with a number of special groups, such as allusers and iris-superusers. Every user also belongs to a group that matches their user name. You may not add other users to that group, or create a new user that has the same name as a group.
Note
The special groups that are available in your Deephaven installation may differ from the list below, and some of the above special groups may require setup before they can be used.
The following special groups are used to provide specific access in Deephaven:
allusers- All Deephaven users are assigned to this group.- By default, members of this group may open interactive consoles and create Persistent Queries; this is considered a "full-access" group.
- The name of the group allowed to perform these operations can be changed by updating the following property:
deephaven.access.fullaccess.group=allusers - For example, to create a
deephaven-fullaccessgroup for full access, the following property could be added:deephaven.access.fullaccess.group=deephaven-fullaccess- A user not assigned to the
deephaven-fullaccessgroup would not be allowed to create Persistent Queries or start an interactive console.
- A user not assigned to the
deephaven-noninteractive- Members of this group are not able to open a console, but will be allowed access through the controller if they have the required privileges (i.e., they can start and stop workers, create queries, and so on). They will also be allowed to connect to a query if they have the required privileges for that query. See Persistent Query Access Control.- The name of the group assigned to this privilege level can be changed by editing the following property:
deephaven.access.noninteractive.group=deephaven-noninteractive - This group does not exist when the system is first installed. See: Creating a new group above.
- The name of the group assigned to this privilege level can be changed by editing the following property:
deephaven-queryviewonly- Members of this group can view queries, but are not allowed to create or edit queries.- If a user is not assigned to a different privileged group, they are presumed to be in this group (in a default installation, all users are able to create and edit queries because of the allusers group).
- The name of the group assigned to this privilege level can be changed by editing the following property:
deephaven.access.queryviewonly.group=deephaven-queryviewonly - This group does not exist when the system is first installed. See: Creating a new group above.
iris-acleditors- Members of this group can use the ACL Editor panel.iris-datamanagers- Members of this group are privileged users who can:- Create import, merge, and data validation queries, and in-worker services.
- Create live queries and batch queries to run on merge servers.
- Delete intraday data via data validation queries, or using
the data control tool (dhctl).
iris-dataimporters- Members of this group can:- Create import queries and in-worker services.
- Create live queries and batch queries on merge servers.
- Not create merge or data validation queries if they are not a member of a group with those privileges.
iris-datamergers- Members of this group can create merge queries.iris-querymanagers- Members of this group can stop and start all of the queries, but are not allowed to edit them or see the tables (unless otherwise permissioned).iris-schemamanagers- Members of this group can use the Schema Editor panel.iris-superusers- Members of this group can view, edit, start, stop, and delete any Persistent Queries and all tables within a Persistent Query.
Adding Users to Special Groups
Some special groups (like deephaven-queryviewonly) do not exist by default. However, you do not need to configure the group or do anything special to set it up - just click the Group icon next to a user's name, and type in the name of the special group that you want to add the user to. Click "Add", and the special group will be created and the user added.

View-Only Users
There may be instances when you want to share limited views of your data while keeping your queries private. You can create shared users / view-only users in the ACL Editor by adding users to the deephaven-queryviewonly ACL group:
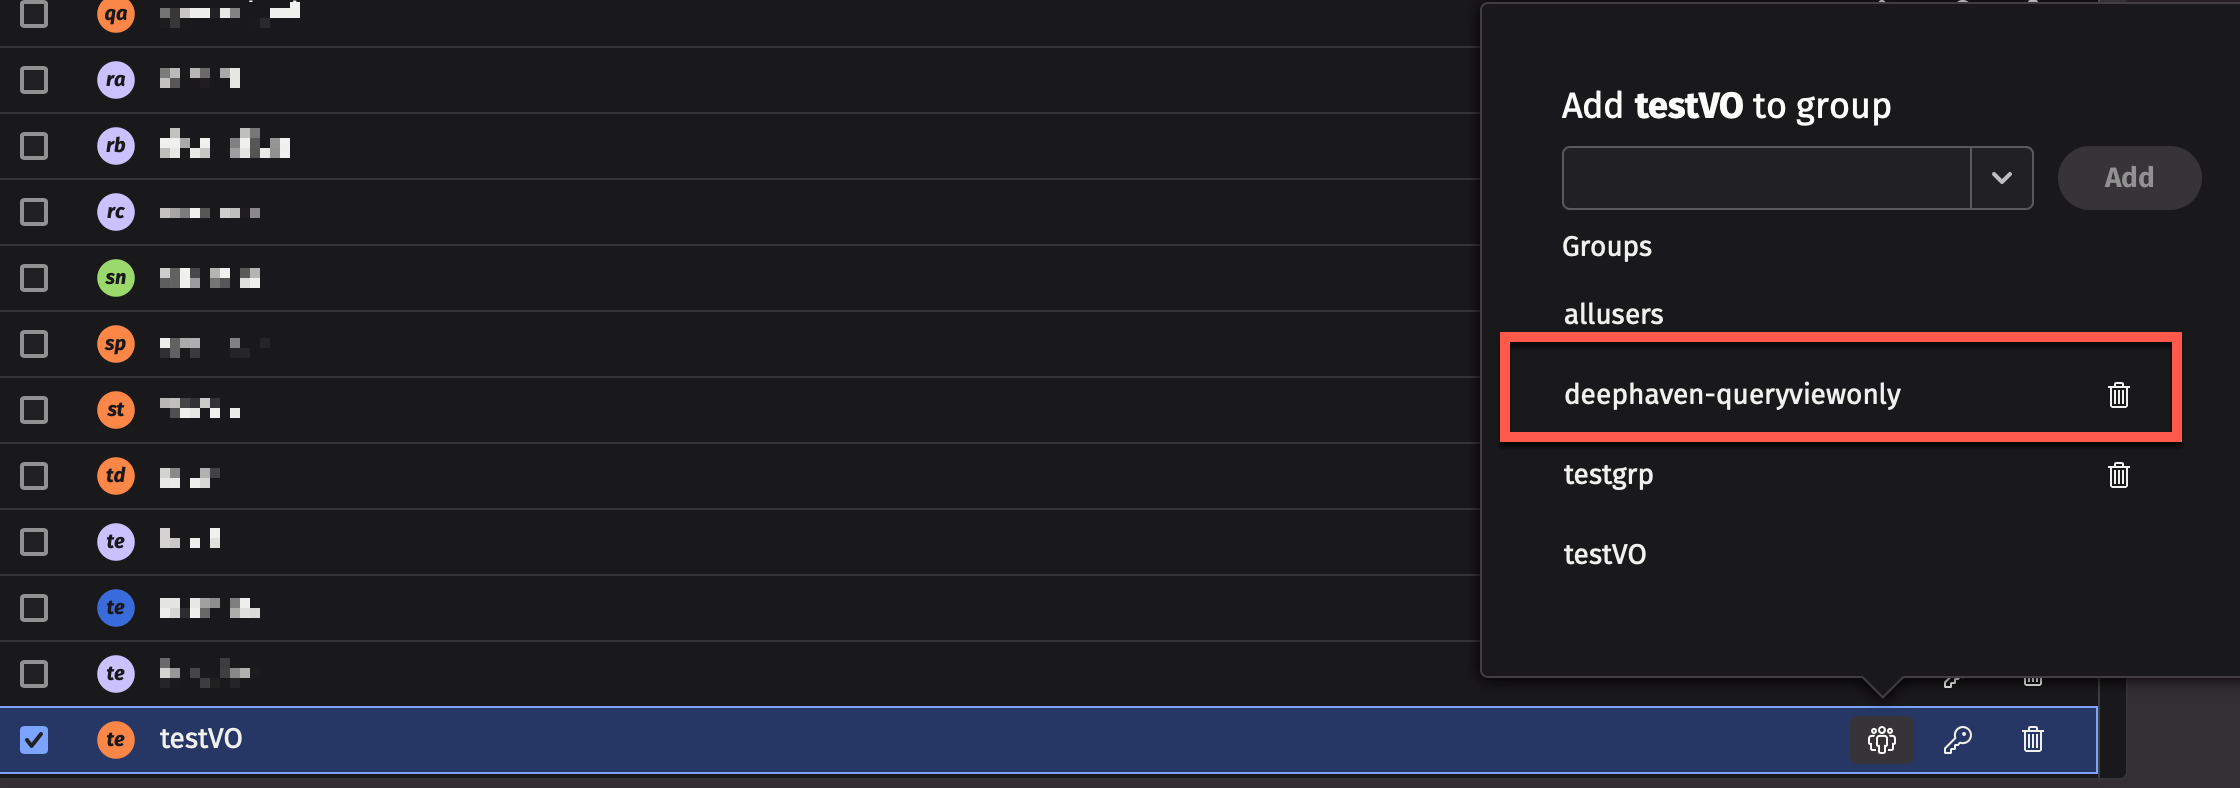
If the group does not exist yet, type deephaven-queryviewonly and click Add. This will create the group and add the user to it.
Members of this group are not allowed to create or edit queries, and can only view the specific Persistent Queries that denote them as a viewer. Permissions for Persistent Queries can be set using the Persistent Query Access Control panel in the Query Monitor.
Table ACLs
The Table ACLs allows you to configure users' access to specific namespaces and tables. You can be as broad as to give all users unrestricted access to a whole namespace, or as narrow as to only allow a user to view a single row of a single column in a single table. Before returning a table to a user, Deephaven applies all of the ACLs for that user.
By default, regular users (i.e., not part of the iris-superusers group) have very limited table access. They can access some data in DbInternal tables, such as log entries for workers that they started and for Persistent Queries that they own, and (if it is installed), they can view data from the LearnDeephaven sample namespace. All other table permissions must be explicitly granted to regular users.
Important
By default, regular users do not have access to read from any user tables.
Caution
The syntax of row and column ACL filters is not validated when added or updated via the Web ACL Editor. Therefore, administrators should validate these ACLs by operating as an affected user and confirming expected results.
Configuration
To configure the system so that users are automatically granted read access to user tables created in a namespace that matches their user name, add a table ACL that uses the OwnNamespaceFilterGenerator. This filter generator allows all users to read from any tables in a namespace that matches their user name. Typically this ACL is added for the allusers group, with * for namespace and * for table, but more restrictive ACLs can be used. One such possibility would be setting an OwnNamespaceFilterGenerator ACL for a UserTablesUsers group so that only members of that group automatically have access to user tables in a namespace that matches their user name.
Note
The namespace to user name match from the OwnNamespaceFilterGenerator is a case-sensitive match, so, User1 would not get read access to tables in the user1 namespace.
Row ACLs
Row ACLs determine the rows that a user can see in the table, but cannot change the columns that a user can see. Row ACLs are implemented with where operations automatically applied to the table.
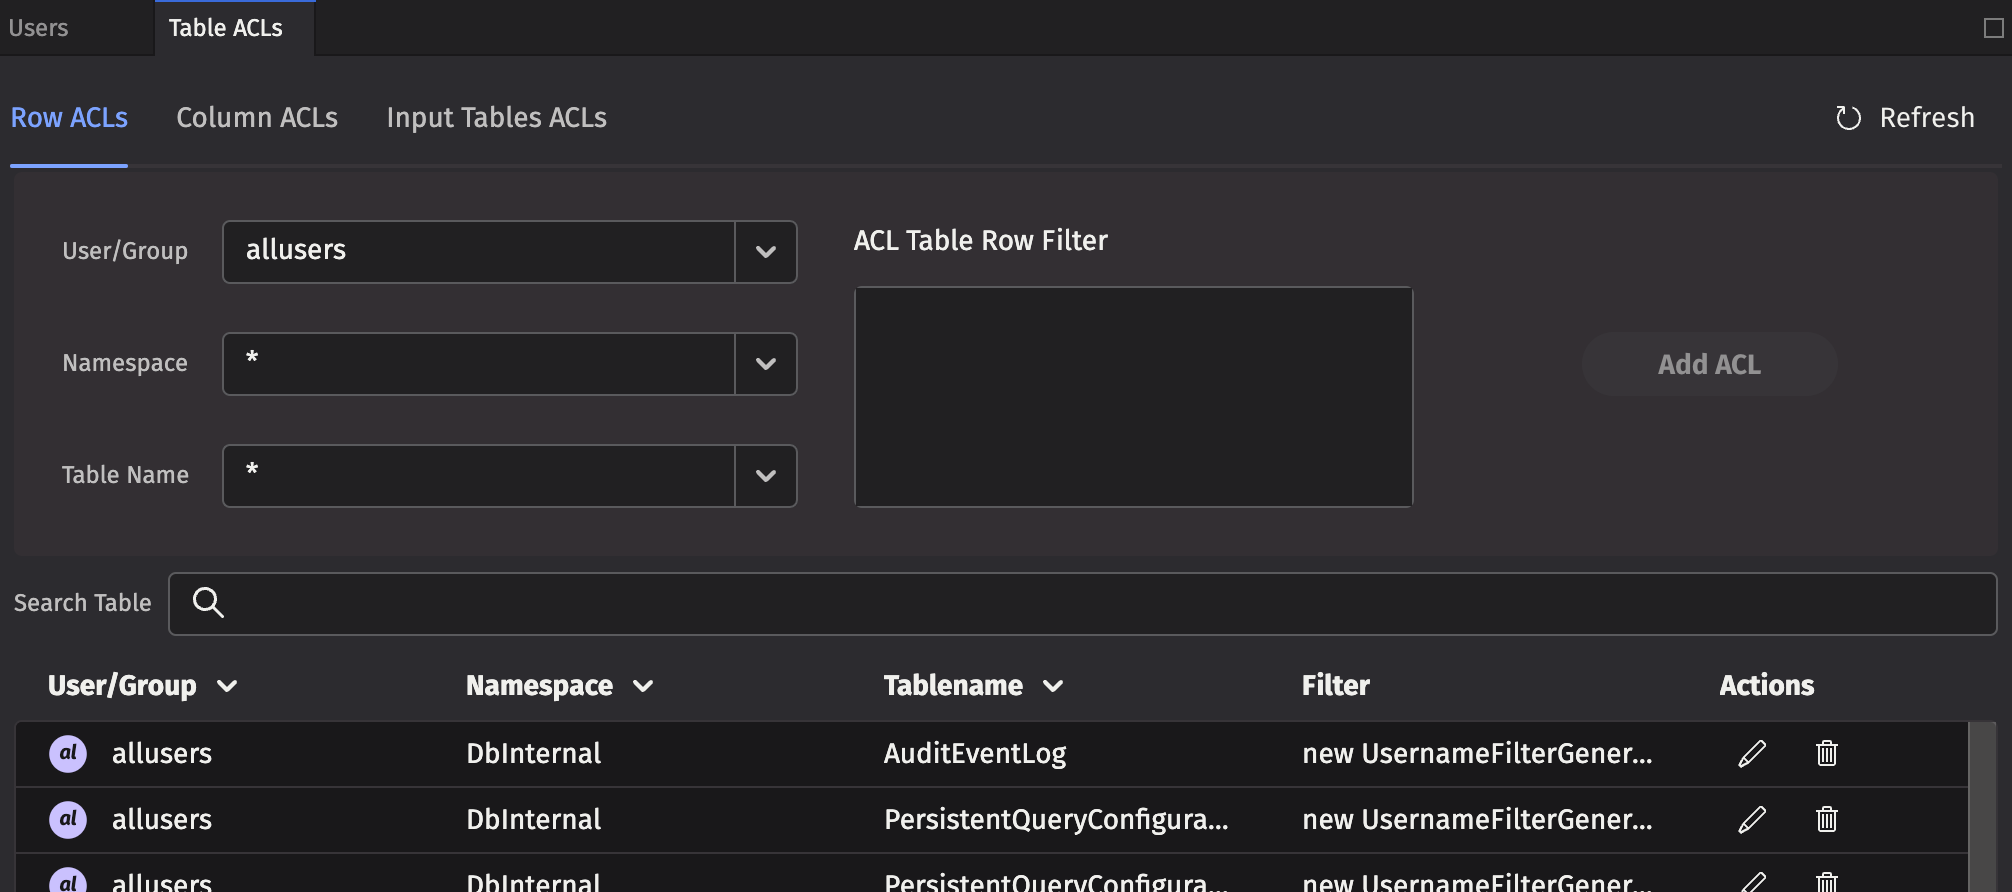
Each Row ACL consists of four components:
- User/Group: The name of the user or group to which this ACL is associated.
- Namespace: The namespace associated with this ACL, to apply to all tables. This may be the wild card
*, which means all namespaces are included. Note: If the namespace is*, the table must also be*. - Table Name: The table with which this ACL is associated. The wild card,
*, applies this entry to all tables within the namespace. - ACL Table Row Filter: A string that represents Java code to create a FilterGenerator for this table. See the syntax below for more details.
Column ACLs
Column ACLs provide administrators a way to restrict access to data on a columnar level. Column ACL data restriction manifests as actual values being replaced by null, in contrast to Row ACLs which restrict access by explicitly filtering rows out of the table. This can be useful when all users must have access to some subset of the data in all rows of a particular table. For example, a manager may need to be able to monitor the current execution of all orders within a system, but may not be allowed access to pricing data for some or all of the symbols.
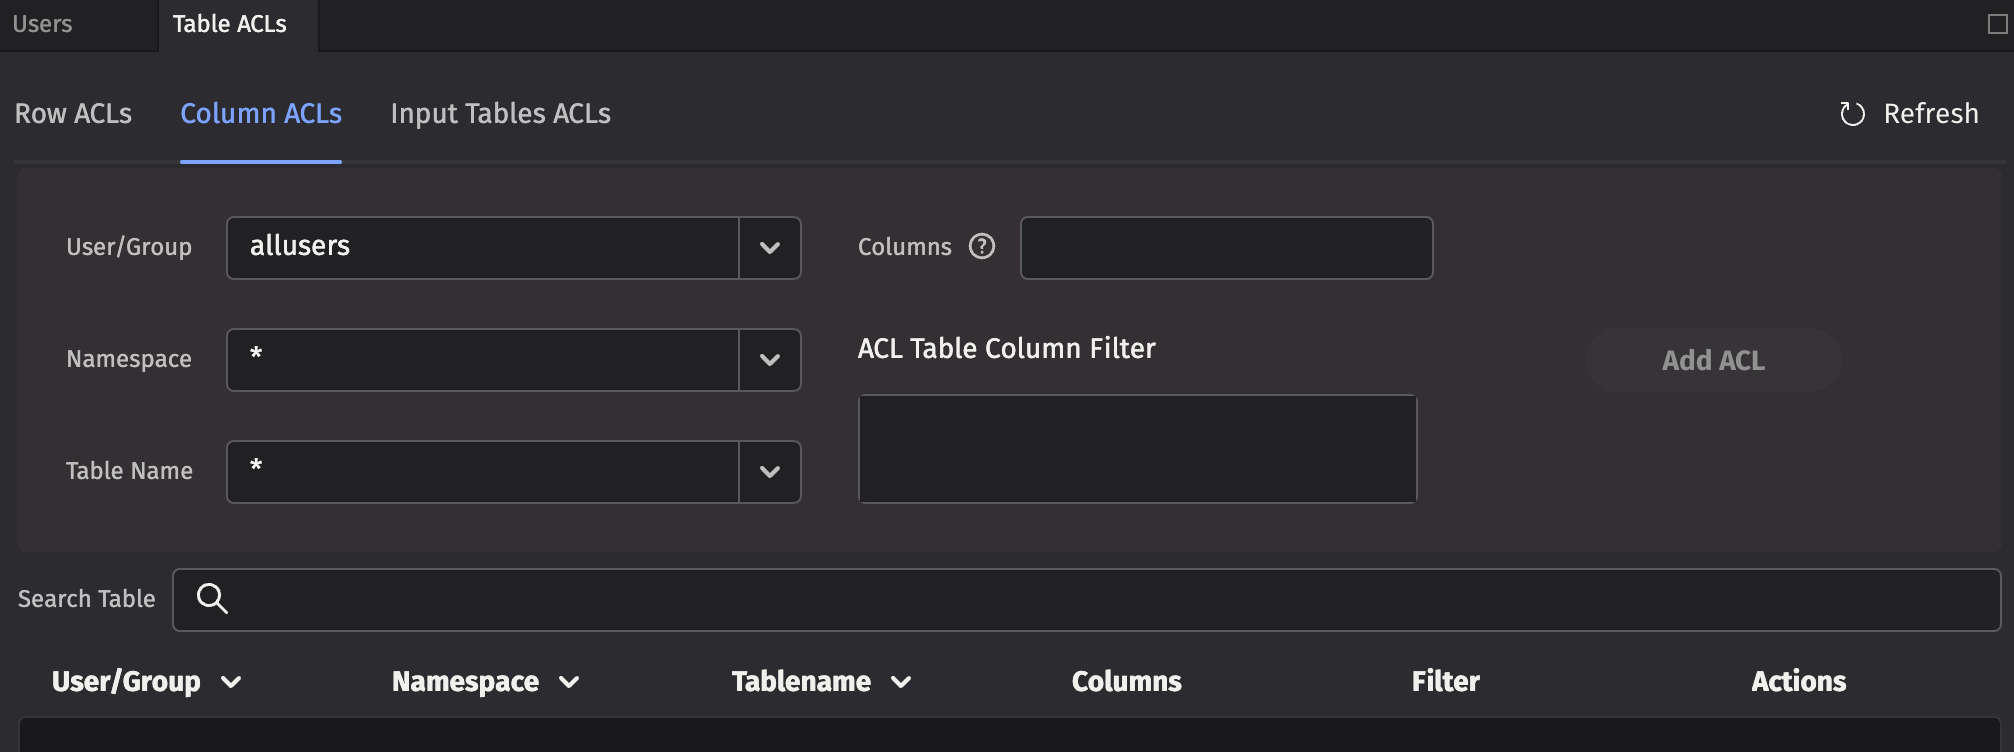
The rules for Column ACL application follow the same rules as for Table (Row) ACLs. The most specific ACL for each group is the one applied. Additionally, Column ACLs are defined with a comma-separated list of column names to which the ACL applies.
Each Column ACL consists of five components:
- User/Group: The name of the user or group to which this ACL is associated.
- Namespace: The namespace associated with this ACL, or
*for all namespaces. - Table Name: The table with which this ACL is associated, or
*for all tables. - Columns: The set of columns in the table for which this ACL applies, or
*for all columns. Note that the columns must exist for the table or tables denoted by the above parameters. - ACL Table Column Filter: A string that represents Java code to create a FilterGenerator for this table. Instead of filtering rows out like a Row ACL, matched rows permit viewing the the specified Columns. Rows that are unmatched, replace the actual column values with
nullvalues. See the syntax below for more details.
Input Table ACLs
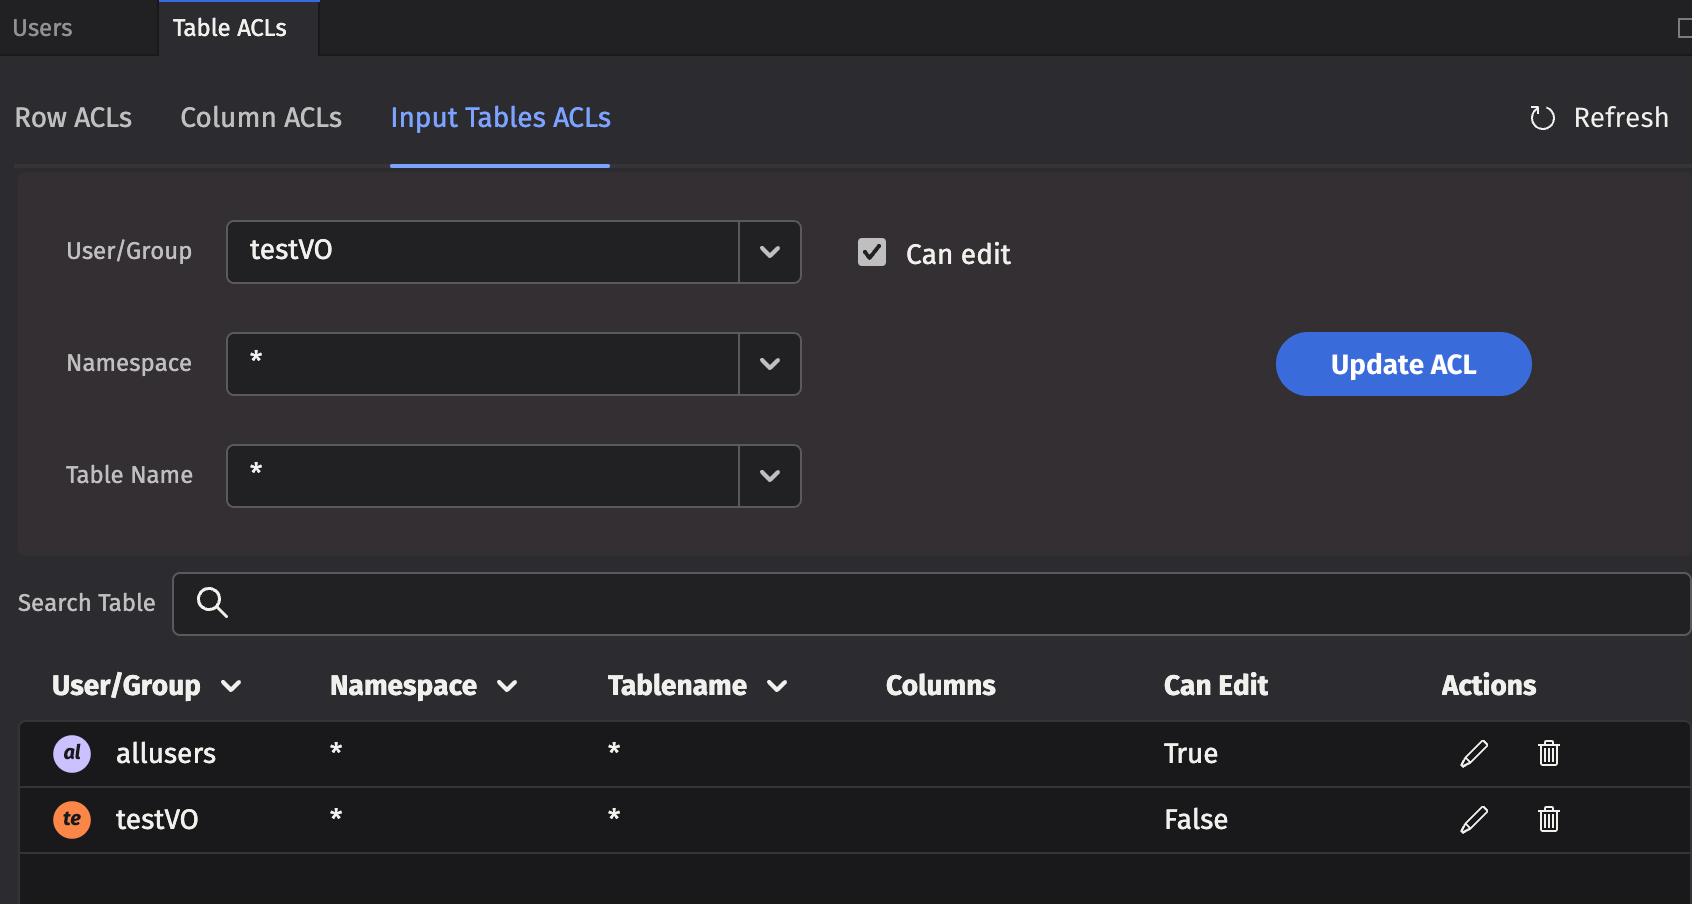
Setting the authorization for individual/group access for reading data in tables is accomplished through the Table ACLs tab. However, setting the authorization of individuals or groups to edit tables is accomplished in the Input Tables tab.
Note
When a user or group is authorized to edit a table, the entire table may be edited. Setting authorization for editing only a portion of the table is not supported.
ACL Table Filters
Using Java code to generate the filters provides additional flexibility. For example, a filter generator could be new AccountFilterGenerator(), which would filter the Account column based on the accounts for which the current user is authorized.
However, writing Java code to generate the filters can be a bit tedious, so there are two shorthand notations available:
*means that all rows in the table should be presented to the user, and- if a filter generator is of the form
whereClause(A, B), whereClause(C, D), then the rows that match (A && B) || (C && D) are available to the user.
To compute the ACLs that should be used for a given user, the following steps are taken:
- All of the user's groups are collected into a list.
- For each group, get the ACL generator for the table, namespace, or default (in that order).
- If no ACL generator was found, then deny permission.
- Run all of the ACL generators (unless one returns the empty set of filters, which means permit everything).
- If all generators returned null, deny permission (Note: If a generator returns null, that means deny; if it returns an empty list, that means permit everything).
- Apply a
.whereOneOf()operation to the table with all the returned filters.
When computing the list of ACLs for a table, the most specific ACL for a particular group is used. For example, if "UserXYZ" belongs to the groups "groupABC", "groupXYZ", and "allusers", and if the following ACLs exist:
| Group | Namespace | Table | Filter |
|---|---|---|---|
allusers | * | * | new OwnNamespaceFilterGenerator() |
groupABC | SystemEQ | PositionCache | new AccountFilterGenerator() |
groupABC | SystemEQ | * | * |
groupXYZ | SystemEQ | * | whereClause(`false`) |
Then, the ACL generators that would be used for the SystemEQ.PositionCache table are:
new OwnNamespaceFilterGenerator()forallusers, because no more specific ACL exists for that group.new AccountFilterGenerator()forgroupABC, becauseSystemEQ.PositionCacheis more specific thanSystemEQ.*(the*filter would be unused in this case).whereClause(`false`)forgroupXYZ
The OwnNamespaceFilterGenerator would return null because the SystemEQ namespace is not equal to the username UserXYZ, thus contributing no filters. The AccountFilterGenerator would return a match filter for the account column. Finally, the whereClause(`false`) produces a match filter with no results. This has the effect of allowing the user to see an empty table, but without denying permission. When taken together, groupABC could see rows in SystemEQ.PositionCache that have the appropriate accounts configured.
If any other table from the SystemEQ namespace were requested, then the SystemEQ.* ACL would be the most specific ACL for group ABC, resulting in an ACL of *, which would short-circuit further evaluation; and all rows would be visible.
Note
Adding a user to a group can only increase the permissions enabled for that user. Users cannot lose any existing permissions by being added to another group (e.g., if a group has the NullFilterGenerator() applied, any pre-existing user permissions would not be impacted.)
To add a new table filter, type the Java code into the ACL Table * Filter field and click Add ACL.
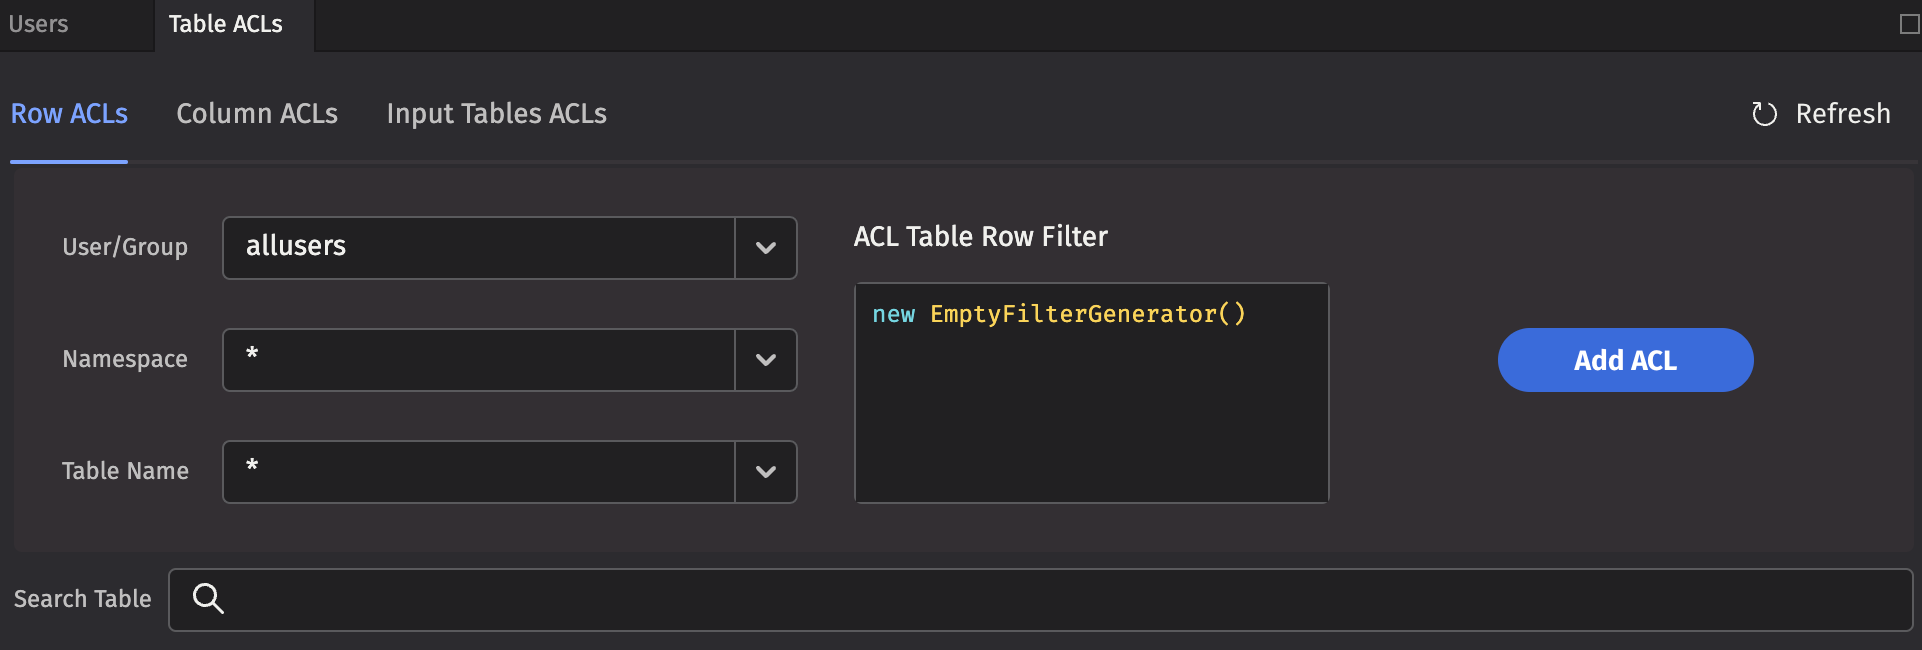
Here are Deephaven's built-in filter generators:
EmptyFilterGenerator()- Provides full access; it can be abbreviated as*.SimpleFilterGenerator()- Passes through a simplewhereclause; it can be abbreviated by using a filter generator string beginning withwhereClause.AccountFilterGenerator()- Creates a match filter for accounts for which this user is authorized; suitable for restricting position logs, trade logs, etc. to just the accounts a user should see. By default, this filters the Account column, but an optional column name can be passed into the generator.StrategyFilterGenerator()- Creates a match filter for strategies for which this user is authorized. By default, this filters the Strategy column, but an optional column name can be passed in to the generator.OwnNamespaceFilterGenerator()- Produces an empty filter (i.e., allow everything) when the namespace matches the effective user name; otherwise produces null (i.e., no filter). This allows users to have full access to their own user tables.UsernameFilterGenerator()- Creates a match filter for this user's username. By default, this filters the Username column, but an optional column name can be passed in to the generator.UserCollectionFilterGenerator()- Creates a filter for this user's username within a collection. By default, this filters the Username column, but an optional column name can be passed in to the generator. This is useful, for example if a table column contains a list of authorized users for each row.GroupFilterGenerator()- Creates a match filter for groups to which this user belongs. By default, this filters the Group column, but an optional column name can be passed in to the generator.WorkerNameFilterGenerator()- Produces a filter that matches only this worker. By default, this filters the WorkerName column, but an optional column name can be passed in to the generator. This is useful for filtering query logs.- Note: the
QueryPerformanceLog,UpdatePerformanceLog, andQueryOperationPerformanceLogcontain several user name columns which may be used for filtering in the latest version of Deephaven, so thisFilterGeneratoris no longer commonly used.
- Note: the
RequestIdFromWorkerNameFilterGenerator()- Produces a dynamic where filter based on theDbInternal.QueryPerformanceLogtable (we know the worker of a database, and this log lets us correlate a worker with a request ID). By default, this filters the RequestId column, but an optional column name can be passed in to the generator.- Note: the
QueryPerformanceLog,UpdatePerformanceLog, andQueryOperationPerformanceLogcontain several user name columns which may be used for filtering in the latest version of Deephaven, so thisFilterGeneratoris no longer commonly used.
- Note: the
NullFilterGenerator()- Provides no access to a table; only useful to override a less-specific ACL for a group.ConjunctiveFilterGenerator(fg1, fg2, ...)- Runs filter generators fg1, fg2, etc., and returns a filter that is the conjunction of the filters returned by the passed-in filter generators. You can use this to further restrict the output of another filter generator.CopyFilterGenerator(Namespace, Table)- Copies the ACLs from another table to this table.CombiningFilterGenerator(Type)- ACLs are normally applied disjunctively. In some cases, users may want to override this behavior and combine some group filters conjunctively instead. This generator is initialized with the operation type desired (Type.ConjunctiveorType.Disjunctive) and as a single methodaddFilter(group, generator)to which specific filter generators can be added. Note that this generator is intended for programmatic ACLs.
Persistent Query ACLs
Just as Access Control Lists can be applied to tables, they can also be applied to Persistent Queries. The owner of a query, as well as designated administrator groups, have full access to the query. They can see every table and are able to edit the query, restart it, stop it, etc. The owner and administrator can also select groups that can view the query. Viewer groups are not able to view the query source code, stop, start, or edit the query.
However, permissions do not carryover to the plots generated by those same Persistent Queries. To set access control for viewing these plots, you must use the setValidGroups method in the Persistent Query that generates the plot. See setting permissions for viewing plots.
Caution
Table and plot operations may or may not preserve their source's ACLs. Best practice is to apply ACLs at the end of your Persistent Query to make sure that they are not unexpectedly dropped.
Tables
As part of the Groovy code, filters can be added to tables. These filters do not take effect for the owner, admin, or members of the iris-superusers group -- only for viewers.
When no per-table ACLs are defined, the behavior of the Deephaven system is controlled by the property PersistentQuery.openSharingDefault, which defaults to true.
When PersistentQuery.openSharingDefault is true, if no filters are defined on any table, viewers can see all of the rows in all the tables produced by the query. If a filter is defined for at least one table, then viewers cannot see any tables without filters. This has the effect of making it convenient to let people see the full results of a query. Assuming care is taken to restrict part of the query, the parts that have not been addressed from a security perspective are hidden.
When PersistentQuery.openSharingDefault is false, viewers are not permitted to load any tables from the query if no filters are defined on any table. This requires explicit ACLs to be defined for all tables to be shared, but makes inadvertent sharing of data less likely.
For Core+ workers, see Table Access Control for instructions on adding ACLs to exported tables.
For Legacy workers, Row and Column filters are applied to tables using a TableFilterProvider instance, created as follows:
Operations to add Row or Column ACLs can then be chained to apply the desired permissions to the table.
Row ACLs are applied using the following method:
db- is the database objectgroupis the group to which access is provided,filter1,filter2, etc. are filter generator expressions to add (disjunctively). The format of the filter expressions is the same as for Table ACLs defined in the DB ACL Editor.
Column ACLs are applied using the following method:
Filters can be chained, for example:
In this example, group1 may access the entire table, but group2 can only view rows where A is equal to B, or rows where A is equal to C, and D is equal to E. Additionally, group3 can only view the specified rows.
Plots
The ability to see and edit Persistent Queries and the tables they generate is determined by the settings used by the query author in the Access Control tab of the Persistent Query Configuration panel. However, those permissions do not carryover to the plots generated by those same Persistent Queries.
To set access control for viewing these plots, you must use the setValidGroups method in the Persistent Query that generates the plot.
To limit viewing access to a particular plot, first write the query to create and show the plot. Then, assign the setValidGroups method to that plot.
Note
In a Python query, the setValidGroups argument must be on a separate line. Arguments to setValidGroups method include the names of the User(s) and Group(s) you want to be allowed to see the plot.
For example, the following query creates an XY Series chart to show the price of a single security (PFE) over the course of one day. No viewing restrictions are currently in place.
To set the viewing permissions for this plot, add the following line to the query.
When this query is executed in Deephaven, only User1, User2, and individuals included in Group1 would be allowed to open and view the plot using the Show Widget button in the Deephaven console.
For example, if User3 was not included in Group1, User3 would not be able to view PlotPFE even if User3 was authorized to view the Persistent Query and/or the tables generated by the Persistent Query.
Note
The setValidGroups method will have the same effect as the addFilter method (described above in the Tables section) in that, if used, any table without restrictions will also be hidden.
Keep in mind that the setValidGroups method does not differentiate the data shown to each user. The widget can make use of the IrisWidgetSupport getIrisUserContext method to restrict information based on the user.
The LiveWidgetVisibilityProvider interface can be implemented by a widget to restrict the set of users that can load the widget. However, it does not differentiate the data shown to each user. The widget can make use of the IrisWidgetSupport getIrisUserContext method to restrict information based on the user.