Ingest JDBC data into system tables
This guide demonstrates how to generate a schema from a SQL query ResultSet, deploy it, and ingest data from JDBC sources using the command line. These commands assume a typical Deephaven installation, a SQL Server source database, and a SQL Server table created as follows:
After creating the table, you can populate it with some sample data. For example:
Deephaven offers tools to infer a table schema from JDBC and import data using a JDBC interface. Both schema inference and data imports work with a JDBC ResultSet rather than directly with the source table. Fortunately, most JDBC drivers include detailed metadata in the ResultSet, allowing standard SQL types to be accurately mapped to Deephaven column types.
JDBC data source support
When using JDBC data sources with data import classes and worker scripts, you can specify any driver class string and connection URL. The schema discovery and data import processes rely on standard JDBC functionality, so most drivers are compatible.
For JDBC, a limited set of data sources are currently available through the GUI. Each driver has a name displayed in the JDBC persistent query panel, and a required driver class that Deephaven will use to connect. These data sources have been tested and their typical drivers are known to support features needed for schema discovery and data import.
| Database | Name | Driver Class |
|---|---|---|
| MySQL/MariaDB | MySQL | com.mysql.cj.jdbc.Driver |
| Amazon Redshift | Amazon Redshift | com.amazon.redshift.jdbc.Driver |
| Microsoft SQL Server | SQL Server | com.microsoft.sqlserver.jdbc.SQLServerDriver |
| PostgreSql | PostgreSQL | org.postgresql.Driver |
Deephaven does not distribute the driver JARs for these databases so you will need to provide them for the databases you'll be connecting to. Place the JAR files in the following directory on each Deephaven server that will perform imports (you may need to create it first):
In some cases, you may need to consult the data source's product documentation for specific instructions on connecting via a JDBC driver. For example, the data source might need to be reconfigured to allow username and password authentication from the Deephaven merge server where the import process or Schema Editor is running. Additionally, some drivers have unique requirements for the connection URL. For instance, Postgres requires the database name to be included in the connection URL, whereas MySQL does not.
Schema preparation
Note
When using recent versions of the Microsoft SQL Server driver and using self-signed certificates for SSL connections, you may need to add trustServerCertificate=true to your connection URL to avoid certificate validation errors. For example, jdbc:sqlserver://1.2.3.4; trustServerCertificate=true ensures that the driver trusts the self-signed certificate.
This section outlines the necessary steps to prepare a schema, which must be completed before attempting to ingest data using either the command-line interface or the Web UI.
Generate a schema
See the Schema inference page for a detailed guide on generating a schema from a JDBC data source.
Deploy the schema
Once you have a schema file (e.g., /tmp/ExNamespace.Trade.schema), you need to deploy it. The dhconfig schema import command makes this schema definition known to your Deephaven instance.
JDBC import Persistent Query
Once you have deployed a schema, you can import JDBC data into Deephaven using a Persistent Query (PQ) configured for JDBC import. This method allows you to schedule and manage imports directly from the Deephaven UI.
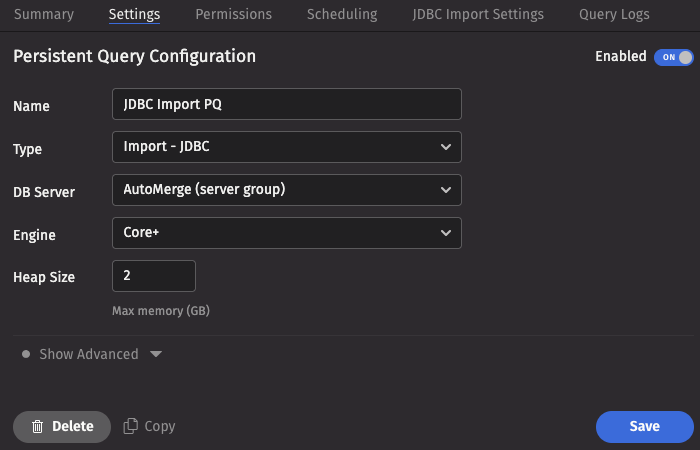
To create a JDBC Import Persistent Query (PQ), click the +New button above the Query List in the Query Monitor and fill in the options.
- Name your query appropriately, as it will appear in the Query List.
- Select the type Import - JDBC.
- Select an appropriate DB Server (import PQs must use a merge server).
- Choose the Engine (Core+ or Legacy).
- Select an appropriate value for Heap Size.
- Options available in the Show Advanced Options section of the panel are typically not used when importing or merging data.
This screenshot shows a JDBC import PQ called JDBC Import PQ using the Core+ engine.
- The Permissions tab gives the query owner the ability to authorize Admin and Viewer Groups for this query.
- The Scheduling tab provides options on when the PQ should run.
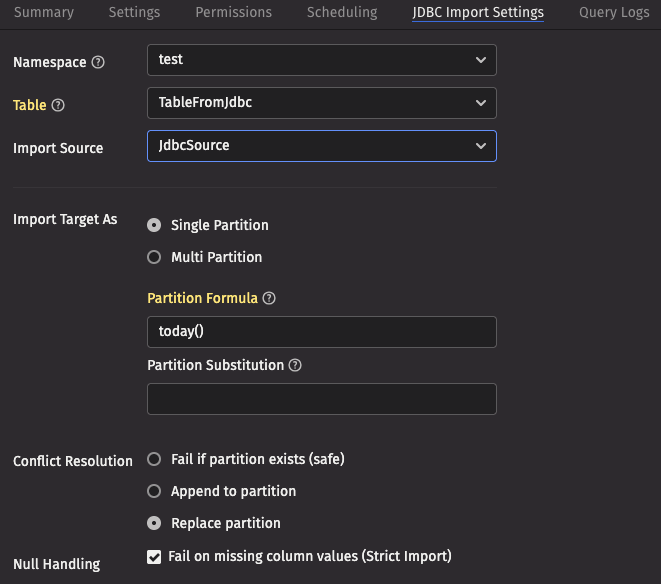
Click the JDBC Import Settings tab to choose the options pertaining to importing using JDBC.
These screenshots show the top and bottom of the panel for a table called TableFromJdbc in the namespace test, using an import source called JdbcSource.
JDBC Import Settings
- Namespace: The namespace into which you want to import the file.
- Table: The table into which you want to import the data.
- Import Source: The import source section of the associated schema file that specifies how source data columns will be set as Deephaven columns.
- Strict Import will fail if a file being imported has missing column values (nulls), unless those columns allow or replace the null values using a default attribute in the
ImportColumndefinition.
- Strict Import will fail if a file being imported has missing column values (nulls), unless those columns allow or replace the null values using a default attribute in the
- Output Mode: Determines what happens if data is found in the fully-specified partition for the data. The fully-specified partition includes both the internal partition (unique for the import job) and the column partition (usually the date).
- Safe - The import job will fail if existing data is found in the fully-specified partition.
- Append - Data will be appended to it if existing data is found in the fully-specified partition.
- Replace - Data will be replaced if existing data is found in the fully-specified partition. This does not replace all data for a column partition value, just the data in the fully-specified partition(s).
- Single/Multi Partition: Controls the import mode. In single-partition, all of the data is imported into a single Intraday partition. In multi-partition mode, you must specify a column in the source data that will control to which partition each row is imported.
- Single-partition configuration:
- Partition Formula: A formula that specifies the partition into which the data is imported. If a specific partition value is used, it will need to be surrounded by quotes. For example:
today()"2017-01-01" - Partition Substitution: A token used to substitute the determined column partition value in the SQL query, to allow the dynamic determination of these fields. For example, if the partition substitution is
PARTITION_SUB, and the query includesPARTITION_SUBin its value (e.g.SELECT * FROM SQL_TABLE WHERE DATE = 'PARTITION_SUB'), thatPARTITION_SUBtoken will be replaced with the partition value determined from the partition formula.
- Partition Formula: A formula that specifies the partition into which the data is imported. If a specific partition value is used, it will need to be surrounded by quotes. For example:
- Multi-partition configuration:
- Import Partition Column: The name of the database column used to choose the target partition for each row (typically "Date"). There must be a corresponding Import Column present in the schema, which will indicate how to get this value from the source data.
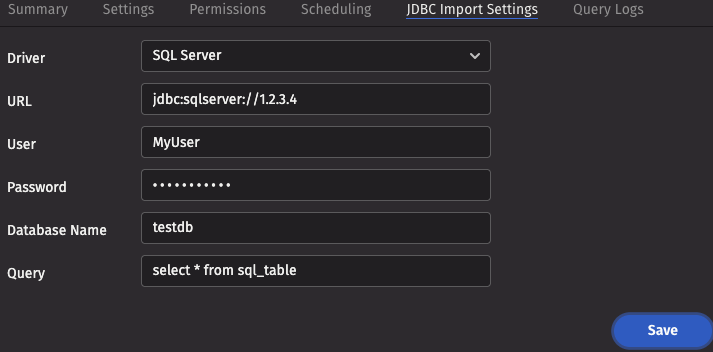
- Driver: The name of the driver needed to access the database.
- URL: The URL for the JDBC connection.
- User: The username for the remote database, if applicable.
- Password: The password for the remote database, if applicable.
- Database Name: The database or catalog name for the remote database, if applicable.
- Query: The query detailing what data you want to pull from the database.
Worker-scripted JDBC imports
Deephaven provides tools for importing using JDBC from a Deephaven Groovy script running in a Core+ worker. Compared to other methods, this permits more elaborate logic with respect to existing data. These scripts can be executed as a PQ or in a Code Studio. All imports should be performed as the dbmerge user or from a Persistent Query running on a merge server.
As with JDBC import Persistent Queries, first ensure that your driver JAR file is available in the importer's classpath.
Example
The following Core+ script imports from JDBC to a specified partition. Update the driver, URI, user, password, and query as needed.
For further information on the Builder, see the API docs for the io.deephaven.importers.jdbc.JdbcImportOptions.Builder class.
Command-line import
Warning
Command-line CSV imports with iris_exec are deprecated and will be removed in the release after Grizzly Plus.
sudo -u dbmerge /usr/illumon/latest/bin/iris_exec jdbc_import <launch args> -- <jdbc import args>
Example import command
The following example imports data from the JDBC source into the specified intraday partition, using the schema file generated in the previous step.
This example imports data into the ExNamespace.Trade table, using a schema that was previously generated (e.g., via schema_creator which would place the schema file in a directory for the namespace) and deployed. Once the schema is deployed, this command can be used to import data from the JDBC source.
JDBC Import Arguments
The JDBC importer takes the following arguments:
| Argument | Description |
|---|---|
| Either a destination directory, specific partition, or internal partition plus a partition column must be provided. A directory can be used to write a new set of table files to a specific location on disk, where they can later be read with TableTools. A destination partition is used to write to intraday locations for existing tables. The internal partition value is used to separate data on disk; it does not need to be unique for a table. The name of the import server is a common value for this. The partitioning value is a string data value used to populate the partitioning column in the table during the import. This value must be unique within the table. In summary, there are three ways to specify destination table partition(s):
|
-ns or --namespace <namespace> | (Required) Namespace in which to find the target table. |
-tn or --tableName <name> | (Required) Name of the target table. |
-om or --outputMode <import behavior> | (Optional):
|
-rc or --relaxedChecking <TRUE or FALSE> | (Optional) Defaults to FALSE. If TRUE, will allow target columns that are missing from the source JDBC to remain null, and will allow import to continue when data conversions fail. In most cases, this should be set to TRUE only when developing the import process for a new data source. |
-sn or --sourceName <ImportSource name> | Specific ImportSource to use. If not specified, the importer will use the first ImportSource block that it finds that matches the type of the import (CSV/XML/JSON/JDBC). |
-jd or --jdbcDriver <class name> | Class name of the driver to load to connect to the data source. See below for more details. |
-cu or --connectionUrl <JDBC URL> | Information needed to find and connect to the data source. See below for more details. |
-jq or --jdbcQuery <query string> | The full query string to execute against the data source. In most cases, this will need to be delimited with double-quotes. |
The schema of the target table will be used to select default setters for the transformation of incoming data if there are no ImportColumns to provide other instructions. For example, if the source column is a string, but the Deephaven table column is designated as integer, the importer will attempt to cast the data as integer.
- The driver will need to be available from the
classpathof the importer.- Examples of driver classes are:
com.microsoft.sqlserver.jdbc.SQLServerDriverfor Microsoft SQL Servercom.mysql.jdbc.Driverfor MySQL
- Examples of driver classes are:
- The
connectionURLwill include things like server name, port, authentication, etc, that will vary depending on the type of data source being used. - An example of a SQL Server URL for a local, default instance, using integrated Windows security, might be something like the following:
jdbc:sqlserver://localhost:1433;databaseName=Sample;integratedSecurity=true
- Other sources may be a bit different. For example, a sample MySQL
connectionURLfollows:jdbc:mysql://localhost:3306/Sample?user=root&password=secret
The SQL query format will also vary depending on specific language capabilities and expectations of the data source. However, the resultant columns should match the column names in the target table. Most SQL dialects will allow columns to be calculated or labeled as part of the query, and the importer will match columns based on the resultant labels. Rather than just directly matching result set column names to target table column names, another option is to add transformation metadata to the Deephaven schema. This allows the user to specify options like a different source column name, a different source column data type, whether a column can be null, and even custom transform functions to use during the import. See the general importer topic for a sample of schema for an import target table.
In addition to column translation features of the CSV importer, the JDBC importer will perform special handling when the source column is a Date type (JDBC DateTime, Date, or Timestamp), and the destination is an Instant. This handling will attempt to do direct conversion between date values.
Warning
After completing a JDBC import, you must run a rescan command for the imported data to become available in Deephaven. The Data Import Server (DIS) will not automatically detect the new data.
Run this command to rescan a specific table:
See the Data control tool rescan documentation for more details.