Version: Python

How to display tables in an Inline Frame

In this guide, you'll learn how to create a basic web page with embedded tables and charts from Deephaven using Inline Frames (IFrames). In addition to the Deephaven Web UI, the Deephaven server also provides endpoints for fetching individual tables or charts. Add the following script using Application Mode to run through the examples below:

from deephaven import time_table
from deephaven.plot import Figure

# Create a ticking table with x and y values showing a sin wave
sin_table = time_table("PT1s").update(["x=i", "y=Math.sin(x)"])

# Create a plot displaying the sin_table data
sin_chart = Figure().plot_xy(series_name="Sin wave", t=sin_table, x="x", y="y").show()

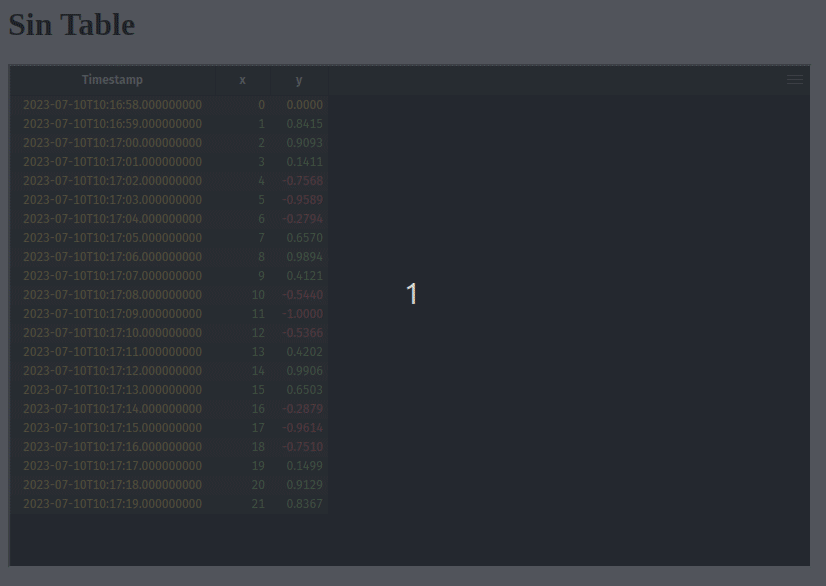
Display tables in an IFrame

Assuming your server is running at http://localhost:10000/ide/, the URL for retrieving a specific table is:

http://localhost:10000/iframe/widget/?name=TABLE_NAME

For example, to show the sin_table from the code above, the IFrame URL is http://localhost:10000/iframe/widget/?name=sin_table.

Here is a basic HTML page embedding an IFrame:

<html>
<body>
<h1>Sin Table</h1>
<iframe
src="http://localhost:10000/iframe/widget/?name=sin_table"
width="800"
height="500"
></iframe>
</body>
</html>

img

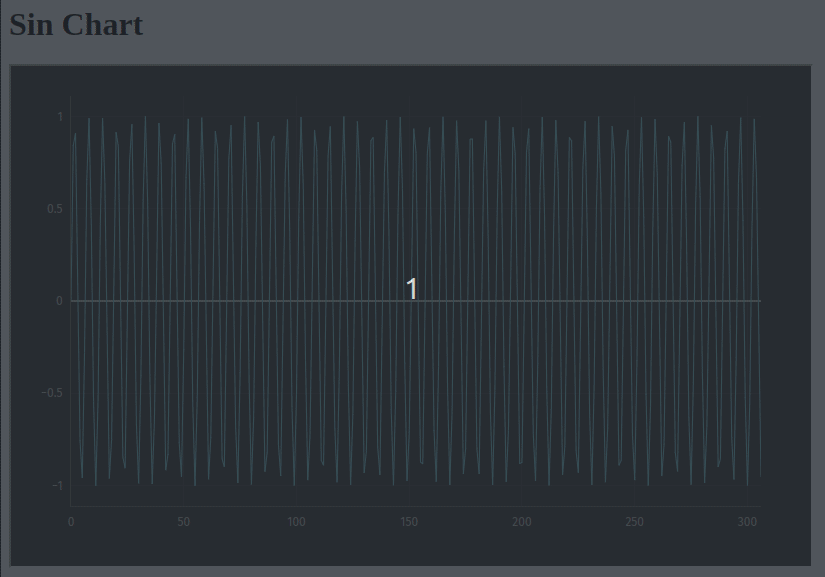
Display charts in an IFrame

Assuming your server is running at http://localhost:10000/ide/, the URL for retrieving a specific chart is:

http://localhost:10000/iframe/widget/?name=CHART_NAME

For example, to show the sin_chart from the code above, the IFrame URL is http://localhost:10000/iframe/widget/?name=sin_chart.

Here is a basic HTML page embedding an IFrame:

<html>
<body>
<h1>Sin Chart</h1>
<iframe
src="http://localhost:10000/iframe/widget/?name=sin_chart"
width="800"
height="500"
></iframe>
</body>
</html>

img

Authentication

When embedding in IFrames, you may want to provide authentication details from the parent window. This can be done by providing the authProvider=parent query parameter on the IFrame URL, and then responding to the authentication request sent by the child window.

Expand for the full html.
<html>
<head>
<script>
/**
* Listen for events on the window, sent from the IFrame
*/
window.addEventListener(
"message",
function (e) {
console.log("message received: ", e.data);
const { data, source } = e;
const { id, message } = data;

/** Only look for the login request */
if (message === "io.deephaven.message.LoginOptions.request") {
/**
* Specify the authentication type and any other parameters for logging in.
*/
source.postMessage(
{
/** Need to respond with the same message ID */
id,

/**
* payload is the login options for `client.login`.
* type: Authentication type to use
* token: Authentication token or password
* username?: Username to authenticate against
*/
payload: {
/**
* The authentication handler to authenticate with.
* See https://github.com/deephaven/deephaven-core/tree/main/authentication
*/
type: "io.deephaven.authentication.psk.PskAuthenticationHandler",

/**
* Replace this token with the token configured for the server.
* Should be kept secret.
*/
token: "hello",
},
},
"*"
);
}
},
false
);
</script>
<body>
<h1>Sin Table</h1>

<!--
The IFrame for our table.
In addition to the `name` parameter that we have specified before, we also specify `authProvider=parent`.
That triggers the embbeded IFrame to wait for login credentials from the parent window.
-->
<iframe
id="tableIframe"
src="http://localhost:10000/iframe/widget/?name=sin_table&authProvider=parent"
width="800"
height="500"
></iframe>

<h1>Sin Chart</h1>
<!--
The IFrame for our chart. We specify `authProvider=parent` here as well, and this parent window will authenticate both IFrames.
-->
<iframe
src="http://localhost:10000/iframe/widget/?name=sin_chart&authProvider=parent"
width="800"
height="500"
></iframe>
</body>
</html>

img