Streaming binary logs
This section of the crash course introduces Deephaven's binary logs (often referred to as binlogs), which are integral to handling intraday data streams within the Deephaven ecosystem.
Binlogs are specialized files designed to manage real-time or near-real-time data, particularly ticking data — information that updates continuously throughout the day. These logs provide an efficient mechanism for ingesting and processing high-frequency data.
Written in a proprietary, row-oriented binary format, binlogs are optimized for Deephaven’s performance, enabling rapid data ingestion and processing. This makes them ideal for scenarios that require fast, large-volume data throughput.
Here’s how the data ingestion process works:
- An application receives data and writes it to binlogs.
- A process called the tailer reads these files and sends them to the Data Import Server, where they are stored persistently within the Deephaven installation.
- From there, they are available to the system's users through the IDE and through clients such as the Python client.
How intraday data is partitioned
Intraday data is systematically partitioned to optimize storage and retrieval efficiency. Deephaven's partitioning strategy involves three key components:
- Column partition
- One column is chosen to partition the data on disk, determining the highest level of data segmentation. This is known as the column partition.
- Typically, the column partition is a
Datecolumn, as dates naturally distinguish intraday data from historical data.
- Internal partition
- The internal partition is simply used to separate data sources and is not crucial to this discussion.
Overview
This guide provides an end-to-end binary-logging example using a simple Java application. The basic process consists of these steps:
- Define and deploy the schemas.
- Generate the Deephaven logger classes from these schemas.
- Create the logger application to log some data for these tables.
- Compile the logger application.
- Run the logger application.
- Query the tables to see the logged data.
- Merge the data into historical.
- Validate the data and remove it from intraday.
The steps in this guide are performed on a Deephaven server. If your installation has multiple nodes, use the infrastructure node. The infrastructure node is the one that runs a configuration server.
Note
To follow along, you'll need an account with access to the Deephaven installation:
The steps below require access to a Deephaven administrative user.
- Deploy the schemas, making them available to the Deephaven installation.
- Make the compiled code available to the Deephaven installation
- Run the example program
Define and deploy the schemas
When binary logs are used for data ingestion, the first step is to define a schema. This example provides two simple schemas.
The date-based schema uses dynamic date partitioning to determine the column partition value for each logged row.
Date-based schema
namespace="ExampleNamespace"andname="LoggingDate"define the table's namespace and table name.<Column name="Date" dataType="String" columnType="Partitioning"/>sets the column calledDateas the partitioning column. This is the column used to determine the column partition value for each row.- The generated logger's package is defined by the
loggerPackage="io.deephaven.crashcourse.dynamic.gen"definition, and the class name by theloggerClass="LoggingDateFormat1Loggerdefinition. - The
Validatorsection is explained in the later validation section.
The function-based schema uses a function to determine the column partition value for each logged row.
Function-based schema
namespace="ExampleNamespace"andname="LoggingFunction"define the table's namespace and table name.<Column name="MyPartition" dataType="String" columnType="Partitioning"/>sets the column calledMyPartitionas the column partitioning column. This is the column used to determine the column partition value for each row. This is an advanced use case, as this table isn't partitioned by aDate- there's not even a column that reflects a date.- The generated logger's package is defined by the
loggerPackage="io.deephaven.crashcourse.dynamic.gen"definition, and the class name by theloggerClass="LoggingDateFormat1Loggerdefinition.
First, create schema files on disk.
Note
While there are tools that support schema discovery from existing data sources, they are beyond the scope of this example.
The example below creates simple schemas and a temporary directory to hold the schema files.
Copy the date-based schema to the server or paste it into a file there.
Copy the function-based schema to the server or paste it into a file there.
Deploy the schemas, making them available to the Deephaven system. This requires access to an operating system account with Deephaven administrative privileges, by default irisadmin.
Generate the logger classes
Next, use the Deephaven generate_loggers script to generate the Deephaven logger classes from the schemas. The logger classes are used by the application to log data to binary log files, while the listener classes will be generated as needed (not with this command) by the Deephaven Data Import Server to load the data.
First, create a local directory for use by the Deephaven code-generation scripts.
Then, call the script that generates and compiles the Deephaven logger classes.
The command includes several parameters.
-d /usr/illumon/latest/tells the scripts where to find the Deephaven installation.-f iris-common.propindicates which property file to use (this is the default file).-j -Dlogroot=${WORKSPACE}/logsspecifies a directory in which to write logs.packages=io.deephaven.crashcourse.dynamic.genrestricts the logger class generation to just the package named in the schema, ensuring it doesn't generate other loggers. Use unique names for different applications to provide an easy way to only regenerate what's needed.outputJar=exampleGeneratedJar.jarensures that the generated JAR file has a unique name to distinguish it from other generated JAR files.
The generated classes are visible in the generated JAR file.
Copy the generated JAR file to a location where it is available to the Deephaven application. This requires access to an operating system account with Deephaven administrative privileges such as irisadmin.
For application development, the JAR can be copied to a development environment such as an IDE (the application also needs access to other Deephaven JARs). The generation script also creates $WORKSPACE/IllumonCustomerGeneratedCodeSources.jar with the generated source code.
Create the logger application
Create a Java file with the application. This example simply creates one on the Deephaven server, but in a real application, this will likely be developed in an IDE using the classes generated earlier.
LoggingExample.java
The EventLoggerFactory class creates the intraday logger instances. This factory returns a fully initialized logger ready to write data. Based on properties, it can be set up to either write binary log files or send data to the Log Aggregator Service. This example writes log files directly.
- One dynamic logger is created for each table defined with the schemas, to illustrate using data to determine the internal partition value.
- When creating the
dateLogger(for rows for theLoggingDatetable with column partition values based on the timestamp field), a timestamp is taken from the current date and time. Offsets are used to generate timestamps, and records are written for yesterday and today to simulate a date rollover indicated within the data'sTimestampfield. In an application receiving data from a remote source, the timestamps are likely contained within the data. - When creating the
functionLogger(for theLoggingFunctiontable), a lambda is passed in as the final parameter of thecreateIntradayLoggercall. This example uses the first 10 characters of theSomeDatacolumn to determine the column partition value. Since a String can be null or empty, it uses a default value to ensure that an exception is not raised in this case. - A third
fixedPartitionLoggerlogger is created to write data to a single column partition value, "2020-01-31", to the sameLoggingDatetable as the date logger.
Note
This example uses hard-coded values, but a real application would generate them from its data source.
Save the LoggingExample class in java/io/deephaven/crashcourse/dynamic/LoggingExample.java:
You may need to type the following command before pasting to avoid formatting issues:
Compile the logger application
Compile the Java code, creating a JAR file that can be run.
Note
A real application would be developed in an IDE and use something like Gradle to manage dependencies, but for this example, simply compiling the Java is sufficient.
Create the compilation script which compiles the Java file and puts the resulting compiled code into myClass.jar. Copy compile.bash to the server or paste it into a file there.
compile.bash
Then run it.
Copy the application JAR file to a location where it is available to the Deephaven application. This requires access to an operating system account with Deephaven administrative privileges such as irisadmin.
Run the logger application
Since the application uses the default location to write the binary log files, access to an operating system account with Deephaven administrative privileges, such as irisadmin, is required.
Use the iris_exec script to run the program.
- It will set up the classpath so that the application can access any required Deephaven code.
- The first parameter
io.deephaven.crashcourse.dynamic.LoggingExamplespecifies the class that is run. - The extra parameter
-DLoggingExample.useDynamicPartitions=truetells the application to use the dynamic (row-based) partitioning. The-jtells the script that it is a Java parameter to be passed through to the JVM.
You can see the generated binary log files for the two tables.
The location into which these logs are generated can be changed by updating the log-related properties as defined in the Deephaven Operations Guide. Applications can be run under non-Deephaven accounts with additional tailer configuration to find them.
The following commands delete the data and start over.
Warning
The commands below perform a complete restart of the Deephaven application. They should not be used on a production system.
Query the data
The data logged by the application should now be available in Deephaven intraday. In the web IDE, create a new Core+ Code Studio.

The following statements query the two partitions of data we created with the date-based logger and the partition created by the fixed-partition logger.
The following statements query the two partitions of data we created with the function-based logger by querying the table for those specific partitions. These partitions were dynamically determined by the first ten characters of the data, so that is used in the .where clause.
At this point, you've successfully created an application that writes Deephaven binary logs, ingested them into the system, and queried the results. The rest of this guide provides optional follow-on data workflow steps.
Merge the data
Data from binary logs is always ingested as Intraday data. This isn't intended for long-term storage, so each day's data is generally merged into historical data. A typical workflow performs this merge every day, often through a Data Merge Persistent Query. This is done after the day's data is complete, either overnight or after the close of the business day.
Set up historical data storage
Before merging intraday data to historical, the disk system must be set up. Consult your administrator for permissions to do this. Here is an example bash script to create historical partitions for ExampleNamespace. This is a one-time task and further details are found in the NFS partition methodologies appendix of the architecture guide.
Create a Data Merge Persistent Query
To create a Data Merge Persistent Query, you'll need to be logged in to the Deephaven web interface as a data administrator. This example only shows the steps for the LoggingDate table.
The Query Monitor is used to create a Data Merge Persistent Query. Navigate to the Query Monitor tab and click the New button:
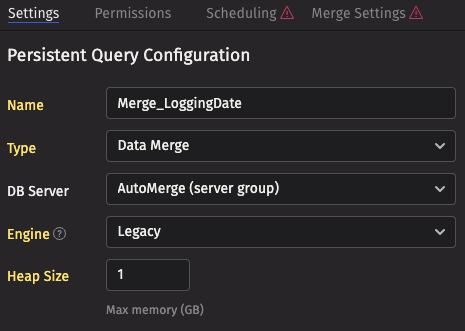
- On the Settings tab, give the Persistent Query a reasonable name
- Choose the
Data Mergetype. - Select
AutoMergefor the DB server. This tells the server to choose any available merge server (there is probably only one). - Assign it 1 GB of memory.
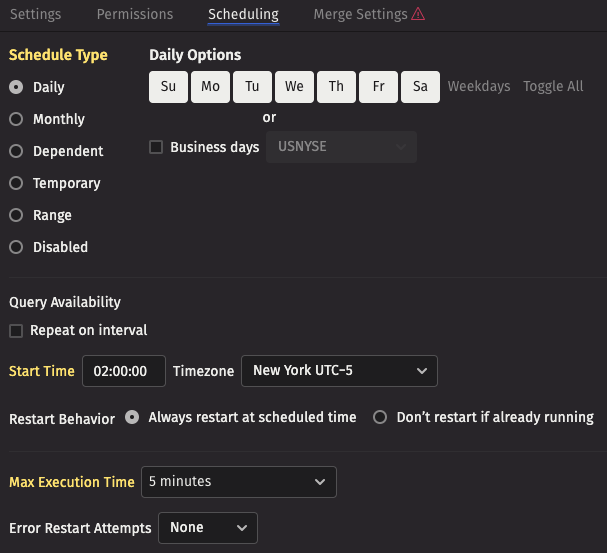
For data that is to be retained, a merge query should be set up to run every night after intraday data ingestion has completed. For this example, we'll assume the merge should be performed after midnight, merging yesterday's data. Select the Scheduling tab and update the scheduling appropriately - this example runs at 2 AM New York time every night.
- The
DailySchedule Type should already be selected. - Ensure that all the days are selected under Daily Options.
- Change the Start Time to
02:00:00. - Set the Max Execution Time to
5 minutes. If the query takes longer than 5 minutes it will fail, but this example should take a few seconds.
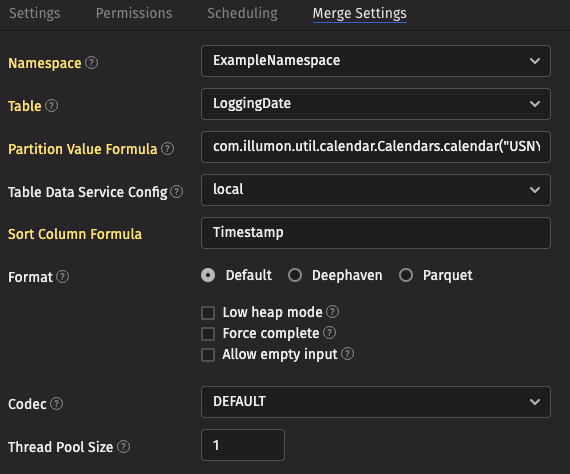
On the Merge Settings tab, choose the namespace and table name.
- The Partition Value Formula specifies the partition to be merged, and uses the Legacy engine's format. Yesterday can be written as
com.illumon.util.calendar.Calendars.calendar("USNYSE").previousDay(1). - The Sort Column Formula ensures that the merged data is sorted by the values in the specified columns -
Timestampensures that the data is sorted in time order.
Click Save.
Since the Persistent Query won't run until the early morning, we will start it manually now to see its effects. Select your query name in the Query Monitor and click the Start button.
After it completes, yesterday's data can now be viewed as historical data:
Validate and delete intraday
At this point, yesterday's data is both intraday and historical. A typical workflow then validates that the data has been written to historical and deletes it from intraday, often through the use of a Data Validation Persistent Query which runs immediately following the Data Merge persistent query. You'll need to be logged in to the Deephaven web interface as a data administrator to perform these tasks.
Click the New button.
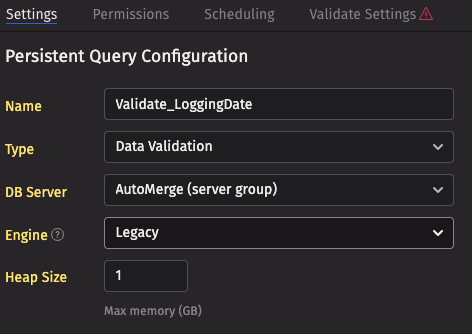
- On the Settings tab, give the Persistent Query a reasonable name
- Choose the
Data Validationtype. - Select
AutoMergefor the DB server. This tells the server to choose any available merge server (there is probably only one). - Assign it 1 GB of memory.
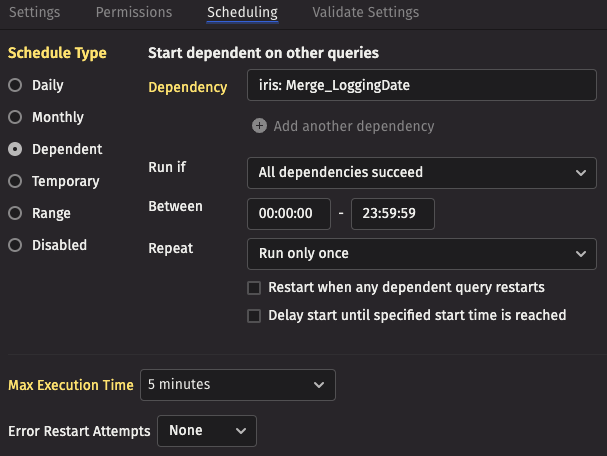
On the Scheduling tab, configure the query so that it automatically starts after the merge query completes.
- Choose the
DependentSchedule Type. - Select the dependency as the merge query created earlier.
- Set the Max Execution Time to
5 minutes.
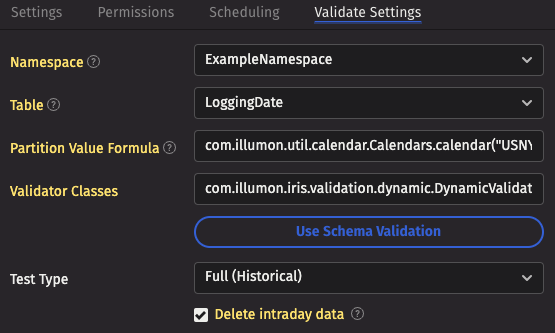
Update the Validate Settings tab.
- The Namespace and Table fields configure the table being merged, which should be set to
LoggingDate. - The Partition Value Formula specifies the partition to be merged, and uses the Legacy engine's format. Yesterday can be written as
com.illumon.util.calendar.Calendars.calendar("USNYSE").previousDay(1). - For the Validator Classes, click the Use Schema Validation button. This tells the validator to perform validation based on the
<Validator>section in the schema we defined earlier:<assertSize min="1" max="999999999" />indicates that there should be at least one value in the historical table, and no more than999999999. Many different data validation options are available.
- Set Test Type to
Full (Historical)so that the validation runs against the merged (historical) data. - Select the Delete intraday data checkbox. This causes a successful validation to delete the intraday data.
To simulate a real environment, delete the associated binary logs so they don't get re-ingested after:
In normal operations, this will run every time the merge query completes successfully, but it can be started manually by selecting it in the Query Monitor and clicking the Start button.
After it runs, the data will no longer be in yesterday's intraday table, but only in historical. Since data is cached, you'll need to restart your Code Studios (you may see an exception in the Code Studio looking at the intraday data as it's deleted).