Ingesting Kafka data in a Kubernetes installation
This guide will demonstrate setting up an in-worker Data Import Server (DIS) that connects to a Kafka broker and writes incoming data to a Deephaven table for a system deployed on Kubernetes. Note that some of the steps will differ from those shown here to accomplish the same thing on a bare metal installation.
This guide assumes that you have access to your cluster configured, and that you are familiar with Kubernetes and the
kubectl command. The examples here use a namespace of deephaven as an example, adjust accordingly for your environment.
Configure a new Data Import Server
Open a management shell terminal
Open a terminal session on management-shell pod.
$ kubectl -n deephaven exec -it deploy/management-shell -- /bin/bash
Create a new DIS configuration
Next, use the dhconfig dis tool to add a new data import
server named iwd-kafka1 with a claim for all tables in the Kafka namespace
with the below command. This configures Deephaven's data routing without requiring
any manual config file changes. The --name parameter value is arbitrary, but make a note of it. It will be needed when we
create the persistent query script in a Deephaven console later.
root@management-shell-1a2b3c4d5e-vwxyz:/$ /usr/illumon/latest/bin/dhconfig dis add --name iwd-kafka1 --claim Kafka
Restart the Table Data Cache Proxy (TDCP)
After the routing file changes, the tdcp process needs a restart to pick up the changes. Note that this is not done within
a management-shell terminal. We will perform a scale down and scale up of the tdcp deployment to do this with these commands.
# Scale the tdcp deployment down and wait a moment for the pod to terminate:
$ kubectl -n deephaven scale deploy/tdcp --replicas 0

# Scale the tdcp deployment back up
$ kubectl -n deephaven scale deploy/tdcp --replicas 1
Create the in-worker DIS as a Persistent Query
Create a schema
If you do not have a table to consume your Kafka data, you will need to define a schema for the Deephaven table.
Create a Persistent Query
Use the Deephaven web console and create a Persistent Query.
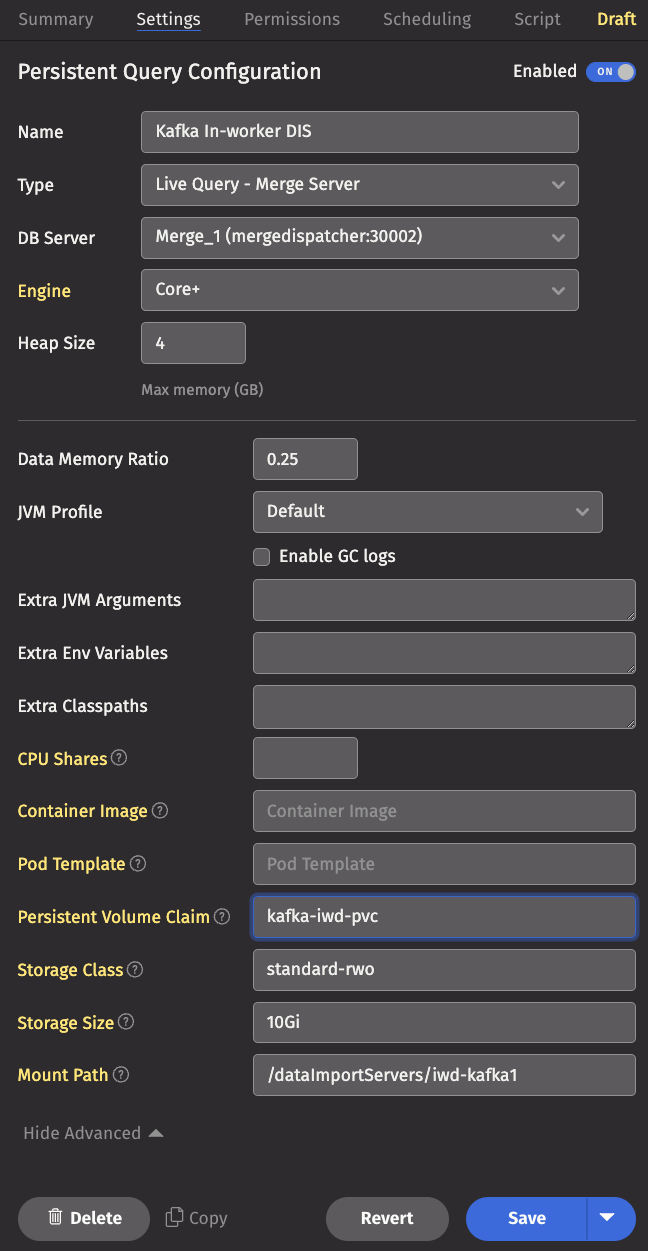
Enter the settings
Under the Settings tab, click Show Advanced and fill in the Persistent Volume Claim, Storage Class, Storage Size, and
Mount Path fields. If the stated persistent volume claim (pvc) does not exist, one is created with the storage class and
size specified. In that case, the storage class you specify must be one that has a dynamic volume provisioner associated with
it so a persistent volume is also created. If you choose to use a pre-existing pvc, you do not need to specify
the storage class or storage size.
Write the script
Click the Script tab and enter a script to create the data import server that connects to your Kafka broker. A simple example script is shown below, and there are further examples and more detailed information on consuming Kafka data for Core+ workers and Legacy workers.
import io.deephaven.kafka.KafkaTools
import io.deephaven.enterprise.kafkawriter.KafkaTableWriter
import io.deephaven.enterprise.dataimportserver.DataImportServerTools

kafkaServer="kafka-broker-example.com"
kafkaTopicName="quickstart"         // Your Kafka topic
kafkaDisName="iwd-kafka1"           // The storage 'name' value you added to the routing.yml file
targetNamespace="Kafka"             // The target namespace added to the 'claims' section of the routing.yml file
targetTable="IWD_Test"              // The target table for which you created a schema

// Set Kafka properties
final Properties props = new Properties()
props.put("bootstrap.servers", kafkaServer + ":9092")
props.put("fetch.min.bytes", "65000")
props.put("fetch.max.wait.ms", "200")
props.put("enable.auto.commit", "false")
props.put("group.id", "dhdis")
// Override the default record field of KafkaOffset to Offset
props.put("deephaven.offset.column.name", "Offset")
props.put("deephaven.timestamp.column.name", "Timestamp")

// Create DIS with previously configured name and storage path.
// The path must match the 'Mount Path' value entered in the Settings tab.
dis = DataImportServerTools.getDisByNameWithStorage(kafkaDisName, "/dataImportServers/iwd-kafka1")

final KafkaTableWriter.Options opts = new io.deephaven.enterprise.kafkawriter.KafkaTableWriter.Options()
opts.dataImportServer(dis)
opts.tableName(targetTable).namespace(targetNamespace)
opts.topic(kafkaTopicName)
opts.kafkaProperties(props)
opts.keySpec(io.deephaven.kafka.KafkaTools.Consume.simpleSpec("Key", String.class))
opts.valueSpec(io.deephaven.kafka.KafkaTools.Consume.simpleSpec("Value", String.class))

// Configure fixed partitioning
opts.partitionValue(today())

KafkaTableWriter.consumeToDis(opts)
Troubleshooting
If the ingester Persistent Query fails to initialize, the main error, which can be viewed in the Summary tab of the Persistent Query details, generally has information about what caused the failure. A common failure cause is a mismatch, such as a missing or wrong-type column, between the ingester configuration and the schema of the target table.
In most cases, once the errors are corrected, the ingester can be restarted to retry with the new configuration. However, if the schema is updated, and some data has already been written during a previous execution of the ingester using the previous schema, this can cause subsequent attempts to fail because the already-written data does not match the new schema.
Two options to address this situation are:
- Attach the ingester PVC to a Code Studio pod:
- When launching a new Code Studio, select a merge worker, and click
Show Advanced - Enter the name of the PVC used for the Kafka ingester Persistent Query in the
Persistent Volume Claimfield. Also enter the storage class name, the mount point, and the size, the same as what are specified for the Persistent Query. - Launch the Code Studio.
- Python or Groovy statements can be used from within the Code Studio to delete a non-matching destination path, such as this for use from a Legacy Groovy worker; or, alternately,
kubectlcan connect to the Pod running the worker and Linuxrmcan delete the non-matching path(s).
- Use
kubectlto find and delete the PVC and PV that store the data; they are recreated the next time the Persistent Query is started.
kubectl get pvc kafka-iwd-pvc --namespace example_k8s
NAME            STATUS   VOLUME                                     CAPACITY   ACCESS MODES   STORAGECLASS   AGE
kafka-iwd-pvc   Bound    pvc-0255bf9a-28c8-4fa4-a0aa-de23f05834e0   1Gi        RWO            standard-rwo   2d1h
In this example, delete the PVC (kafka-iwd-pvc) and the PV (pvc-0255bf9a-28c8-4fa4-a0aa-de23f05834e0).