Use Envoy as a front proxy
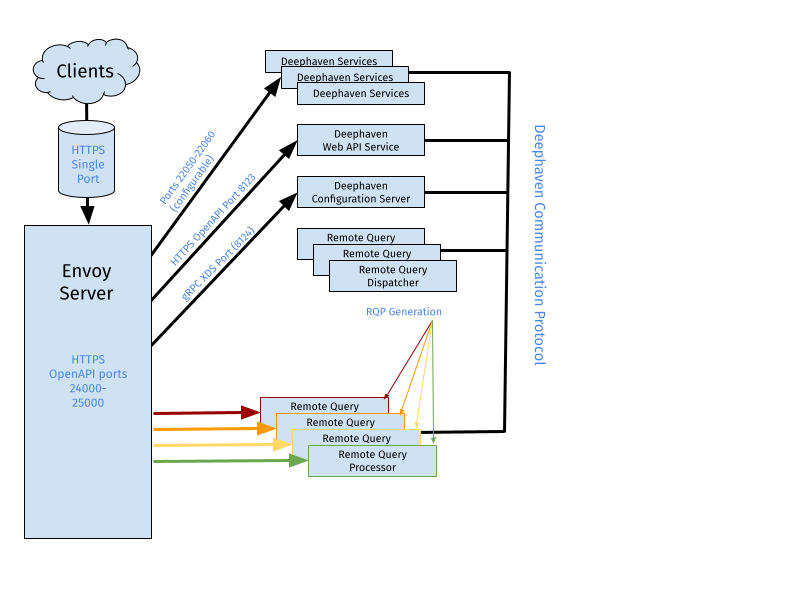
The Deephaven UI relies on multiple connections to Deephaven services within the cluster to function properly. This setup necessitates that these service ports be accessible. Exposing a single port to the outside world is often preferable to streamline network management and enhance overall security. Envoy is an open-source network proxy that is scalable and routes traffic from a single external port to the various internal Deephaven services.
Note
Since Envoy routes all inbound and outbound network traffic through the proxy, this may impact performance, particularly on high-throughput systems.
Below is a simple network diagram of a Deephaven system configured with Envoy as a front proxy.
Installation
Select a single node within the Deephaven cluster for installation. If your cluster uses Ubuntu, you can install Envoy using apt-get, build it from source, or utilize Envoy's prebuilt Docker images. Deephaven recommends using the Docker images because they are the easiest to configure, run, and maintain. Below is a summary of the installation methods for Envoy. You can find complete documentation on the Envoy project's installation page. Additionally, check the version support matrix to see which Envoy versions are supported by Deephaven.
You can find appropriate installation directions for various environments at https://www.getenvoy.io/. The Deephaven version support matrix indicates which Envoy version to install for a specific version of Deephaven. When updating to a new major version of Deephaven, an upgrade of Envoy may also be necessary.
First, ensure that Docker is installed and running on the host, then download the Envoy proxy image that matches your Deephaven version:
Note
Some versions of Linux have packages for Podman instead of Docker. For Podman, replace the docker part of each command below with podman.
sudo docker pull envoyproxy/envoy:v1.29.4
On Ubuntu systems only, you can install Envoy using:
sudo apt-get install envoy
Configuration
Envoy must be set up to listen for incoming traffic on a specific address and port to function as a proxy for Deephaven services. It should also be configured to use the Deephaven Configuration Service, known as an xDS, for discovering routes to individual Persistent Queries and other services. Specifically, Deephaven provides a Cluster Discovery Service (CDS) and a Route Discovery Service (RDS) for Envoy to utilize.
Deephaven services and workers are defined as clusters in the dynamic Envoy configuration. Deephaven’s RDS establishes routing rules that map various paths to specific workers and services. Any path that does not correspond to a worker or service prefix is directed to the Web API service.
There are two methods for configuring the integration between Deephaven and Envoy: manual and automatic. Details for manual configuration are provided in later sections of this page. Automatic configuration is primarily addressed in the Deephaven installation documentation, specifically in the Installation and Upgrade Guide and in the cluster configuration documentation under the section titled DH_CONFIGURE_ENVOY.
When configuring Envoy automatically, the installer sets the necessary properties in the iris-endpoints.prop file and adjusts the Envoy settings in getdown.global to direct the Client Update Service to use Envoy. Additionally, the installer generates an Envoy configuration YAML file, named envoy3.yaml, and copies it to the Deephaven node where Envoy is installed.
Tip
If Envoy is running on a separate system, the file copy step can be disabled by setting DH_ENVOY_COPY_YAML=false in the cluster.cnf file. An alternate location for Envoy can be specified by setting the DH_ENVOY_FQDN property in cluster.cnf.tip
Create an Envoy YAML file named envoy3.yaml and place it in /etc/sysconfig/illumon.d/resources. An example Envoy configuration is provided below. However, a few settings require more specific configuration for your system. See Deephaven Configuration.
Envoy Configuration File
node: { id: 'envoynode', cluster: 'envoycluster' }

# This section tells Envoy that there is a dynamic cluster discovery service 'xds_service
# that is communicating via GRPC using the V3 API and data structures.
dynamic_resources:
  cds_config:
    resource_api_version: V3
    api_config_source:
      api_type: GRPC
      transport_api_version: V3
      grpc_services:
        envoy_grpc: { cluster_name: xds_service }

# This section tells envoy what servers are available to load balance to.  In the case of deephaven
# there is a single xds service on port 8124, serviced from DH's configuration server.

# This configuration assumes the web_api_service is running on the same host as Envoy.
# If envoy is instead running within a docker container, or another host the address should
# be updated.
static_resources:
  clusters:
    - name: xds_service
      connect_timeout: 0.25s
      type: STRICT_DNS
      typed_extension_protocol_options:
        envoy.extensions.upstreams.http.v3.HttpProtocolOptions:
          '@type': type.googleapis.com/envoy.extensions.upstreams.http.v3.HttpProtocolOptions
          explicit_http_config:
            http2_protocol_options: {}
      load_assignment:
        cluster_name: 'xds_service'
        endpoints:
          - lb_endpoints:
              - endpoint:
                  address:
                    socket_address:
                      # Update these values to match your configuration server and xds port
                      address: <enter-ip-here>
                      port_value: 8124

  # This section tells envoy to listen for incoming connections on port 8000 from anywhere
  # and discover routes via a V3 GRPC interface
  listeners:
    - address:
        socket_address:
          # This address and port is the port to which clients will connect.
          # 0.0.0.0 indicates that Envoy should listen for -all- connections on the configured port
          # from any interface
          address: 0.0.0.0
          port_value: 8000
      filter_chains:
        - filters:
            - name: envoy.filters.network.http_connection_manager
              typed_config:
                '@type': type.googleapis.com/envoy.extensions.filters.network.http_connection_manager.v3.HttpConnectionManager
                codec_type: AUTO
                use_remote_address: true
                stat_prefix: egress_http
                request_timeout: 0s
                stream_idle_timeout: 600s
                # DH rds has both websocket routes and gRPC routes.  Some of the websocket routes include
                # redirections, and there is no way to configure a websocket upgrade_config for redirections,
                # so we need a default for it.  gRPC routes explicitly disable the websocket upgrade.
                upgrade_configs:
                  - upgrade_type: websocket
                rds:
                  route_config_name: rds_config
                  config_source:
                    resource_api_version: V3
                    api_config_source:
                      api_type: GRPC
                      transport_api_version: V3
                      grpc_services:
                        envoy_grpc:
                          cluster_name: 'xds_service'
                access_log:
                  - name: envoy.file_access_log
                    typed_config:
                      '@type': type.googleapis.com/envoy.extensions.access_loggers.file.v3.FileAccessLog
                      path: '/tmp/envoy-rds.log'
                http_filters:
                  - name: envoy.filters.http.router
                    typed_config:
                      '@type': type.googleapis.com/envoy.extensions.filters.http.router.v3.Router
          transport_socket:
            name: envoy.transport_sockets.tls
            typed_config:
              '@type': type.googleapis.com/envoy.extensions.transport_sockets.tls.v3.DownstreamTlsContext
              require_client_certificate: false
              common_tls_context:
                alpn_protocols: 'h2,http/1.1'
                tls_certificates:
                  - certificate_chain:
                      filename: '/lighttpd.pem'
                    private_key:
                      filename: '/lighttpd.pem'
admin:
  access_log_path: '/tmp/envoy-admin.log'
  # Setting these will allow a sysadmin to dump Envoy configurations from localhost of the envoy
  # host.  We suggest you disable this in production, as the admin interface can be used to
  # modify the running configuration.
  # Select one of the two cases below, with docker or without docker.
  #
  #
  # - Without docker: listen only on the localhost interface.
  #
  #address:
  #  socket_address: { address: 127.0.0.1, port_value: 8001 }
  # For running inside docker, and being able to connect to the envoy admin port from the host
  # machine, use the configuration below instead (potentially replacing 8001 with the port
  # you prefer to use).
  #
  #address:
  #  socket_address: { address: 0.0.0.0, port_value: 8001 }
Static resources
Clusters
In the static_resources section, configure the target address and port on which the Configuration Service listens for xDS requests.
If the Configuration Service is running on a different node than Envoy, or if Envoy is running inside a Docker container (as per the recommended configuration), change this to the appropriate address. For example, on a host with address 10.128.0.123 running Envoy inside a Docker container, the address should be set to 10.128.0.123. It might be more appropriate, or just easier, to use a DNS name. If desired, change the cluster type from STATIC to LOGICAL_DNS and replace the address with a fully qualified domain name. The port must be set to match the Deephaven system property ‘envoy.xds.port‘, which is set to 8124 by default.
Listeners
The listeners section tells Envoy what addresses and ports it should listen on for forwarding. Deephaven only uses a single address and port for these forwarding requests. In the example configuration, the address 0.0.0.0 and port 8000 indicate that Envoy should listen for connections from ANY interface on port 8000. Users connect to Deephaven using the URL:
https://<<myFQDN>>:8000/iriside
This port can be changed to any available port, and it is also possible to set the address to something more specific to constrain where connections are allowed from.
TLS certificates
When using TLS, Envoy needs to be aware of the TLS Certificate chain and private key file to complete the TLS handshakes. This is configured by the common_tls_context stanza. The example configuration uses Deephaven’s default SSL trust store and private key, which are installed at /etc/ssl/private. Administrators should consider installing their own trust store and key for Envoy.
Administration
Administrators may like to set up the Envoy administration port to inspect the currently running Envoy configuration, which includes the currently configured routes and clusters. Be careful when this is enabled, as it allows access to internal Envoy configuration. Deephaven recommends disabling this in production configurations.
Running Envoy with Docker
To run Envoy with Docker, first create the container. This container is named deephaven_envoy and is reused each time Envoy needs to start.
- The YAML file created above is used.
- The Client Update Service's pemfile is used for the certificate (it is recommended to create a different one for a production installation).
sudo /usr/bin/docker run -d \
   -p 8000:8000 \
   -p 8001:8001 \
   -v /etc/sysconfig/illumon.d/resources/envoy3.yaml:/config.yaml \
   -v /etc/sysconfig/illumon.d/client_update_service/lighttpd.pem:/lighttpd.pem \
   -u 9002 \
   --name deephaven_envoy \
   envoyproxy/envoy:v1.29.4 -c /config.yaml
This command configures a few things for the container:
-d-> Run the container in detached mode (as a background process).-p 8000:8000-> map internal port 8000 to host port 8000.-p 8001:8001-> map internal port 8001 to host port 8001 (this is omitted if the admin port is not used).-v /etc/sysconfig/illumon.d/resources/envoy3.yaml:/config.yaml-> Mount the host’s/etc/sysconfig/illumon.d/resources/envoy3.yamlfile as/config.yamlwithin the container so the Envoy instance can see it.-v /etc/sysconfig/illumon.d/client_update_service/lighttpd.pem:/lighttpd.pem-> Mount the tls key file into the container.-u 9002-> Run as irisadmin. Note that theirisadminuser ID may be different. Runid -u irisadminto double-check the user ID. If the system runs the core infrastructure processes, such as the Persistent Query Controller as a different user, that user's ID should be used instead. The key consideration is that the Envoy process must have rights to read the configuration YAML and certificate files.--name deephaven_envoy-> names the container.envoyproxy/envoy:v1.29.4 -c /config.yaml-> Launch the envoy 1.29.4 container using the mounted config.yaml file as the config source.--add-host=hostname.company.com:1.2.3.4-> adds an entry to the docker container’s /etc/hosts file. This is useful when DNS resolution is not configured inside the Docker image, but a hostname is used in the configuration YAML. This example does not do this.
Running Docker containers, including the Envoy container, can be displayed with:
sudo docker container ls
If the container does not start, run it interactively to see the output. Replace -d with -it.
To delete the container (for example, to recreate it), use the following command:
sudo docker rm deephaven_envoy
To display the logs for a container, use the following command. You can use either the container ID or its name. The second example shows the logs from a specified date onward.
sudo docker logs deephaven_envoy
sudo docker logs deephaven_envoy --since 2021-11-18
Adding the option --follow continuously 'tail's the log in the container; you can save that to a local file on the host
by running it in the background like in the example below. Note that the command below redirects output using bourne shell syntax;
if you use tcsh, you need to modify accordingly.
sudo docker logs deephaven_envoy --follow > /tmp/envoy.log 2>&1 < /dev/null &
The following command stops the container.
sudo docker container stop deephaven_envoy
Configuring Envoy as a system service
To run using systemd, create the file /etc/systemd/system/envoy.service.
sudo vi /etc/systemd/system/envoy.service
The following file contents assume that Envoy is being run in a Docker container, as illustrated above. For systems with podman instead of docker, replace the command with /usr/bin/docker.
Warning
The ExecStart and ExecStop commands must not include sudo.
If you're using Podman instead of Docker, replace the ExecStart command with the following, and replace docker with podman in the ExecStop command:
ExecStart=/usr/bin/podman restart deephaven_envoy
# /etc/systemd/system/envoy.service
[Unit]
Description=Envoy Proxy
Documentation=https://www.envoyproxy.io/
After=network-online.target
[Service]
User=root
Type=simple
RemainAfterExit=yes
ExecStart=/usr/bin/docker run -rm deephaven_envoy
ExecStop=/usr/bin/docker container stop deephaven_envoy
[Install]
WantedBy=multi-user.target
After editing the file, reload the daemon process and configure Envoy to automatically run at startup:
sudo systemctl daemon-reload
sudo systemctl enable envoy
Start Envoy with:
sudo systemctl start envoy
View the systemd logs with:
sudo systemctl status envoy.service
Stop Envoy with:
sudo systemctl stop envoy
Deephaven configuration
This section provides manual instructions in case automated (DH_CONFIGURE_ENVOY=true) installation is not being used. It describes how to configure Deephaven services to interact with Envoy.
This requires a number of additions to Deephaven properties. Changes are needed to the iris-environment and iris-endpoints properties files, as well as the getdown.global configuration file.
Note
Envoy is no longer an option only for the Deephaven Web UI. Once Envoy is enabled for Deephaven, all services must be configured to use Envoy, or the Configuration Server service will fail to start.
Update iris-environment.prop
The following changes are required for the file iris-environment.prop. Here are the commands to export, edit, and reimport this file:
sudo -u irisadmin /usr/illumon/latest/bin/dhconfig properties export --etcd -f iris-environment.prop -d /tmp/

sudo -u irisadmin vi /tmp/iris-environment.prop

sudo -u irisadmin /usr/illumon/latest/bin/dhconfig properties import --etcd -f iris-environment.prop -d /tmp/
To enable Envoy, set the following properties at the global scope (add them to the property file). Replace the URL with the fully-qualified URL.
global.websocket.server.enabled=true
envoy.front.proxy.url=user-facing-host.company.com:8000
envoy.terminate.ssl=true
- The
global.websocket.server.enabledproperty is used by a number of services to decide whether to start a websocket listener that Envoy uses. When set at the global scope, all services that are capable are fronted by Envoy. - The
envoy.front.proxy.urlproperty indicates the host and port on which Envoy is listening for connections. - By default, the configuration service listens for Envoy xDS requests on port 8124. Change this port by setting the
envoy.xds.portproperty. Deephaven also assumes Envoy has been configured to listen for HTTP requests with SSL enabled (and strongly recommends this configuration, as the connection is used for authentication). If SSL must be disabled, set theenvoy.terminate.sslproperty to false.
Envoy closes websockets after 5 minutes of inactivity (by default). Other proxies in the network path can also close the connections. To prevent this, Deephaven sends a heartbeat to keep each connection alive. The heartbeat frequency can be changed with the property below. This is not normally needed, but the following property is used if necessary.
envoy.front.proxy.keepalive.ping.ms=60000
The Configuration Server needs to have the following properties available because it runs the Envoy discovery service and needs to know how to route traffic to all eligible services.
Webapi.server.portis already set and does not need to be changed.Webapi.server.hostis probably not set and needs to be added to the configuration file currently being edited. Unless the Envoy server is running on a different server than the web server, this is the same URL as was added toenvoy.front.proxy.urlbut without the port. This can be a global property.
Webapi.server.host=web-api-host.company.com
Tell the Swing Console (and other client programs) to use Envoy, and adapt the authentication client on it to use Envoy.
These properties should be added to the [service.name=iris_console|interactive_console] stanza in the property file.
    global.websocket.client.enabled=true
    authentication.server.list=user-facing-host.company.com
    authentication.server.port.ssl=8000
    tls.truststore=
    authentication.server.overrideAuthority=
Assign a unique websocket port to each service that will be fronted by Envoy. While the same port can be used for the Auth Server on different hosts, each Query Dispatcher on a given host must have a different port. The suggested ports in this document are compatible with most default installations.
Many of the properties must be accessible to the Configuration Server to support the Envoy Discovery Service, as well as the target services. Therefore, the stanza definitions below include both the configuration service and the target service. Make sure to add each property to its corresponding stanza. If the stanzas do not already exist, create them and include the necessary property.
Additionally, ensure that the client_update_service.host and configuration.server.host properties are updated to reflect the fully qualified host name of the server where those processes are running.
#client update service and configuration server
[service.name=configuration_server] {
    client_update_service.host=cus-node.company.com
    client_update_service.port=8443
    configuration.server.host=config-server-node.company.com
}

# acl write server
[service.name=db_acl_write_server|configuration_server] {
    dbaclwriter.host=acl-writer-node.company.com
    DbAclWriteServer.webserver.port=9044
}
Each Query Dispatcher available via Envoy requires a unique WebSocket port. Each process on a given host must use a distinct port. These services are configured in sections that include the following directive: whenever RemoteQueryDispatcherParameters.queryPort is specified, you should also set RemoteQueryDispatcherParameters.websocket.port.
Here are some key points to consider when configuring these properties:
- When running multiple dispatchers on a single node, each dispatcher needs its own port. This is typically applicable for single-node installations, where both the query server and the merge server operate on the same node.
- If there are multiple query servers distributed across different servers, each query server can share the same port. This situation is common in large-scale installations.
The example provided here illustrates the use of different ports for the merge server and the query servers, and it should be suitable for both scenarios mentioned above.
# set the default websocket port for query servers
RemoteQueryDispatcherParameters.websocket.port=22052

# set a different default websocket for all merge servers
[service.name=dbmerge|db_dis_merge|tailer1_merge] {
    RemoteQueryDispatcherParameters.websocket.port=22060
}
Update iris-endpoints.prop
Services that need to know about all the dispatchers at once (specifically the Persistent Query Controller) use a different mechanism than the above stanzas; all the information is in that process's stanza. The Configuration Service now needs the same information, and the WebSocket port needs to be added.
In iris-endpoints.prop, a section like the example below defines all the Remote Query Dispatchers available to the controller. The RemoteQueryDispatcherParameters.websocket.port property active in a given scope defaults to the value for all iris.db.n.websocket.port settings. Only those that are different need to be specified. This usually means the merge servers need this property, but the query servers do not.
The changes below are needed for the file iris-endpoints.prop. These are the commands to export, edit, and reimport this file:
sudo -u irisadmin /usr/illumon/latest/bin/dhconfig properties export --etcd -f iris-endpoints.prop -d /tmp/

sudo -u irisadmin vi /tmp/iris-endpoints.prop

sudo -u irisadmin /usr/illumon/latest/bin/dhconfig properties import --etcd -f iris-endpoints.prop -d /tmp/
In iris-endpoints.prop, add configuration_server to the stanza that includes iris_controller. For merge servers, add their WebSocket port to their iris.db properties. The following example shows a typical configuration for a three-node cluster:
[service.name=iris_controller|configuration_server] {
iris.db.nservers=3

    iris.db.1.host=query-1.company.com
    iris.db.1.classPushList=
    iris.db.1.class=Query

    iris.db.2.host=query-2.company.com
    iris.db.2.classPushList=
    iris.db.2.class=Query

    iris.db.3.host=infra-1.company.com
    iris.db.3.classPushList=
    iris.db.3.port=30002
    iris.db.3.class=Merge
    iris.db.3.websocket.port=22060
}
Note
The iris-endpoints.prop file is regenerated whenever the Deephaven installer is executed, such as when adding nodes to the cluster or upgrading to a newer version of Deephaven. After any reconfiguration or upgrade, the modifications made to this file must be reapplied manually.
Set up the Client Update Service to tell swing clients to use Envoy
- Clients cannot yet get properties files via Envoy. Add the following line to
/etc/sysconfig/illumon.d/client_update_service/getdown.globalso that the Swing client reads properties files from disk. This ensures that all users who log in to this instance can correctly read properties files without making additional changes:jvmarg = -Dcom.fishlib.configuration.PropertyInputStreamLoader.override=com.fishlib.configuration.PropertyInputStreamLoaderTraditional
Edit getdown.global. Note that the configuration service does not access this file, so it does not need to be exported and imported.
sudo -u irisadmin vi /etc/sysconfig/illumon.d/client_update_service/getdown.global
For example:
jvmarg = -Dcom.fishlib.configuration.PropertyInputStreamLoader.override=com.fishlib.configuration.PropertyInputStreamLoaderTraditional
Restart all services on all nodes.
sudo -u irisadmin monit stop all
sudo -u irisadmin monit start all
Possible additional settings
There are several places where message sizes can become larger than the default configured maximum for a WebSocket. If this happens, a message that looks like the following is logged in the process's log file. The message indicates the current maximum and the actual larger size.
CloseReason[1009,Binary message size [338135] exceeds maximum size [65536]]
A workaround for this is to increase the limit using the property websocket.client.max.message.size. This applies to all client Envoy connections and becomes the new default for client connections. It applies to all web servers expecting Envoy connections and to any other clients such as swing consoles. It is usually best to apply this at the global level rather than within a stanza. If a serviceId is appended to the property name, then the new limit applies only to that service.
websocket.client.max.message.size=100000000
If not set, the server message size defaults to the client size but can be changed individually if needed. Like websocket.client.max.message.size, a serviceId can be appended to limit the value to that service.
websocket.server.max.message.size=100000000
Extra Envoy XDS routes
Additional routes can also be added to the Envoy configuration to expose other services through the proxy.
For each route to be added, create a set of properties that define the extra route. These properties must be visible to the configuration server (either global or in a stanza visible to the configuration server). After making changes, the configuration_server must be restarted to make the changes visible.
This example route is named dis and redirects requests for https://envoy-server.company-name.com:<envoy_port>/dis/anything to http://infra-1.company-name.com:8086/anything:
    envoy.xds.extra.routes.dis.host=infra-1.company-name.com
    envoy.xds.extra.routes.dis.port=8086
    envoy.xds.extra.routes.dis.prefix=/dis/
    envoy.xds.extra.routes.dis.prefixRewrite=/
    envoy.xds.extra.routes.dis.tls=false
    envoy.xds.extra.routes.dis.exactPrefix=false
The properties defining an Envoy route are:
envoy.xds.extra.routes.<name>.host- Required. The name or address the Envoy service needs to reach the destination service. This could be different from the host that is used from outside the network.
envoy.xds.extra.routes.<name>.port- Optional. The port of the destination service. Defaults to
443when TLS (Transport Layer Security) is enabled and80otherwise.
- Optional. The port of the destination service. Defaults to
envoy.xds.extra.routes.<name>.prefix- Required. Paths beginning with this prefix are routed to the service at host:port. Do not use "/", "/worker", "/cus", "/comm", "/iris", or other prefixes that create conflicts or ambiguity with Deephaven mappings.
envoy.xds.extra.routes.<name>.prefixRewrite- Optional. Defaults to
/. This value is used to change the prefix from the requested URL before forwarding to the destination service. In the example above, a user would route to the DIS's internal server by requesting a URL such ashttps://envoy-server.company-name.com:8000/dis/config. This server does not know about the/dispart of the path, and Envoy strips the prefix and sendhttp://infra-1-server.company-name.com:8086/configto the destination. (Note the changed path and port.)
- Optional. Defaults to
envoy.xds.extra.routes.<name>.tls- Optional. Indicates whether the destination service uses TLS/HTTPS. This is independent of whether Envoy is using TLS. Defaults to true.
envoy.xds.extra.routes.<name>.exactPrefix- Optional. If
true, then theprefixandprefixRewritevalues are used exactly as specified in the Envoy route configuration. Iffalse(the default), extra routes are added both with and without a terminating/. This produces the desired results with rare exceptions.
- Optional. If
HTTP headers
Deephaven properties can be used to configure the inclusion of custom HTTP headers in all Envoy responses, or in all web server responses. Deephaven dynamically configures Envoy and the web servers to use headers defined as properties with the form envoy.add.header... and http.add.header... respectively. If Envoy is in use and the same header is set both for Envoy and the server, the Envoy value will take precedence.
Some headers are configured to be enabled by default in iris-defaults.prop, for both Envoy and non-Envoy deployments. These can be disabled or reconfigured by adding matching entries to iris-environment.prop:
# Enabled by default as the risk should be low for breaking other pages. We advise against
# fine tuning this, but instead if it is breaking a specific use case, outright disable it.
# See https://developer.mozilla.org/en-US/docs/Web/HTTP/Reference/Headers/X-XSS-Protection
# for more information.
envoy.add.header.X-XSS-Protection.enabled = true
envoy.add.header.X-XSS-Protection.value = 1; mode=block
http.add.header.X-XSS-Protection.enabled = true
http.add.header.X-XSS-Protection.value = 1; mode=block
# Enabled by default, the server should be able to set all of its own content-type headers
# correctly. It is possible that third-party plugins could cause issues with this, so it can
# be disabled if desired.
envoy.add.header.X-Content-Type-Options.enabled = true
envoy.add.header.X-Content-Type-Options.value = nosniff
http.add.header.X-Content-Type-Options.enabled = true
http.add.header.X-Content-Type-Options.value = nosniff
# Enabled by default, the server doesn't make use of any referrer information. Can be enabled
# as desired to handle other use cases.
envoy.add.header.Referrer-Policy.enabled = true
envoy.add.header.Referrer-Policy.value = no-referrer
http.add.header.Referrer-Policy.enabled = true
http.add.header.Referrer-Policy.value = no-referrer
# These settings restrict documents loaded from Deephaven to block no-cors calls and permit
# running the page in a secure context. The CORP header is disabled for the Grizzly release,
# but will be enabled in later updates, while the others are enabled by default.
envoy.add.header.Cross-Origin-Embedder-Policy.enabled = true
envoy.add.header.Cross-Origin-Embedder-Policy.value = require-corp
envoy.add.header.Cross-Origin-Opener-Policy.enabled = true
envoy.add.header.Cross-Origin-Opener-Policy.value = same-origin
http.add.header.Cross-Origin-Embedder-Policy.enabled = true
http.add.header.Cross-Origin-Embedder-Policy.value = require-corp
http.add.header.Cross-Origin-Opener-Policy.enabled = true
http.add.header.Cross-Origin-Opener-Policy.value = same-origin
The iris-defaults.prop also includes a set of pre-defined, disabled header properties. These can be enabled and, if needed, reconfigured by adding entries to iris-environment.prop:
# Disabled by default, applications should enable this after their TLS certificates are
# deployed and confirmed to work, as disabling this after the fact can result in clients
# remembering the old value for a long time.
envoy.add.header.Strict-Transport-Security.enabled = false
envoy.add.header.Strict-Transport-Security.value = max-age=31536000; includeSubDomains
http.add.header.Strict-Transport-Security.enabled = false
http.add.header.Strict-Transport-Security.value = max-age=31536000; includeSubDomains
# Disabled by default, but can be enabled if iframe widgets will not be used from other origins.
# This can optionally be fine tuned to allow specific origins or same origin loading.
envoy.add.header.X-Frame-Options.enabled = false
envoy.add.header.X-Frame-Options.value = DENY
http.add.header.X-Frame-Options.enabled = false
http.add.header.X-Frame-Options.value = DENY
# Disabled by default, this CSP policy prevents embedding pages in an iframe. This is a more
# modern equivalent to the X-Frame-Options header above, and also can be fine tuned to allow
# specific remote origins or same origin.
envoy.add.header.Content-Security-Policy.enabled = false
envoy.add.header.Content-Security-Policy.value = frame-ancestors 'none';
http.add.header.Content-Security-Policy.enabled = false
http.add.header.Content-Security-Policy.value = frame-ancestors 'none';
Caution
This section is intended to be enabled after the Grizzly release, but, presently, it can potentially interfere with applications loading the JS API from another server.
envoy.add.header.Cross-Origin-Resource-Policy.enabled = false
envoy.add.header.Cross-Origin-Resource-Policy.value = same-origin
http.add.header.Cross-Origin-Resource-Policy.enabled = false
http.add.header.Cross-Origin-Resource-Policy.value = same-origin
To fix any application affected by this, add the crossorigin="anonymous" attribute to the <script> tag for the Deephaven JS API. It will also be necessary to enable the domain that the application will load from with the Access-Control-Allow-Origins header, using the cors.allowedOrigins property. This can be set to * to permit all origins:
cors.allowedOrigins=*
Or specifically set to the domain that will load the API and contact the server:
cors.allowedOrigins=https://www.somedomain.com
To enable a pre-configured header, add a property entry with ...enabled=true to iris-environment.prop. The property must be placed in a location that is readable by the configuration server (either global or in a stanza visible to the configuration server).
For example, if Envoy is used:
envoy.add.header.Cross-Origin-Resource-Policy.enabled = true
Or if it is not:
http.add.header.Cross-Origin-Resource-Policy.enabled = true
This enables the Cross-Origin-Resource-Policy header with the default value of same-origin.
To change the value, add a second property with envoy.add.header...value=....
Other custom headers not pre-defined in iris-defaults.prop can also be added. For each header to be added, create a pair of properties that define and enable the header and set its value. These properties must be visible to the configuration server (either global or in a stanza visible to the configuration server).
For example, this would set a two-hour max age on all CORS preflight calls:
envoy.add.header.Access-Control-Max-Age.enabled = true
envoy.add.header.Access-Control-Max-Age.value = 7200
Or for non-Envoy deployments:
http.add.header.Access-Control-Max-Age.enabled = true
http.add.header.Access-Control-Max-Age.value = 7200
After importing the modified property file, the configuration server must be restarted to pick up these changes.