Batch CSV
This section of the Crash Course covers batch imports of CSV data. CSV import queries ingest CSV files directly to the Deephaven system as intraday data that users can read from the database using db.live_table.
Note
This guide covers making CSV data available via the Deephaven database. There are simpler ways to ingest CSV data into memory, such as read_csv and Uploading a table from a file. However, those methods do not persist the data in Deephaven's database, meaning the data is not available to other users or clients.
This guide presents the steps required to import the following example CSV file, saved as /data/sample.csv:
The process of ingesting data from CSV files is as follows:
The data will then be available to users through the IDE and through clients such as the Python client.
Note
Both steps require higher access levels than a default user account. Consult your administrator for assistance.
- Only an admin user can deploy the schema.
- To run a CSV import query, the user must be a member of one of the
iris-datamanagers,iris-dataimporters, oriris-superusersgroups. See the list of special groups for more information.
Deploy a schema for the table
When importing CSV data, the first step is to deploy a schema. Schema inference tools can generate a schema from a CSV file. The schema can then be deployed to the Deephaven system using the dhconfig schemas command. Both schema inference and schema deployment require access to an operating system account with Deephaven administrative privileges, by default irisadmin.
Run the following on the Deephaven server (in a Kubernetes installation, run this in the management shell) to generate a schema file from the CSV file:
The generated schema file is saved to /tmp/CSVExampleNamespace.CSVExampleTableName.schema:
namespace="CSVExampleNamespace"andname="CSVExampleTableName"define the table's namespace and table name.- The ImportSource element,
<ImportSource name="IrisCSV" type="CSV" arrayDelimiter="," />, is required when using CSV import queries. See the schema documentation for more information. <Column name="Date" dataType="java.lang.String" columnType="Partitioning" />sets theDatecolumn as the partitioning column.<Partitions keyFormula="__PARTITION_AUTOBALANCE_SINGLE__" />specifies the formula used when determining the layout of historical storage. For more information on how key formulas are used and a list of pre-defined formulas that are available, see the partition key formula documentation.
Deploy the schema to make it available to the Deephaven system:
Run a CSV import query
Note
CSV import queries do not yet support the Core+ engine. As a consequence, the Partition Formula in a CSV import query uses Legacy Engine formulas such as currentDateNy(). This is analogous to the Core+ today() method used in the above Python console query. For more information, see the Legacy to Core+ time handling documentation.
Once the schema has been deployed, define an Import - CSV Persistent Query (PQ) to ingest the CSV file. You'll need to be logged in to the Deephaven web interface as a data administrator to perform these tasks.
To create a CSV Import query, head to the Query Monitor. At the top of the Query Monitor, there's a +New button that sits above the Query filters. Click it, and select the following options from the dropdowns:
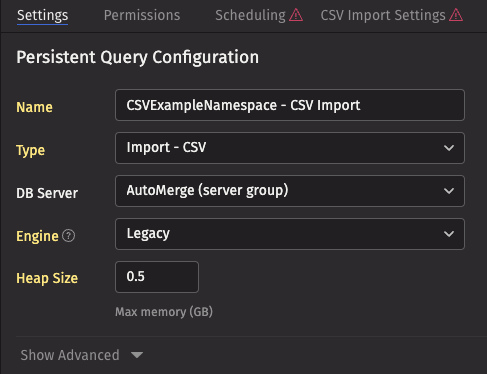
- On the Settings tab, give the PQ a reasonable name, such as
CSVExampleNamespace - CSV Import. - Choose the
Import - CSVtype. - Select
AutoMergefor the DB server. This tells the server to choose any available merge server (there is probably only one). - Assign it 0.5 GB of memory.
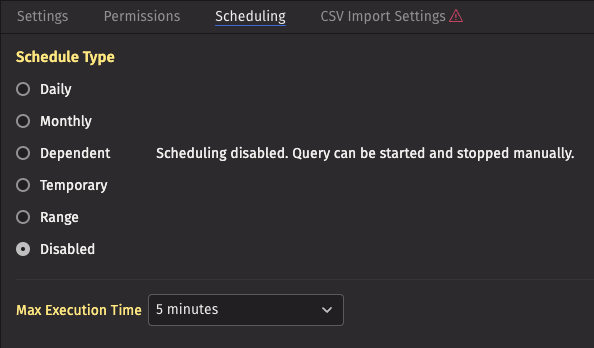
On the Scheduling tab, configure the query so that it runs only when manually started.
- Choose the
DisabledSchedule Type. - Set the Max Execution Time to
5 minutes.
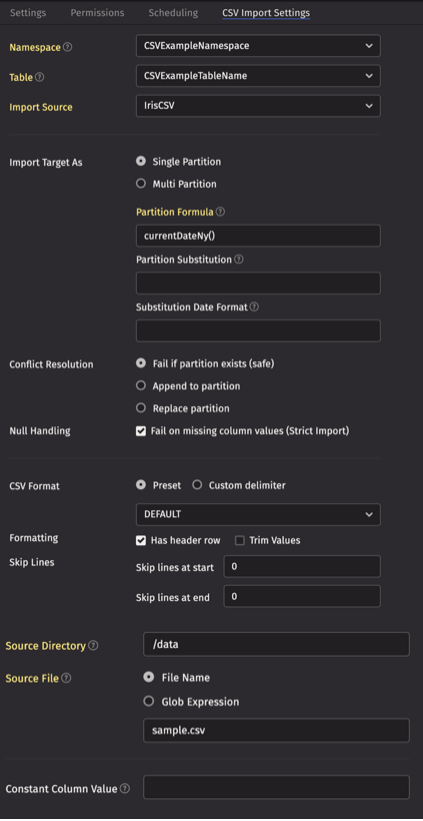
Update the CSV Import Settings tab.
- The Namespace and Table fields should match the schema:
CSVExampleNamespaceandCSVExampleTableName. - The Import Source specifies the file type to ingest and should be set to
IrisCSV. - For the Import Target, click the Single Partition button, and fill in the Partition Formula with
currentDateNy(). This tells the query to ingest the data into today's intraday partition. - Set Source Directory to
/data, click the File Name button, and set the text field tosample.csv.
For a detailed explanation of all CSV import settings, see the CSV import documentation.
Save the query, then start it manually by selecting it in the Query Monitor and clicking the Start button. Once the query completes, you must rescan the table for the data to become available in the Deephaven system.
Warning
After completing a CSV import, you must run a rescan command for the imported data to become available in Deephaven. The Data Import Server (DIS) will not automatically detect the new data.
Run this command to rescan a specific table:
For example, to rescan the TradeData table in the MarketOps namespace:
See the Data control tool rescan documentation for more details.
Open a Code Studio with the +New button atop the Deephaven IDE and query the data in a Python Core+ console with the following code:
Merge and validate the data
Intraday data is only intraday data during the current day. On subsequent days, it is no longer intraday, it is historical. As such, a common workflow in Deephaven involves merging intraday data into historical storage after the day's data has been fully ingested. Once the data has been validated, it is typically deleted from intraday storage. See the streaming binary logs crash course for a complete walkthrough of this process.