Ingesting Kafka data in a Kubernetes installation
This guide demonstrates how to set up an in-worker Data Import Server (DIS) that connects to a Kafka broker and writes incoming data to a Deephaven table for a system deployed on Kubernetes.
Benefits of Kafka with Deephaven on Kubernetes
- Scalability: Leverage Kubernetes orchestration to scale Kafka ingestion based on workload demands
- Resilience: Benefit from Kubernetes self-healing capabilities for more reliable data ingestion
- Portability: Deploy your Kafka ingestion pipelines consistently across different Kubernetes environments
- Resource Optimization: Configure resource limits and requests for optimized performance
Core+ vs. Legacy Kafka Ingestion
Deephaven provides two frameworks for Kafka ingestion:
- Core+ Kafka Ingestion: The newer, recommended framework with improved performance and features
- Legacy Kafka Ingestion: The traditional Enterprise Kafka framework
This guide supports both frameworks, with specific notes about Core+ benefits where relevant. For comprehensive details on Core+ Kafka ingestion, see Core+ Kafka documentation.
Prerequisites
- Access to a Kubernetes cluster with Deephaven deployed
- Familiarity with Kubernetes and the
kubectlcommand - Existing Kafka topic(s) accessible from your Kubernetes cluster
The examples in this guide use a namespace of deephaven - adjust accordingly for your environment.
Architecture
In this architecture:
- A Persistent Query runs inside a worker pod in the Kubernetes cluster
- The Persistent Query initializes a Data Import Server (DIS) process
- The DIS connects to external Kafka broker(s) and consumes topic data
- Data is stored in a Persistent Volume Claim (PVC) for durability
- The Table Data Cache Proxy (TDCP) routes queries to the appropriate data sources
Configure a new Data Import Server
Open a management shell terminal
Open a terminal session on management-shell pod.
Create a new DIS configuration
Next, use the dhconfig dis tool to add a new data import
server named iwd-kafka1 with a claim for all tables in the Kafka namespace
with the below command. This configures Deephaven's data routing without requiring
any manual config file changes. The --name parameter value is arbitrary, but make a note of it. It will be needed when we
create the persistent query script in a Deephaven console later.
Restart the Table Data Cache Proxy (TDCP)
After the routing file changes, the tdcp process needs a restart to pick up the changes. Note that this is not done within
a management-shell terminal. We will perform a scale down and scale up of the tdcp deployment to do this with these commands.
Create the in-worker DIS as a Persistent Query
Create a schema
If you do not have a table to consume your Kafka data, you will need to create a schema for the Deephaven table. The recommended approach is to use the SchemaHelper tool, which automatically generates a schema from your KafkaTableWriter.Options configuration.
In your Persistent Query script, after configuring your options with key and value specifications, add the schema helper call before consumeToDis:
The SchemaHelper derives the schema from your keySpec and valueSpec configurations. You can customize the generated schema with grouping columns, symbol table settings, and merge key formulas:
For more details about schema creation options, see schema helper tools in the Core+ Kafka documentation.
Create a Persistent Query
Use the Deephaven web console and create a Persistent Query.
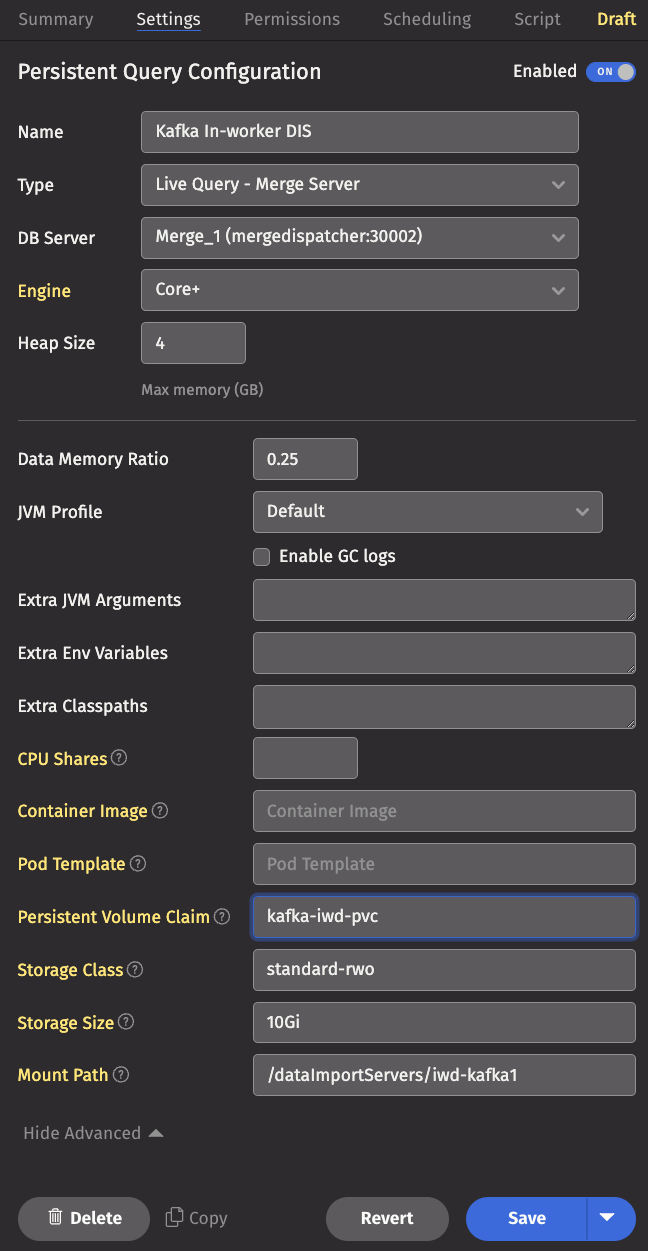
Enter the settings
Under the Settings tab, click Show Advanced and fill in the Persistent Volume Claim, Storage Class, Storage Size, and
Mount Path fields. If the stated persistent volume claim (pvc) does not exist, one is created with the storage class and
size specified. In that case, the storage class you specify must be one that has a dynamic volume provisioner associated with
it so a persistent volume is also created. If you choose to use a pre-existing pvc, you do not need to specify
the storage class or storage size.
Write the script
Click the Script tab and enter a script to create the data import server that connects to your Kafka broker. A simple example script is shown below, and there are further examples and more detailed information on consuming Kafka data for Core+ workers and Legacy workers.
Advanced Configuration Options
Partitioning Strategies
The example script uses fixed partitioning with opts.partitionValue(today()), which is simple but may not be optimal for all scenarios. Consider these alternative approaches:
Fixed Partitioning
Fixed partitioning assigns a single partition for the life of the ingester:
Dynamic Partitioning
Dynamic partitioning determines partitions as a function of the data, useful for time-series data:
For more details on partitioning strategies, see the Core+ Kafka documentation.
Security Considerations
Kafka Authentication and Encryption
When connecting to a secured Kafka cluster, you'll need to configure appropriate security settings:
Kubernetes Secrets
Instead of hardcoding credentials, use Kubernetes secrets:
-
Create a secret containing Kafka credentials:
-
Mount the secret to your Persistent Query pod and reference environment variables in your script.
Monitoring Kafka Ingestion
Monitoring Kafka ingestion in Kubernetes environments is important for ensuring reliability. Here are several approaches:
1. Deephaven Query Monitor
Use the Deephaven Query Monitor to check the status of your Persistent Query and view any error messages.
2. Kubernetes-native Monitoring
- Pod Metrics: Monitor CPU, memory usage of the worker pod running your ingestion
- Pod Logs: Check logs for ingestion-related messages
- Pod Events: Watch for pod-related events
3. Prometheus & Grafana
If your Kubernetes cluster has Prometheus and Grafana installed, create dashboards for:
- JVM metrics from your Deephaven worker pods
- Kafka consumer lag metrics
- PVC storage utilization
Troubleshooting
Common Issues and Solutions
Ingester Initialization Failures
If the ingester Persistent Query fails to initialize, view the error in the Summary tab of the Persistent Query details. Common causes include:
-
Schema Mismatch: Missing or wrong-type columns between ingester configuration and table schema
- Solution: Ensure your schema matches the data format from Kafka
-
Kafka Connectivity Issues:
- Solution: Verify the Kafka broker is accessible from the Kubernetes cluster and check network policies
-
Resource Constraints: Pod out of memory or CPU limits exceeded
- Solution: Increase the resource allocation for your Persistent Query pod
-
Storage Issues: PVC mounting problems or insufficient storage
- Solution: Check PVC status and storage class compatibility
Schema Evolution Problems
When schema changes cause ingestion failures because previously written data doesn't match the new schema:
Option 1: Attach PVC to Code Studio
- Launch a new Code Studio, select a merge worker, and click
Show Advanced - Enter the name of the PVC used for the Kafka ingester, along with storage class name, mount point, and size
- Launch the Code Studio
- Delete non-matching paths using Python/Groovy:
Option 2: Delete and Recreate PVC
-
Identify the PVC:
-
Delete the PVC and its associated PV:
-
Restart the Persistent Query to create a new PVC
Debugging Connection Issues
To verify Kafka connectivity from within the Kubernetes cluster:
Advanced Troubleshooting
For more complex issues, consider these approaches:
-
Enable Verbose Logging: Add logging properties to your Kafka consumer configuration
-
Analyze Pod State: Generate a diagnostics dump for deeper inspection
-
Consult Support: For persistent issues, contact Deephaven support with:
- PQ logs
- Kafka topic metadata
- Kubernetes cluster information