Installing Python
Deephaven Python setup
Deephaven's Python API is split into two parts:
- Python for Deephaven servers can be installed automatically by the installer process, or manually after the system installation has been run. The default is to install Python 3.10 automatically. See Python client workstations for details on standalone Python installations on systems other than Deephaven.
- A client-side API, where the Python code starts a Java JVM that communicates with the Deephaven server. This can be run from a remote machine or from a server itself.
Without getting into the technical details, jpy bridges the gap between Java and Python using natively compiled C code. As such, jpy requires dynamically linked libraries for both Python and Java: libpython.so and libjvm.so (or .dll/.dylib for Windows/Mac). libjvm is always provided in all Java installations, but you must configure jpy to find it. libpython is not automatically included in all Python installations, and you may need to install additional packages, or install Python from source, to have the necessary shared libraries available on your machines.
For both server and client applications in Deephaven, Python must communicate with Java using a library called jpy. In previous releases, this functionality was provided through a package called deephaven-jpy. Starting from Deephaven version 1.20221001 (Jackson), Deephaven now depends on and actively maintains the open-source public package jpy==0.15.0.
For detailed information on supported Python versions, please refer to the Python version support matrix. It is essential to use the same version of Python for both the client and server when using a Python client to interact with a server Python session. To understand why this requirement exists, please read the Python Client Workstations section.
Important
The default version of Python is 3.10.
- In releases before 1.20231218 (Vermilion Plus), Python 3.8 was the default version.
- As of 1.20240517.344 (Grizzly), Python 3.8 is no longer supported.
Any python3.6, python3.7, or python3.8 environment (venv, conda environment, etc.) set up previously will no longer work.
Before upgrading to this version of Deephaven, you should migrate any environments you wish to keep functioning to at least Python 3.9, which has been available since version 1.20221001.001.
The recommended way to manage Python installations on Deephaven servers is to use Deephaven Auto-Provisioning. With auto-provisioning, you must supply Python 3.9 or 3.10 on your system PATH and install lib pythonandpython-venv`.
Important
On systems that do not use auto-provisioning, you need to uninstall the deephaven-jpy package before upgrading.
Manually install Python
The Deephaven installer installs Python 3.10 by default. If Python was not installed during the Deephaven installation, it can be manually installed afterwards.
To manually install the deephaven Python package, you must install, at minimum, python, libpython and java. If you wish to take advantage of automatically-updated virtual environments that will have new Deephaven wheels installed every time you upgrade a server, you will also need to install the appropriate python-virtualenv package as well. Once all dependencies are installed, you will be ready to python3 -m pip install deephaven.
To see if the correct version of libpython is already installed on your system, use ldconfig:
ldconfig -p | grep libpython
For manual installations, you need to find your own trusted source for python, libpython and python-venv, or you need to build python from source. Below are simple examples for building Python with the necessary flags to also build libpython on Deephaven-supported operating systems.
Install on Ubuntu 20.04
If you wish to use a Deephaven-supported version of Python, you must use a third-party repository or build it yourself.
Before you can build Python, install system dependencies. Refer to official Python documentation for details.
Note
openssl, bzip2, and libffi are required by Deephaven.
sudo apt-get update
sudo apt-get build-dep python3
sudo apt-get install pkg-config
# Include all optional packages that python can support. openssl, bzip2 and libffi are *required* by deephaven
sudo apt-get install build-essential gdb lcov pkg-config \
      libbz2-dev libffi-dev libgdbm-dev libgdbm-compat-dev liblzma-dev \
      libncurses5-dev libreadline6-dev libsqlite3-dev libssl-dev \
      lzma lzma-dev tk-dev uuid-dev zlib1g-dev
If you wish to use third-party repositories or tools (not recommended on production systems), you may find it easiest to use the deadsnakes PPA (Personal Package Archives).
Important
Be sure to consult with your DevOps experts before adding any PPA to any machine.
sudo add-apt-repository -y ppa:deadsnakes/ppa
sudo apt-get update -y
sudo apt-get install python3.9 python3.9-venv libpython3.9 -y
Install on Ubuntu 22.04
Ubuntu 22.04 default repositories contain Python versions 3.10 and later, while Deephaven currently supports 3.9 and 3.10. Installing previous versions requires getting them from third-party repositories, such as the deadsnakes PPA, or building from source, as described in the next section.
To install Python 3.10 on Ubuntu 22.04:
sudo apt-get update -y
sudo apt-get install python3.10 python3.10-venv libpython3.10 -y
Install on Red Hat 8
Python 3.9 and 3.10 must be built from source. Before you can build Python, however, you need some extra packages:
sudo dnf makecache
sudo dnf groupinstall "Development Tools" --exclude=java*,jna*
sudo dnf install make gcc openssl-devel bzip2-devel libffi-devel zlib-devel xz-devel yum-utils dnf-plugins-core
sudo dnf builddep python3
Red Hat 8 offers Python 3.9 in its standard repositories.
Install on Red Hat 9
You only need to run sudo dnf install python39-devel, and all the necessary packages will be installed for you. However, libpython will be located in /usr/lib instead of /usr/lib64. You can fix this by setting the following property in iris-environment.prop:
jpy.pythonLib=/usr/lib64/libpython3.9.so
Any other version of Python must be built from source. Before you can build Python, however, you need some extra packages:
sudo dnf makecache
sudo dnf groupinstall "Development Tools" --exclude=java*,jna*
sudo dnf install make gcc openssl-devel bzip2-devel libffi-devel zlib-devel xz-devel yum-utils dnf-plugins-core
sudo dnf builddep python3
Build Python from source
If you need a version of Python not included in your operating system repositories, you may find it easiest to simply build from source.
This example uses wget to download the tar, but you should get it from a trusted source and verify the file checksum before installing it.
# Install Python
function install_py() {
    local py_ver="${1:?}"
    local short_ver="${py_ver%\.*}"
    if command -v python${short_ver}; then
        echo "Python $py_ver already installed. Skipping install"
        return 0
    fi
    echo "Installing python version $py_ver"
    WITH_OPENSSL_ARG=""

    # python >= 3.10 can't handle super-ancient openssl
    if [[ "${short_ver}" =~ 3.1[0-9] ]]; then
        local openssl_version
        openssl_version="$(openssl version | awk '{print $2}')"
        if [[ "$openssl_version" == 1.0* ]]; then
            echo "Detected ancient openssl.  Creating workaround openssl directory in /opt/deephaven/openssl11"
            # The Python configure script very much wants openssl/ssl.h and libs to be in the same place.  It will use
            # CFLAGS and LDFLAGS in some places, but not others so this creates a path that is "good enough" for Python's
            # configure script to use; and then we combine it with the CFLAGS/LDFLAGS.
            if [ ! -d /usr/illumon/openssl11 ] ; then
                sudo mkdir -p /opt/deephaven/openssl11
                sudo ln -s /usr/lib64/openssl11/ /opt/deephaven/openssl11/lib
                sudo ln -s /usr/include/openssl11/ /opt/deephaven/openssl11/include
            fi
            WITH_OPENSSL_ARG="--with-openssl=/opt/deephaven/openssl11"
            export CFLAGS="-I/opt/deephaven/openssl11/include"
            export LDFLAGS="-L/opt/deephaven/openssl11/lib"
        fi
    fi

    if grep "ID=" /etc/os-release | grep -cE "rhel|rocky" ; then
        LIBDIR_ARG="--libdir=/usr/lib"
    else
        LIBDIR_ARG=""
    fi

    mkdir -p /tmp/pyInstall
    cd /tmp/pyInstall

    # Get python archive. You should verify the checksum of the file to ensure it has not been tampered with
    wget https://www.python.org/ftp/python/${py_ver}/Python-${py_ver}.tgz || {
        echo "Could not use wget to download python source!"
        return 1
    }
    tar xf Python-${py_ver}.tgz
    cd /tmp/pyInstall/Python-${short_ver}*/
    # It is _very_ important to have --enable-shared flag, as we require libpython for runtime dynamic linking
    sudo -n ./configure --prefix=/usr \
      $WITH_OPENSSL_ARG $LIBDIR_ARG \
      --enable-shared LDFLAGS="$LDFLAGS -Wl,-rpath /usr/lib" \
      --enable-optimizations --with-ensurepip=install
    # Do not override system python version
    sudo -n make altinstall -j $(nproc || echo -n 2)
    # Make sure to update library paths
    sudo -n ldconfig
}

# Choose what version of python to install
# install_py 3.9.18
install_py 3.10.12
These manual installation instructions are applicable to any version of Python available in the python.org FTP directories. However, it is recommended to use either version 3.9.18 or 3.10.12, as these versions have been tested by Deephaven.
You can also use existing tools like pyenv to accomplish the installation. Just be aware that you must generate libpython for jpy integration with Deephaven to function properly. If you're using pyenv, you should run export PYTHON_CONFIGURE_OPTS="--enable-shared" before invoking the tool.
Additionally, tools like pyenv may install shared libraries in different paths than those used by Deephaven by default. If you encounter issues with missing libraries when installing from other sources, you may need to locate your shared Python library by running ldconfig -p | grep libpython. After identifying the correct location, update your iris-environment.prop file to point to it. For more details, refer to the jpy Props section.
Automatic provisioning of Python Virtual Environments
Once you have set up Python and libpython on a machine and installed a Deephaven RPM/tar, you are ready to create your Python environment(s).
The Deephaven installation provides the following:
deephaven.whldeephaven_jupyter_grid.whl- A set of
requirements.txtfiles - Some scripts to easily automate the installation and automatic update of
venvenvironments
Deephaven can also be installed from PyPi using python3 -m pip install, but we package the wheels directly in the Deephaven installation so they can be installed without network connectivity.
The wheels can be found in /usr/illumon/latest/python/wheels, and the requirements.txt files in /usr/illumon/latest/python/envs/.
Auto-provisioning is a two-step process:
-
Set up auto-provisioning:
/usr/illumon/latest/install/python/setup_dh_auto_provision.sh- Done once per machine, but safe to run many times.
- Writes configuration files describing your venv to
/etc/sysconfig/deephaven/python/. - Can be used to add new versions of Python as they are supported.
-
Invoke auto-provisioning:
/usr/illumon/latest/install/python/auto_provision.sh- Reads in all venv configuration files in
/etc/sysconfig/deephaven/python/and invokespip installfor you. - Can be invoked manually, typically done right after setting up
auto_provision. - Performed automatically on every Deephaven upgrade, to use compatible
deephaven.whl. - Only updates supported Python environments; configuration for unsupported Python versions is ignored.
- Reads in all venv configuration files in
Currently, Deephaven will create up to three virtual environments:
/db/VEnvs/python39/db/VEnvs/python310/db/VEnvs/jupyter
A VEnv will only be created if the corresponding version of Python is present on this machine.
The Jupyter VEnv will be created with Python 3.10.
Note
/db/VEnvs are owned by the configured DH_ADMIN_USER (default irisadmin). This cannot be changed as we enforce these permissions on every upgrade. However, if users do not want irisadmin to own their own VEnvs, they can configure them in any other directory (see below).
Customer-configured Virtual Environments
Customers may choose to configure their own auto-provisioned virtual environments.
Note
This is a more advanced use case, and we recommend contacting customer support directly for detailed instructions, as you will also need some custom jpy props to use your custom VEnv.
As irisadmin, invoke:
/usr/illumon/latest/install/python/auto_provision.sh <name> <owner> <env-dir> <requirements-file>
<name>must be a unique identifier for the VEnv.<owner>is the user account who will own the VEnv.<env-dir>is where the VEnv will be created.<requirements-file>will be the requirements.txt used to create the VEnv.
Note that Virtual Environments created this way will be automatically updated whenever Deephaven is upgraded.
Deephaven requirements.txt
Deephaven ships with the following requirements.txt, to ensure compatible dependencies are used:
/usr/illumon/latest/python/envs/py39/specs/worker-standard/requirements.txt
These files are used to auto-provision Python venvs.
/usr/illumon/latest/python/envs/py39/specs/jupyter-notebook-server/requirements.txt/usr/illumon/latest/python/envs/py310/specs/worker-standard/requirements.txt/usr/illumon/latest/python/envs/py310/specs/worker-jupyter/requirements.txt/usr/illumon/latest/python/envs/py310/specs/jupyter-notebook-server/requirements.txt
You can take the desired requirements.txt files from your Deephaven installation to set up your own Python environment on other machines or using different Python environment managers. However, keep in mind that these environments will not automatically receive the latest Deephaven wheels when you upgrade your system. To install the necessary packages, simply copy the desired requirements.txt file and run pip3 install -r path/to/requirements.txt. For a complete example, refer to the section on Creating a Local Python VEnv.
Warning
Avoid editing these files to manage your own dependencies. If you do so, your changes will be overwritten on the next Deephaven upgrade. See Customer-configured Virtual Environments to customize your chosen dependencies (e.g., adding more dependencies).
Add other packages to worker VEnvs
Additional packages can be installed to Deephaven Query and Merge server VEnvs to make them available to Python worker processes.
One way to achieve this is to create your own requirements.txt file associated with the virtual environment and then running Customer-configured Virtual Environments.
Another option is to install the packages interactively on an ad-hoc basis:
sshor otherwise log on to each Query or Merge server where a package needs to be available to workers. (VEnvs are not shared between servers, so, if a package is needed on all Query servers, it needs to be installed to each of them.)sudo su -to the Deephaven system admin account (irisadmin, by default).- Activate the Python VEnv into which the new packages should be added; e.g.,
source /db/VEnvs/python39/bin/activate - Use
piporpip3to install the desired packages.
Configure jpy for Deephaven
Once you have installed the Deephaven wheel on your machine, you are ready to launch a Persistent Query or console worker. To do so, you must provide the location of the necessary Python shared libraries.
Core+ workers are configured using a Python virtual environment associated with worker kinds. For Legacy workers, configuration properties select Python libraries. The properties for Legacy workers can be supplied at runtime as Java system properties, and are also set for you in iris-defaults.prop.
jpy.programNamereferences the path to the Python executable for your Python environment.jpy.jpyLibreferences the jpy dynamic library from your Python environment, which comes from thejpypackage once it is installed into your environment.jpy.jdlLibreferences the jdl dynamic library from your Python environment, which also comes from thejpypackage once it is installed into in your environment.jpy.pythonLibreferences the dynamic library associated with your Python executable.
These properties are meant to be set on any given query worker to select a particular Python environment. Remembering and typing all four of these paths is laborious and error-prone, so we instead use a "prop stanza" to group these paths into a single, easy-to-remember system property: jpy.env.
The iris-defaults.prop file that is shipped with and automatically updated by your Deephaven installation has predefined jpy.env configuration stanzas matching the default paths for all Python shared libraries and executables when auto-provisioning is used.
- If you used Deephaven auto-provisioning to set up a
python3.9virtual environment, just set system property-Djpy.env=python39, start your query / console, and enjoy using Python in Deephaven. Note: Ubuntu users must also add-Dos=ubuntu. - If you are not using auto-provisioning or if your installed libpython does not match the defaults supplied in
iris-defaults.prop, you can add your own configuration stanzas, based on the examples below.
jpy prop configuration examples
All configuration below are prop-files, which you can edit using /usr/illumon/latest/bin/dhconfig properties export/import iris-environment.prop.
Important
Values shown below are all system defaults that are set in iris-defaults.prop. Do not edit iris-defaults.prop, as it will be overwritten the next time Deephaven is updated.
Put your own global configuration in iris-environment.prop.
Select a VEnv by passing -Djpy.env=python39:
[jpy.env=python39] {
    jpy.programName=/db/VEnvs/python39/bin/python3.9
    jpy.pythonLib=/usr/lib/libpython3.9.so
    jpy.jpyLib=/db/VEnvs/python39/lib/python3.9/site-packages/jpy.cpython-39-x86_64-linux-gnu.so
    jpy.jdlLib=/db/VEnvs/python39/lib/python3.9/site-packages/jdl.cpython-39-x86_64-linux-gnu.so
}
[jpy.env=python39,os=ubuntu] {
    jpy.pythonLib=/usr/lib/x86_64-linux-gnu/libpython3.9.so.1
}
Note
The os=ubuntu stanza shows how to use more than one system property to select a group of related Python configuration props. The only difference between Ubuntu and other operating systems is where libpython is found, so add an extra stanza just to set jpy.pythonLib when -Dos=ubuntu is used.
If your default location of libpython does not match the iris-defaults.prop values, you must add your own updates to iris-environment.prop or another prop file that you wish to use in your Python client.
To find libpython, search your system locations:
# check configured system libraries
ldconfig -p | grep libpython
# look in /usr directory, or anywhere else you may have installed libraries
find /usr -type f -name "libpython*"
To select a VEnv by passing -Djpy.env=python310:
[jpy.env=python310] {
    jpy.programName=/db/VEnvs/python310/bin/python3.10
    jpy.pythonLib=/usr/lib/libpython3.10.so.1.0
    jpy.jpyLib=/db/VEnvs/python310/lib/python3.10/site-packages/jpy.cpython-310-x86_64-linux-gnu.so
    jpy.jdlLib=/db/VEnvs/python310/lib/python3.10/site-packages/jdl.cpython-310-x86_64-linux-gnu.so
}
[jpy.env=python310,os=ubuntu] {
    jpy.pythonLib=/usr/lib/x86_64-linux-gnu/libpython3.10.so.1
}
To select a VEnv by passing -Djpy.env=jupyter:
[jpy.env=jupyter] {
    jpy.programName=/db/VEnvs/jupyter/bin/python3.10
    jpy.pythonLib=/usr/lib/libpython3.10.so
    jpy.jpyLib=/db/VEnvs/jupyter/lib/python3.10/site-packages/jpy.cpython-310-x86_64-linux-gnu.so
    jpy.jdlLib=/db/VEnvs/jupyter/lib/python3.10/site-packages/jdl.cpython-310-x86_64-linux-gnu.so
}
Alternate paths for files
Depending on how Python was installed, the shared object configured by jpy.pythonLib may be in a different path than indicated by the default values set in the iris-defaults.prop file. It may even be in a subdirectory and with a slightly different name.
The value the system is using for jpy.pythonLib can be checked with the property_inspector at the command line of any Deephaven server:
/usr/illumon/latest/bin/iris_exec property_inspector -j -Djpy.env=python39 -- -pn jpy.pythonLib -pf iris-common.prop
.
.
.
Searching for: jpy.pythonLib, starting with file: "iris-common.prop"

Name: jpy.pythonLib Value: /usr/lib/libpython3.9.so,/usr/lib64/libpython3.9.so.1.0,/usr/lib/x86_64-linux-gnu/libpython3.9.so.1 --- Line: 849 --- File: iris-defaults.prop --- Scope: [jpy.env=python39]
Name: jpy.pythonLib Value: /usr/lib/libpython3.10.so,/usr/lib64/libpython3.10.so.1.0,/usr/lib/x86_64-linux-gnu/libpython3.10.so.1 --- Line: 827 --- File: iris-defaults.prop --- Scope: []
-j -Djpy.env= is used to pass the property value for jpy.env into the property_inspector. The above result shows the value used when jpy.env=python39 (/usr/lib/libpython3.9.so) and the value used when jpy.env is not set (/usr/lib/libpython3.10.so).
The default paths for the various Python version shared objects are under /usr/lib/. Some Python installation processes may put the shared object under /usr/lib64 instead. In this case, the value can be updated in the iris-environment.prop file.
Note
Most of the default jpy.pythonLib values are in stanzas such as [jpy.env=python39]. Modifications of the path to the shared object for values originally in a stanza should also be placed in a matching stanza, so that the change only takes effect for corresponding values of jpy.env.
Setting a system default VEnv
Note
For Core+ workers, set the WorkerKind.DeephavenCommunity.venv property according to the customization instructions.
To set a systemwide VEnv default to something other than the initial default of python310, add the following property to the root scope (outside of any stanza) of iris-environment.prop:
RemoteQueryDispatcher.JVMParameters=-Djpy.env=<default_stanza_identifier>
For instance, to set the default to use the Python 3.9 stanza:
RemoteQueryDispatcher.JVMParameters=-Djpy.env=python39
Other custom sets of VEnv properties can also be added to iris-environment.prop with different jpy.env= values in their selector headers.
See examples above.
Note
For the RemoteQueryDispatcher.JVMParameters setting to take effect, the related worker launch application must be updated/restarted. For persistent queries, this means restarting the Persistent Query Controller. For the Web UI Code Studios, this is the web_api_service; for the Swing UI, this means reloading the client_update_service and then relaunching the Swing client so that it can pick up the new value. Other remote clients would need the jpy.env property and value added to the JVM arguments passed when starting the remote worker.
Test the Python server installation
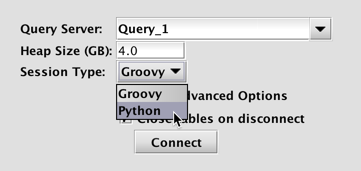
To test the Python installation, open a Deephaven console. To the right of Session Type, click the drop-down list and select Python as shown below. Then, under Advanced Options, supply the appropriate JVM flags (jpy.env) for the desired Python virtual environment, then click Connect.
Once the console has connected to the server, execute the following statement in the console:
from deephaven import *
If this does not result in an error, then your Deephaven environment should be properly configured. To verify you are using the intended Python version, execute the following:
import sys

print(sys.version)
For a more functional test, try the following:
foo = lambda x: x * x
z = 3.1415
tt = db.timeTable("00:00:01").update("I=i", "Y=foo.call(i)", "Z=z")
If the table below appears in the lower portion of the console window, Python is ready to use in the Deephaven console.
Python client workstations
Note
Core+ workers use the pure-Python Core+ Python client, which communicates over the server using gRPC. The following instructions and warnings relate only to a Legacy worker client.
Caution
The following client installation instructions are only required if you plan to execute Legacy Python queries outside of a Deephaven console or Persistent Query. The "local client - remote worker" scenario requires that Python objects are serialized and deserialized via the dill module, which relies on using the pickle protocol, which is not compatible between different versions of Python. It is a requirement that the same version of Python is being used by the local client and remote worker.
To connect to Deephaven servers from stand-alone Python clients, Deephaven Python packages are needed (covered just below), and Deephaven Java client components are also needed.
Installing Deephaven packages for independent Python installations
When installing Deephaven Python client components on other machines, the requirements.txt matching the client's Python version should be used. This ensures that compatible versions of other requirements, such as numpy, are installed. The requirements.txt files specify the deephaven package that matches the installed build. To ensure that this package is found, it should be manually installed before installing from the requirements.txt file.
- Copy
requirements.txtfor the matching version of Python from therequirements.txtpaths on the Deephaven server. For most stand-alone Python clients,worker-standardshould be used. - Copy
/usr/illumon/latest/python/wheels/deephaven-<version>-py2.py3-none-any.whlfrom the Deephaven server to the stand-alone client. - If a VEnv is being used, activate it, so that
pythonstarts the desired installation and version of Python. Alternatively, if multiple Python versions are installed without VEnvs, use the version-specific executable name, such aspython3.9instead ofpythonin the following commands. - Run
python3 -m pip install deephaven-<version>-py2.py3-none-any.whlto manually install the correct version of the Deephaven package. - Run
python3 -m pip install -r requirements.txtto install remaining packages needed by the Deephaven package.
The Creating a Local Python VEnv section provides a complete example of creating a new VEnv, and OS-specific guidance for different operating systems is further down on this page.
This example shell script to copies needed wheel and requirements.txt files from a local Deephaven server:
server=deephaven-server-i-want-to-connect-to.com
my_venv=~/.deephaven/venvs/py39
tmp_dir=/tmp/dh_download

mkdir -p "$tmp_dir"
scp "$server":/usr/illumon/latest/python/wheels/deephaven-1.20*.whl "$tmp_dir"/
scp "$server":/usr/illumon/latest/python/envs/py39/specs/worker-standard/requirements.txt "$tmp_dir"/

source "$my_venv/bin/activate"
if python3.9 -m pip install -r "$tmp_dir/requirements.txt" --find-links "$tmp_dir"; then
    rm -rf "$tmp_dir"
fi
jpy configuration considerations
In order for a Python client to be able to talk to a Deephaven server, it must start a Java Virtual Machine (JVM) using the libjvm shared library. In order to do this, you must tell the client where to find libjvm.so (or .dll/.dylib for Windows/Mac). This can be achieved through jpy configuration, or (on Unix systems) by adding the path to the directory containing libjvm.so to the system native library path variable, LD_LIBRARY_PATH.
Whenever starting a JVM from Python, it is highly recommended to always preload the libjvm shared library:
import jpyutil

jpyutil.preload_jvm_dll()
Define libjvm using jpyutil
The ideal way to tell Python where to find libjvm is to use jpyutil, a tool that is shipped with jpy, which will infer the location of libjvm from the JAVA_HOME variable (or similar variables, like JDK_HOME). It is enough to set JAVA_HOME before starting Python and then invoking jpyutil.preload_jvm_dll(), as described above, but it is also recommended to save the location of libjvm directly into your Python environment by invoking python3 -m jpyutil (usually done after activating your VEnv).
If Python cannot find libjvm, you will see errors that look like:
ImportError: libjvm.so: cannot open shared object file: No such file or directoryImportError: jvm.dll: cannot open shared object file: No such file or directory
To save the location of the desired libjvm shared library, invoke jpyutil as follows:
# Activate the desired Python environment
source /db/VEnvs/python39/bin/activate

# Setup java home.
# You may wish to simply export/set JAVA_HOME to a known location for Java on your system.
# On windows, use `set JAVA_HOME=C:\...`
# On Mac, `JAVA_HOME=$(/usr/libexec/java_home)`
if [ -z "${JAVA_HOME:-}" ]; then
    JAVA_HOME="$(readlink -m "$(command -v java)")"
    JAVA_HOME="${JAVA_HOME//\/bin\/java/}"
else
    JAVA_HOME="$(readlink -m "$JAVA_HOME")"
fi
export JAVA_HOME

# Invoke jpyutil
python3 -m jpyutil --req_java --req_py
# Note: if you need sudo to gain write permissions to site-packages directory,
# make sure you pass along your environment using `sudo -E python3 -m jpyutil...`,
# or use `sudo su correct_user` and then activate your venv + set JAVA_HOME as `correct_user`
The steps above, while optional, will write the location of a configuration file, site-packages/jpyconfig.py, which records a jvm_dll = /path/to/libjvm variable. This ensures that the JAVA_HOME used when you ran python3 -m jpyutil will always be the libjvm shared library used by the configured Python environment, regardless of your environment when you start a Python session. If you don't create this configuration file, you must supply JAVA_HOME every time you start your Python session.
Note
The path in site-packages/jpyconfig.py to libjvm may be a path to a link, with the linked version being specific to a version of Java that is installed; e.g., on OSX systems, this may be /usr/local/lib/libjvm.dylib, which then links to libjvm.dylib in a Java install directory under Library. If the actual libjvm.dylib referenced through this configuration entry and link is different from the version of Java used by the Deephaven installation, start_jvm will fail with class not found errors. In such cases, it will be necessary either to replace the link with one that points to the correct Java version of libjvm.dylib, or to update site-packages/jpyconfig.py to point directly to the correct Java version of libjvm.dylib instead of the /usr/local/lib/ link.
If python3 -m jpyutil fails to find libjvm from JAVA_HOME, you may additionally require setting LD_LIBRARY_PATH (described below) before invoking python3 -m jpyutil, but you will not need to keep the altered library path when starting a Python session from the environment where you ran jpyutil.
Further debugging of jpy issues may be facilitated by setting the environment variable JPY_LOG_LEVEL:
export JPY_LOG_LEVEL=DEBUG
Define libjvm using LD_LIBRARY_PATH (Unix systems only)
While the jpyutil tool can help Python figure out where to find libjvm and then load it at runtime using jpyutil.preload_jvm_dll(), you can also bypass this requirement by putting the path to the directory containing libjvm directly onto your system library path.
You can alter the system library lookup path using LD_LIBRARY_PATH or ldconfig, but this is generally not recommended. Many system admins will not allow a user to alter native library paths, and it can cause problems if system-wide LD_LIBRARY_PATH disagrees with the JVM the user wishes to select at runtime, or if you lose system-configured library paths by overwriting instead of appending to the library path.
You should not use LD_LIBRARY_PATH unless the jpyutil solution above does not work for you.
If you must use LD_LIBRARY_PATH, you should add the parent directory where libjvm is found in your JAVA_HOME:
find $JAVA_HOME -name "libjvm*" -exec dirname {} \;
Connectivity for client systems
Python client connectivity is comparable to connectivity for the Deephaven Swing UI (thick client). In a default environment, this will require that all Deephaven servers are resolvable from the client's network connection, and that a variety of ports are accessible to the client from the Deephaven servers.
If Deephaven is configured to use Envoy, then all client communications with the Deephaven cluster will be proxied through the Envoy service. The client will only need to resolve the Envoy service name and connect to its configured external port.
See Deephaven process ports for details of processes and default ports needed for connectivity in systems not configured to use Envoy.
Package installation for client systems
There are many ways to set up and maintain a Python environment - far too many to cover here. This section will provide some simple guidance for a few different options for popular Operating Systems. A more detailed guide is provided elsewhere for how to set up a local VEnv.
Windows guidance
Anaconda is probably the simplest way to set up and maintain a Python environment on Windows, and the necessary packages are in the conda repository. After installing the desired Anaconda version (which also supplies pip), simply perform the command (for 64-bit Windows):
conda install dill wrapt numpy scipy pandas
Deephaven packages can be installed by executing the following:
python3 -m pip install deephaven
Mac OSX guidance
A stripped-down version of Python comes installed with OS X, but there are many fewer complications observed when avoiding the use of this OS X system Python. It is recommended that the user use Anaconda (same as Windows instructions) or Macports. Anaconda and Macports segregate all packages from the Mac OS X native libraries, and makes it easier to avoid problems and conflicts with system packages. Homebrew is based on integrating with the system packages, which can be problematic specifically for Python usage. If you do choose Homebrew, you should only install Deephaven into a local Python VEnv.
For Macports, after basic Macports configuration, execute the following:
sudo port install python<version>
<version> indicates the desired Python version (currently 39 and 310 are supported by Deephaven). Note that Macports supports installing and using multiple versions. After the install completes, follow with the dependencies. Assuming you are installing <version>=39, execute the following:
sudo port install py39-pip py39-wrapt py39-dill py39-numpy py39-scipy py39-pandas
Perform the suggested port select --set pip pip<version> to make the desired version of pip the default. Otherwise, directly use the appropriate pip command for the desired version; i.e., pip-3.9 or pip-3.10. Then run the following:
sudo python3 -m pip install deephaven
If system Python is used (i.e., installed via Homebrew), Python may be unable to find libjvm using LD_LIBRARY_PATH because Apple System Integrity Protection (SIP) precludes redirecting the loader for System resources. If this is an issue, use Anaconda or Venv to create a Python environment where you are allowed to alter how shared libraries are loaded.
Linux guidance
Use the package manager, as appropriate for your Linux distribution, to install the appropriate version of Python and the associated pip. It is likely that associated numpy and pandas packages also exist in the package manager, as may wrapt and dill. Otherwise, these packages will installed by pip as dependencies of the deephaven package.
The deephaven package can then be installed from PyPI by using pip:
sudo python3 -m pip install deephaven
Set up the Deephaven Client Environment
To run Deephaven from a Python session, you need to:
- Correctly set up Java and jpy
- Create local copies of Deephaven Java jars and configuration files
- Provide flags / environment variables to enable Deephaven to connect your local Python session to a remote Python session.
In order to get all the necessary files, you can either use a Deephaven swing local workspace, use the Deephaven Updater, or download and unpack the file /usr/illumon/latest/install/deephaven_downloader.zip from a Deephaven server. This archive contains a Python script, update_workspace.py, which is used to download the correct binary and configuration files from any given Deephaven server to your local machine, so client applications like Python can securely communicate with that Deephaven server.
DEEPHAVEN_WORKSPACE Environment Variable
The DEEPHAVEN_WORKSPACE variable will be the root of the local Deephaven file structure, where all the necessary jars and configuration files for any number of remote Deephaven servers will be placed. When using the deephaven_downloader.zip archive to download files, the desired location (something like <user home>/deephaven/workspaces/remote) should be set in the environment variable DEEPHAVEN_WORKSPACE and will be created if it does not exist. That is, execute the following statement:
export DEEPHAVEN_WORKSPACE=<location>
To make this value persistent (and automatic), you may wish to put this statement in your .profile or .bashrc file.
DEEPHAVEN_DEVROOT Environment Variable
The DEEPHAVEN_DEVROOT contains all jar and configuration files for a particular remote server using a standardized file structure. This should be generically located at <DEEPHAVEN_WORKSPACE>/whatever/you/want/<instance>. Here, <instance> is some user-chosen instance name, and the contents are directly tied to the specific remote server that you wish to connect to. Before executing the deephaven_downloader process, set the environment variable DEEPHAVEN_DEVROOT to the desired location as an absolute path, or a relative path within the workspace; this directory need not exist.
In the case that more than one remote server will be used, you can set up more than one devroot, as in <DEEPHAVEN_WORKSPACE>/.iris/<instance_1> and <DEEPHAVEN_WORKSPACE>/.iris/<instance_2>, where <instance_1> and <instance_2> are named appropriately. Switching between the two amounts to setting the environment variable DEEPHAVEN_DEVROOT as appropriate.
Caution
Executing the deephaven_downloader process will affect (delete or modify) the entire contents of DEEPHAVEN_DEVROOT.
Execute the deephaven_downloader process
Extract the deephaven_downloader archive to any desired working directory. Ensure that you have set the DEEPHAVEN_WORKSPACE, and DEEPHAVEN_DEVROOT environment variables as directed above. Change directories to the extracted zip file, then execute:
python update_workspace.py --host <host address>
<host address> is the appbase URL found in Find the Client Update Service Url.
The update_workspace.py script will create any missing directory structure as necessary and sync all appropriate files beneath DEEPHAVEN_DEVROOT from the server indicated by the --host argument. This process may take a while, especially the first time it is run on a particular devroot.
Once this is complete, you will be ready to prepare your local properties for jpy to log in to your Deephaven server and run a remote query.
DEEPHAVEN_PROPFILE Environment Variable
The properties file is an important way of sharing runtime properties between a given Deephaven client and server. It is assumed to be located in the directory <DEEPHAVEN_DEVROOT>/resources/, and the default is iris-common.prop. This file will not exist until after the update_workspace.py script from deephaven_downloader.zip has run.
Before trying to perform any local client/remote worker processing, set the environment variable DEEPHAVEN_PROPFILE=iris-common.prop. If desired, make your own copy of iris-common.prop, and export your DEEPHAVEN_PROPFILE environment variable to this new location. This environment variable is only used in the test script provided at the end of this document; your own Python client code may use a different method to supply the propfile= to deephaven.start_server().
Caution
The DEEPHAVEN_PROPFILE is typically found in the <DEEPHAVEN_DEVROOT>/resources/ directory. Because the entire contents of DEEPHAVEN_DEVROOT will be affected (deleted or modified) by executing the bootstrap process, any changes that you make to the DEEPHAVEN_PROPFILE will be overwritten if you rerun the bootstrap process.
For this discussion, the most important role of DEEPHAVEN_PROPFILE is that this file is where you will provide the appropriate jpy directives to tell the remote worker which Python version to use. Inside the DEEPHAVEN_PROPFILE file, whose full path is <DEEPHAVEN_DEVROOT>/resources/<DEEPHAVEN_PROPFILE>, insert the line:
RemoteQueryClient.extraJvmArgs=-Djpy.env=python39
Change python39 to whatever Python environment matches the remote server you want to connect to.
If you do not have local VEnvs created in /db/VEnvs, the default jpy.env shipped with Deephaven will not work for you.
You will instead need to set the jpy properties manually, based on your local system:
RemoteQueryClient.extraJvmArgs=-Djpy.programName=<value> -Djpy.pythonLib=<value> -Djpy.jpyLib=<value> -Djpy.jdlLib=<value>
If your local Python environments are not placed in /db/VEnvs like they are in an auto-provisioned Deephaven server, you will need to manually change these properties.
See the jpy Flags section above for details about the specific values. To figure these values out, it is simplest to:
- create a VEnv on your machine using a supported version of Python,
- find that jpy.env stanza in
<DEEPHAVEN_DEVROOT>/resources/iris-defaults.prop, - and simply change
/db/VEnvs/python3Xto/my/local/venv.
Create a local Python VEnv
While optional, this step will outline how to initialize a local VEnv in which you can run your Python client. We assume you have already run through the Python Installation Instructions, and for this example, we will assume we are creating a Python 3.9 VEnv.
First, create an empty VEnv:
my_venv=~/.deephaven/venvs/py39
python3.9 -m venv "$my_venv"
# activate the venv
source "$my_venv/bin/activate"
To begin, decide what you want to install. Fully tested and vetted Python .whl files are available on PyPI. To get a specific, official version, simply run pip install deephaven==1.2.3 with an internet connection, and you're all set. If you want to install without an internet connection or if you're using a development version of Deephaven that hasn't been published to PyPI, you'll need to download the .whl files and the requirements.txt directly from the Deephaven server you wish to connect to.
Assuming your server is my-server.com, you can download and install the .whl directly from that server.
The locations of the files you need to download are described in the Deephaven requirements.txt and Automatic Provisioning sections. A simple example is given below:
server=deephaven-server-i-want-to-connect-to.com
my_venv=~/.deephaven/venvs/py39
tmp_dir=/tmp/dh_download

mkdir -p "$tmp_dir"
scp "$server":/usr/illumon/latest/python/wheels/deephaven-1.20*.whl "$tmp_dir"/
scp "$server":/usr/illumon/latest/python/envs/py39/specs/worker-standard/requirements.txt "$tmp_dir"/

source "$my_venv/bin/activate"
if pip install -r "$tmp_dir/requirements.txt" --find-links "$tmp_dir"; then
    rm -rf "$tmp_dir"
fi
While more complex to copy these files than to just pip install deephaven, it ensures that your local Python environment matches exactly what the specific server you wish to connect to is using.
Important
It is worth reemphasizing that the Python version used on the client must match the Python version used on the worker, which is a requirement for working serialization imposed by the dill module. Additionally, the version of the dill module itself may need to be the same version between the worker and the client.
Once you've installed Deephaven, be sure to follow the jpy Setup Guide, or at least set JAVA_HOME, as described in the jpyutil Guide.
Test the Python client installation
Now that everything is set up, you are ready to connect your local Python client to a remote Deephaven worker.
After following the bootstrap instructions and activating your local VEnv, you can run one or both of the scripts below to see examples of creating a remote query client and a remote database, and executing remote queries.
Simple example Deephaven script
import jpyutil
jpyutil.preload_jvm_dll()

import jpy
import deephaven

#properties needed to direct the client to use local properties files which are synchronized by the launcher or configuration updater utilities
jvm_properties = {
    "com.fishlib.configuration.PropertyInputStreamLoader.override": "com.fishlib.configuration.PropertyInputStreamLoaderTraditional"
}

#allows the JVM client to use the same properties defined for Swing consoles. This includes things like reverse proxy settings defined for the environment.
jvm_properties["service.name"] = "iris_console"

#suppresses property file load messages
jvm_properties["configuration.quiet"]  = "true"

deephaven.start_jvm(
    devroot="<path to the instance directory which contains java_lib, resources, etc>", #this directory is created by the Deephaven Launcher, the Deephaven Updater, or the update_workspace.py script
    workspace="<path to the workspace to use - often a sub-directory of workspaces under the devroot path>", #this directory is created by the Deephaven Launcher, the Deephaven Updater, or the update_workspace.py script
    propfile="iris-common.prop", #iris-common.prop is the default root property file. This should work for most environments.
    keyfile=None, #use a keyfile as an alternative to username/password authentication
    verbose=None, #set to true to enabled detailed logging during start_jvm
    jvm_classpath=None, #can be used to add extra paths to the classpath
    skip_default_classpath=None, #default adds classpaths for deephaven base jars, customer jars, and confguration files
    jvm_properties=jvm_properties,
)

#override default logging level to WARN, to reduce output to the python console/stdout
dli=jpy.get_type("com.fishlib.io.logger.DelegatingLoggerImpl")
sli=jpy.get_type("com.fishlib.io.logger.StreamLoggerImpl")
ll=jpy.get_type("com.fishlib.io.log.LogLevel")
jls=jpy.get_type("java.lang.System")
dli.setDelegate(sli(jls.out, ll.WARN))

#log in to Deephaven with username and password: username, password, operate-as username (same as username if not impersonating another user)
#the line below is not needed if using key based authentication (see start_jvm arguments)
AuthenticationClientManager = jpy.get_type("io.deephaven.enterprise.auth.AuthenticationClientManager")
AuthenticationClientManager.getDefault().passwordAuthentication("<username>", "<password>", "<operate as user>")

#connect to a query server. Default ports are 22013 for query servers and 30002 for merge servers. These ports and addresses are proxied automatically if Envoy is in use.
rqc = deephaven.RemoteQueryClient("<query or merge server name>", <query or merge server port>)

#start a worker, with specified MB of heap and specified profile
#the db object can then be used to create tables and run other operations, similar to the db object in a Deephaven console
db = rqc.getRemoteDB(4096, "Default")

#a simple query to get a partition and report the number of rows
print(db.i("DbInternal", "ProcessEventLog").where("Date=currentDateNy()").size())
Save this file to simple_test_deephaven.py, then edit it to fill in needed path and authentication information marked in < > delimiters. Then run:
export JAVA_VERSION=<Java version, e.g. jdk11, jdk17>
python3 simple_test_deephaven.py
The script suppresses most information messages by default. It will simply connect to the server and return the current number of rows in the DbInternal.ProcessEventLog table for today's date.
Example Deephaven script which demonstrates several features and operations
#!/bin/python3
import time
import jpyutil

jpyutil.preload_jvm_dll()
import deephaven
import jpy
import dill
import wrapt
import base64
import numpy
import argparse
import getpass
import sys
import os

from deephaven import TableTools

if sys.version_info[0] < 3:
    input = raw_input  # the method changed names

# In general you want to have these arguments, but by setting this to false,
# you can purposefully leave them off and see how start_jvm will respond to the
# null arguments.
requireArguments = True

default_workspace = os.environ.get("DEEPHAVEN_WORKSPACE")
default_devroot = os.environ.get("DEEPHAVEN_DEVROOT")
default_propfile = os.environ.get("DEEPHAVEN_PROPFILE") or "iris-common.prop"
default_query_host = os.environ.get("DEEPHAVEN_QUERY_HOST")
default_query_port = os.environ.get("DEEPHAVEN_QUERY_PORT") or "22013"
default_keyfile = os.environ.get("DEEPHAVEN_KEYFILE")

parser = argparse.ArgumentParser(
    description="This script provides a sequence of tests for executing a local Python "
    "script with table proxies and remote queries against a local remote "
    "query dispatcher."
)
parser.add_argument("-v", "--verbose", action="store_true")
parser.add_argument(
    "-w",
    "--workspace",
    help="Deephaven workspace directory",
    default=default_workspace,
    required=requireArguments and not default_workspace,
)
parser.add_argument(
    "-d",
    "--devroot",
    help="Deephaven installation root",
    default=default_devroot,
    required=requireArguments and not default_devroot,
)
parser.add_argument(
    "-c",
    "--config",
    default=default_propfile,
    required=requireArguments and not default_propfile,
    help="Configuration.rootFile for Deephaven system.",
)
parser.add_argument(
    "-a",
    "--address",
    help="Query server hostname or IP address",
    default=default_query_host,
    required=requireArguments and not default_query_host,
)
parser.add_argument(
    "-p", "--port", help="Query server port", default=default_query_port
)
parser.add_argument(
    "-k",
    "--keyfile",
    help="Default private key file. Not needed if --auth is used.",
    default=default_keyfile,
)
parser.add_argument(
    "-l",
    "--login",
    help="Use password authentication. Not needed if --keyfile is used.",
    action="store_true",
)
parser.add_argument(
    "-cp",
    "--class_path",
    help="Values to add to the JVM Classpath",
    action="append",
    nargs="+",
)
parser.add_argument(
    "-skip",
    "--skip_default_classpath",
    action="store_true",
    help="Use only explicitly set class path values",
)
parser.add_argument(
    "-e", "--python_env", default=None, action="append", help="Define VEnv to use"
)
parser.add_argument(
    "-s", "--service_name", default="iris_console", help="Define VEnv to use"
)

args = parser.parse_args()

# jpy.diag.flags = jpy.diag.F_ALL

if args.class_path is not None:
    cpFlat = []
    for sublist in args.class_path:
        for item in sublist:
            cpFlat.append(item)
    args.class_path = cpFlat

# We use com.fishlib.configuration.PropertyInputStreamLoader.override to be able to use local propfiles;
# if you are using prop files that are stored in your Deephaven cluster's etcd instance, you should be able to remove this
jvm_properties = {
    "com.fishlib.configuration.PropertyInputStreamLoader.override": "com.fishlib.configuration.PropertyInputStreamLoaderTraditional"
}

jvm_properties["service.name"] = args.service_name

if args.python_env is not None:
    jvm_properties["jpy.env"] = args.python_env[0]

# Initialize the JVM
deephaven.start_jvm(
    devroot=args.devroot,
    workspace=args.workspace,
    propfile=args.config,
    keyfile=args.keyfile,
    verbose=args.verbose,
    jvm_classpath=args.class_path,
    skip_default_classpath=args.skip_default_classpath,
    jvm_properties=jvm_properties,
)

# Ask the user for a username/password
if args.login:
    username = input("Username: ")
    password = getpass.getpass("Password: ")
    AuthenticationClientManager = jpy.get_type(
        "io.deephaven.enterprise.auth.AuthenticationClientManager"
    )
    AuthenticationClientManager.getDefault().passwordAuthentication(
        username, password, username
    )
else:
    print("--login not passed, skipping username / password.")
    if not args.keyfile:
        print("--keyfile not passed, authentication will likely fail!")

# Create a RemoteQueryClient
rqc = deephaven.RemoteQueryClient(args.address, int(args.port))

# Create a remote database
db = (
    rqc.getRemoteDB(4096, "Default")
    if not "jpy.env" in jvm_properties
    else rqc.getRemoteDB(4096, "Default", "-Djpy.env=" + jvm_properties["jpy.env"])
)

# This uses our local DB object to create a TimeTable proxy, then performs an update operation against it.
tt = db.timeTable("00:00:01").update("Diff=Timestamp-Timestamp_[0]")

origSize = tt.size()
time.sleep(3)
newSize = tt.size()
if origSize >= newSize:
    raise RuntimeError("Table did not tick!")
col = tt.getColumn("Diff")
direct = col.getDirect()
if len(direct) < newSize:
    raise RuntimeError("Direct is the wrong size!")
for ii in range(0, len(direct)):
    if direct[ii] != ii * 1000000000:
        raise RuntimeError("Direct[%d] is %d" % (ii, direct[ii]))


# Execute a simple remote query using the DB object instantiated by the jpy Holder
class RemoteQueryReturningTable:
    def execute(self, db):
        print("Inside of Table Query")
        return (
            db.i("DbInternal", "QueryOperationPerformanceLog")
            .select()
            .update("DataReads=FirstTimeDataReads+RepeatedDataReads")
        )


qopl = db.executeQuery(RemoteQueryReturningTable())
print("QOPL.size(): %d" % (qopl.size()))
try:
    qopl.getColumn("Quux")
except Exception as e:
    if not "columnName=Quux not found" in str(e):
        print(e)
        raise RuntimeError("Not expected exception text.")
dataReads = qopl.getColumn("DataReads")
colType = dataReads.getType()
if colType != int:  # this was long? I don't know...
    raise RuntimeError("Unexpected type: %s" % colType)

# This creates another table proxy, but is slightly more interesting than
# timeTable, because the i() method is defaulted in the Interface.
pqsl = db.i("DbInternal", "PersistentQueryStateLog")

pqsl = pqsl.where("Date=currentDateNy()")

# Dump out our globals on the remote side


class DumpGlobals:
    def execute(self, db):
        print("pyGlobals: " + str(globals()))
        print("pyLocals: " + str(locals()))
        return True


db.executeQuery(DumpGlobals())

# This is a simple remote query that demonstrates two things:
# (1) we can do something with numpy on the worker, and
# (2) we can also call deephaven.TableTools on the worker.


class NumPyRemoteQuery:
    def execute(self, db):
        import numpy
        from deephaven import QueryScope
        from deephaven import TableTools

        a = numpy.arange(0, 15).reshape(3, 5).ndim
        QueryScope.addParam("a", a)
        return TableTools.emptyTable(1).update("X=a")


npr = db.executeQuery(NumPyRemoteQuery())
TableTools.show(npr)
if npr.getColumn("X").get(0) != 2:
    raise RuntimeError("Expected dimension of 2!")


# This tests among other things printing out an array as a String; which used
# to not work with JEP, but does work with jpy as our Python integration.
class GetFirstDate:
    def execute(self, db):
        dates = db.i("DbInternal", "PersistentQueryStateLog").selectDistinct("Date")
        if dates.size() <= 0:
            raise RuntimeError(
                "Cannot operate on table PersistentQueryStateLog from namespace "
                "DbInternal because it has no data!"
            )
        x = dates.getColumn("Date").getDirect()
        print("Array Print: %s" % (str(x)))
        return x[0]


firstDate = db.executeQuery(GetFirstDate())


# This returns not just a Single value, but an entire array
class GetDateArray:
    def execute(self, db):
        dates = db.i("DbInternal", "PersistentQueryStateLog").selectDistinct("Date")
        x = dates.getColumn("Date").getDirect()
        return x


res = db.executeQuery(GetDateArray())
first = True
for x in res:
    if first:
        first = False
        if x != firstDate:
            raise RuntimeError("First date doesn't match: %s != %s" % (firstDate, x))


class DoMyPow:
    def myPow(self, x):
        return 2**x

    def execute(self, db):
        return self.myPow(4)


powResult = db.executeQuery(DoMyPow())
if powResult != 16:
    raise RuntimeError("Pow result %s" % powResult)


class NestedClasses:
    def execute(self, db):
        return DoMyPow().myPow(5)


db.pushClass(DoMyPow)
nestedResult = db.executeQuery(NestedClasses())
if nestedResult != 32:
    raise RuntimeError("NestedResult result %s" % powResult)


class IntegerHolder:
    def __init__(self, value):
        self.value = value

    def getValue(self):
        return self.value


seventySix = IntegerHolder(76)
if seventySix.getValue() != 76:
    raise RuntimeError("Value %s" % seventySix.getValue())
db.pushClass(IntegerHolder)


class ReturnClass:
    def execute(self, db):
        return IntegerHolder(1492)


rc = db.executeQuery(ReturnClass())
if type(rc) != type(seventySix):
    raise RuntimeError("Bad Type: %s " % type(rc))

if rc.getValue() != 1492:
    raise RuntimeError("Value %s" % rc.getValue())

print("This Deephaven Python client is working correctly!")
Save this file to test_deephaven.py and then, assuming you have activated your Deephaven VEnv and have set the various DEEPHAVEN_* variables in the Client Setup Guide, run:
server=my-query-server.com
python3 test_deephaven.py --address $server --login
The script will ask you for a Deephaven username and password.
It will then run some test queries to verify that your client Deephaven Python session is fully functional.