UI query management
This guide provides an overview of managing Persistent Queries (PQs) in the UI. PQs operate just like console-based queries except that they "persist" in your workspaces: they can be saved and configured to run on a schedule, which allows users to automate operations and dictate the intervals at which they are run. PQs can also be shared with other individuals or teams. The tables and plots generated by PQs are available in the Panels menu and can be added to Code Studios and Dashboards. Users can also open any PQ script available to them in a new Notebook panel by using the PQ Explorer in the Code Studio.
Query Monitor
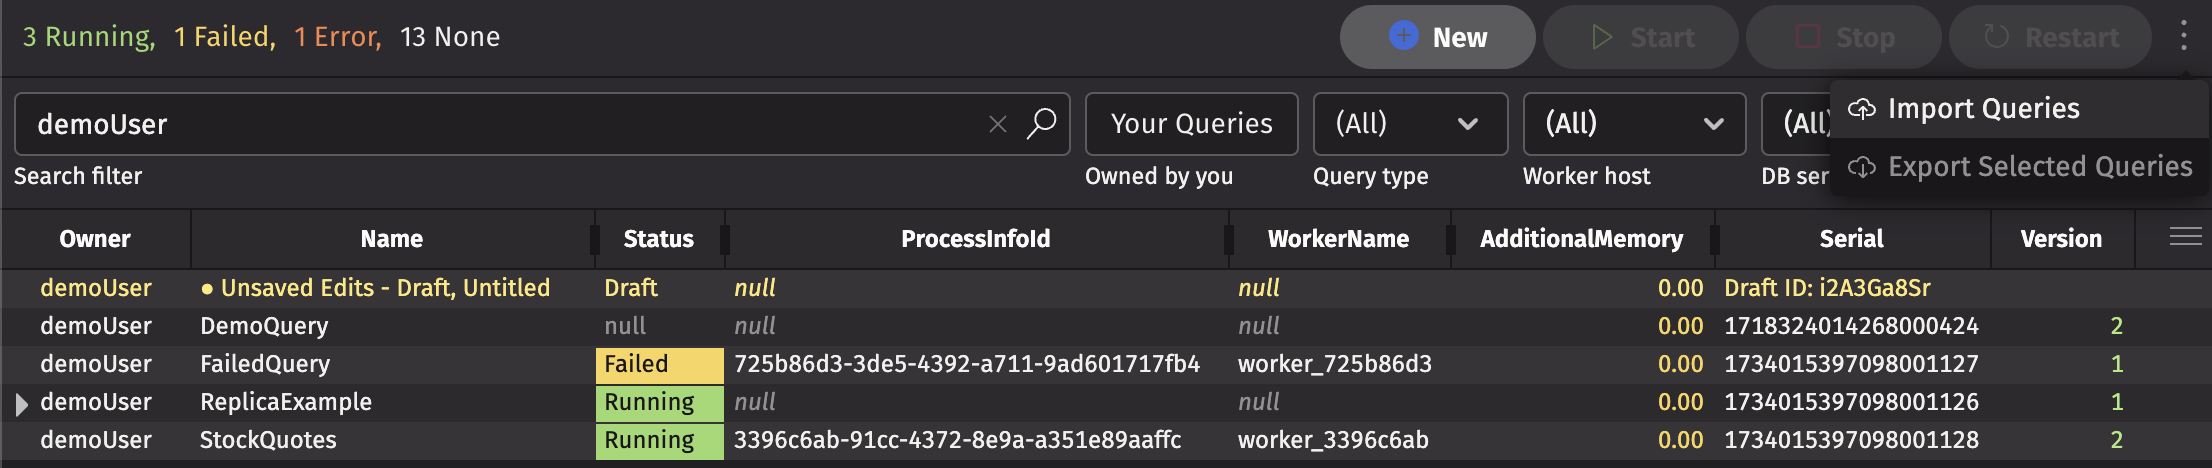
The Query Monitor enables users to manage and create PQs on the web. It is a table that displays information about each query you are authorized to view. The panel on the right displays summary information about the highlighted query, as well as tabs for configuration options and the query's script.
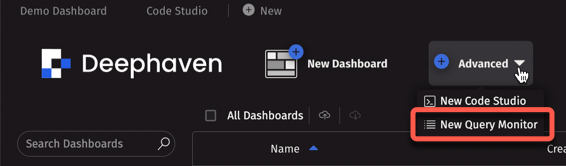
To open a Query Monitor, click the New button to access the Advanced menu, then select New Query Monitor.
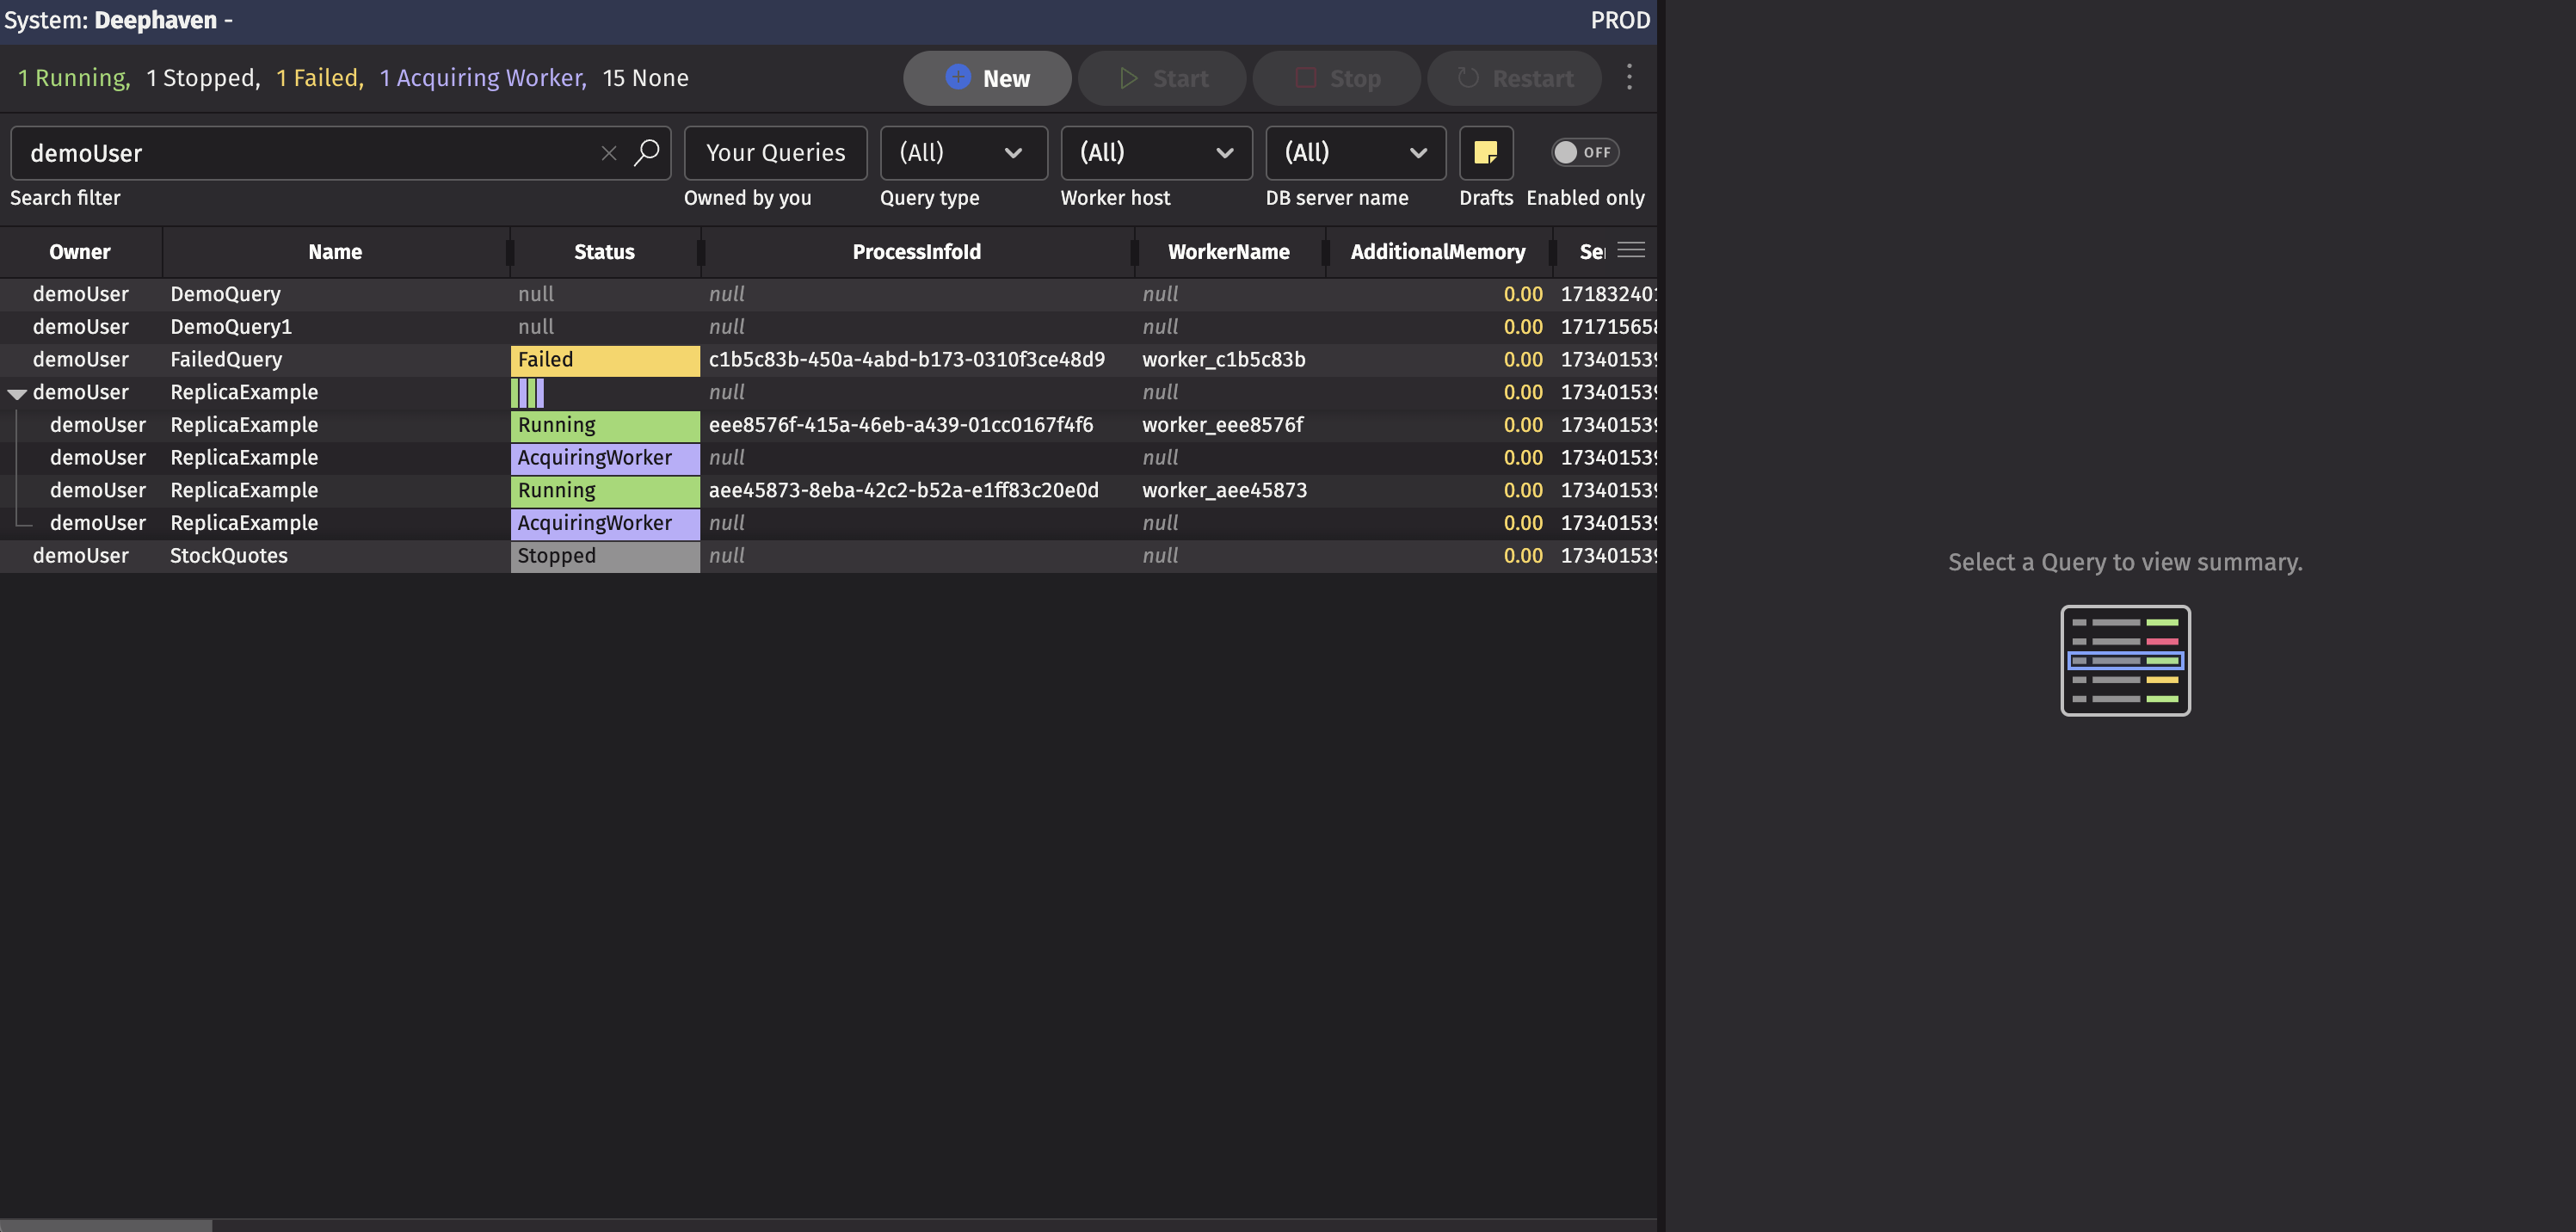
You can view, manage, and create PQs in the Query Monitor (shown above), which provides information about each PQ you are authorized to view, including its name, owner, status, type, and more. The content in the table can be sorted and filtered like any other table. You can sort through these queries by clicking on the column name. Click once to sort in ascending order and twice to sort in descending order. Right-clicking on a column header opens the Deephaven header context menu, with options to hide, filter, or sort columns. Right-clicking on an individual cell opens the Deephaven cell data context menu, which allows you to filter the table by that cell's value, or copy data.
Default PQs
Administrative users will see several additional queries that help Deephaven run properly:
WebClientData: The Web Client Data query must be running for the Deephaven Code Studio to function. If this query is stopped, a Restart WebClientData button appears for any superuser. The button allows you to restart the query and thus reinitialize your Code Studio session.WorkspaceSnapshot: Typically run nightly, it takes snapshots of the WorkspaceData table. This helps the web UI respond faster during loading when a user logs in.RevertHelperQuery: The Revert Helper query is used by the Classic Swing UI to assist Deephaven when a query is reverted to a previous version.ImportHelperQuery: The Import Helper query is used by the Classic Swing UI to assist with import, merge, and validation queries.TelemetryHelperQuery: The Telemetry Helper query is used by the Classic Swing UI to record the user-perceived delay of UI operations.QueryLogHelper: TheQueryLogHelperquery is used by the web UI to display logs for troubleshooting queries.
Buttons
The buttons at the top allow users to create new queries and start or stop existing queries.
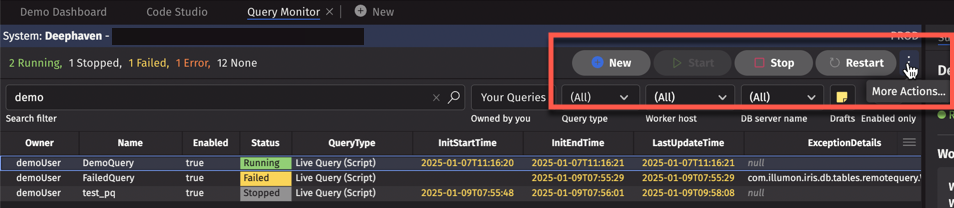
Note that the Restart button restarts all selected queries, whereas the Start button only starts queries with Non-Running Status, such as Stopped, Error, or Failed. The Stop button stops all selected queries.
The More Actions menu includes options to import queries from your local file system and to export queries and related dashboard as XML files.
Convenience filters
Users can take advantage of convenience filters built into the header of the Query Monitor.
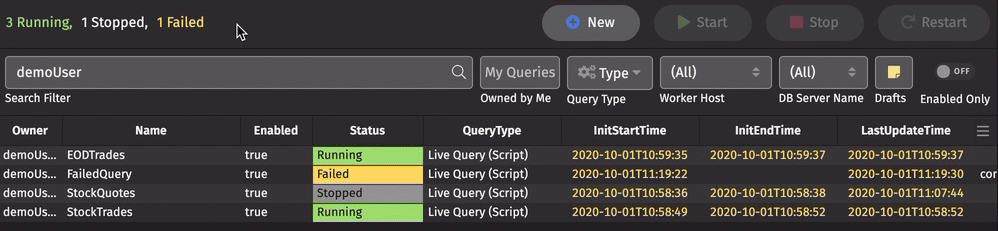
Clicking on a displayed status filters the Status column for that status. Multiple statuses can be selected:
Below the statuses, the Quick Filter bar includes the following options:
- Owner / Name
- My Queries
- Query Type
- Worker Host
- DB Server Name
- Drafts
- Enabled Only
Table data menu
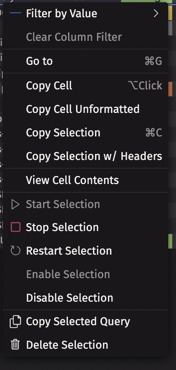
The Query Monitor table data menu includes several options to start and stop your queries, as well as to copy the selected query's script into a new PQ, or delete the selected query. Right-click within the table data to open this menu:
Query Configuration Panel
The panel at the right of the Query Monitor displays summary information about the highlighted query, as well as tabs for configuration options and the query's script. These tabs are discussed in detail in the subsequent sections.
Query Monitors persist in the All Dashboards menu in the New+ tab, and retain any filters or sorts applied to the Query Monitor, as well as any Markdown widgets associated with the panel.
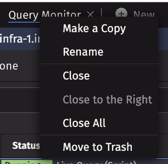
To rename, close, or make an identical copy (including applied filters and sorts) of the Query Monitor panel, right-click its tab:
When you select a query name in the table, the panel on the right side of the Query Monitor shows further information about that query. This information is presented in the following tabs:
Note
Only the query summary is available if you are not authorized to edit the query.
Summary
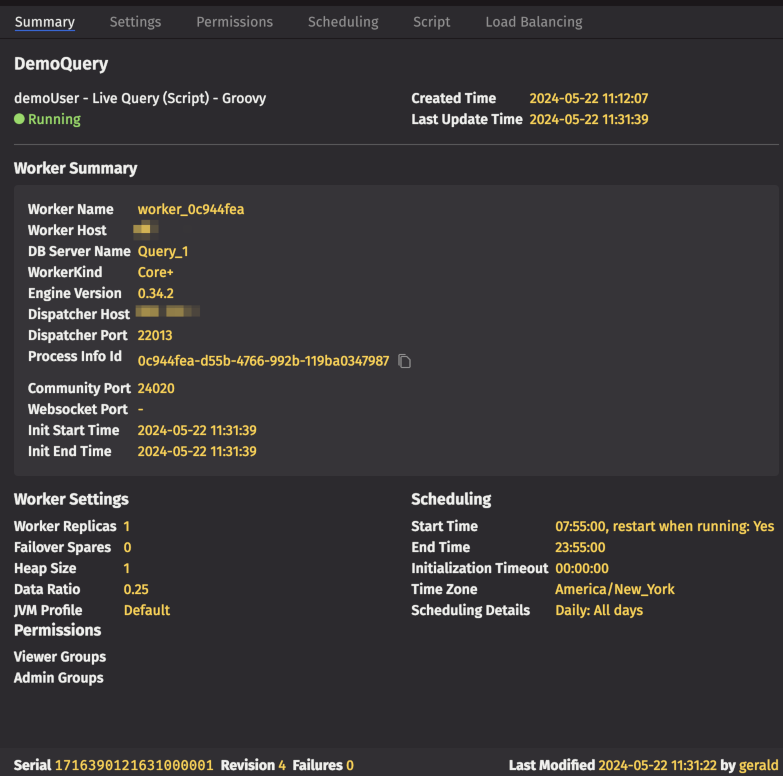
In the example below, the Summary tab displays details for the highlighted query named "DemoQuery", presenting the same information as in the Query Monitor in one easy-to-read screen. Details include the query's start and end time, the last time the query was updated or modified, worker settings, scheduling information, permissions, and full exception details when applicable. If the query has replicas or spares, the Summary tab displays the status of each one for owners and administrators.

Create Persistent Queries
Select the New button at the top of the Query Monitor to create a new PQ.

This opens a new instance of the Query Configuration Panel.
Settings
Configuration Fields
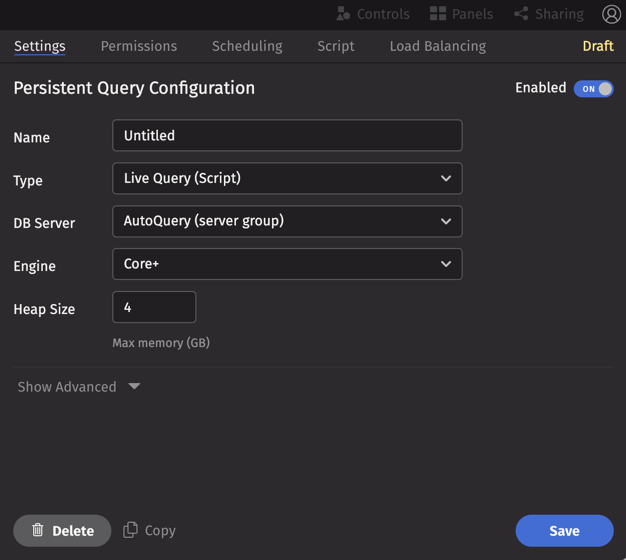
The Settings tab includes the following configuration fields:
Enabled
This button indicates whether the query is enabled. When Enabled is set to "On", the query attempts to run according to its schedule. If you do not want the query to run, toggle the button to "Off".
Name
Query names can be any combination of characters and numbers. However, each query in a given installation of Deephaven must have a unique name.
Type
This is the query configuration type.
DB Server
The DB Server setting allows you to select the database server associated with your Deephaven installation and the chosen query configuration type.
Server classes determine what types of queries can be run on each server, and are used by the Code Studio to determine which database servers a user can select for each query type.
A Deephaven installation has two server classes configured by default:
- Merge - this class is for servers and queries that need to load data into the database, either intraday (such as the import queries), or historical (the merge query).
- Query - this class is for queries that query data but do not need to write it, such as scripts.
When creating or editing a PQ, the Persistent Query Configuration Editor automatically populates the DB server field with appropriate options: e.g., "AutoQuery" for Live Query script queries.
Engine
This option allows you to select between Legacy or Core+ workers.
Heap Size
How much memory (in GB) to provision for the query's Java heap. Additional Memory in advanced settings allows you to specify a memory allocation beyond the Java heap.
Show Advanced
This opens advanced settings for the query:
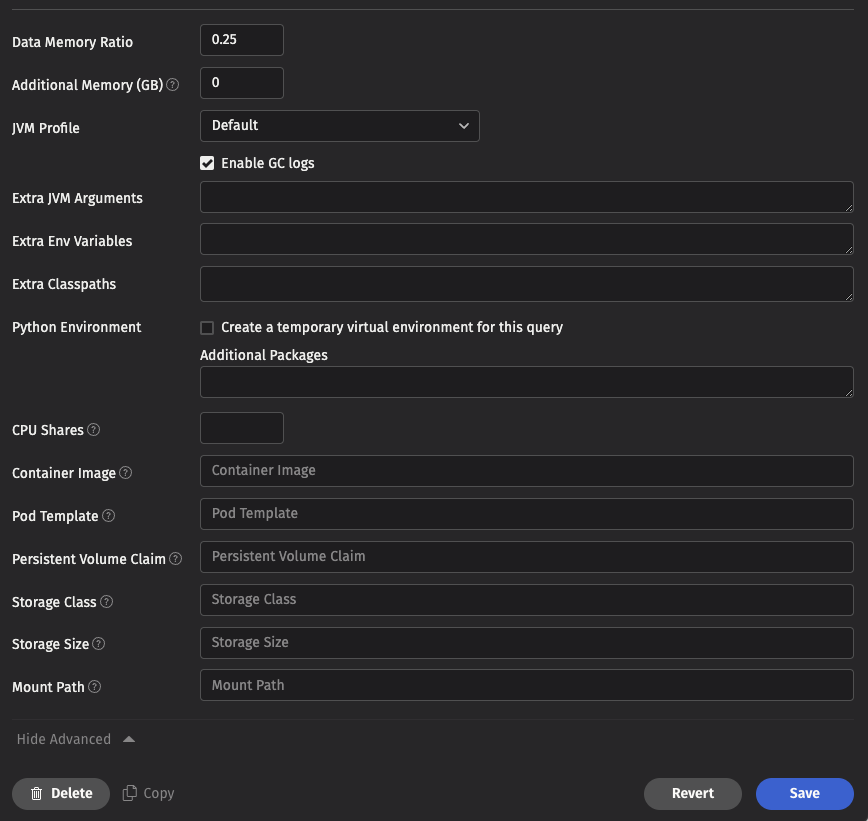
- Data Memory Ratio - Data Memory Ratio is a memory tuning parameter that specifies what percentage of the memory heap is reserved for caching data read from persistent storage. This enables Deephaven to cache data frames into memory on an as-needed basis, which in turn speeds up the processing. The default value of ".25" in that field means 25% of the memory noted in the setting for Memory (Heap) Usage is allocated to the database buffer cache.
- Additional Memory - The amount of additional memory (in GB) allocated to this worker process beyond the JVM heap memory. This allows Deephaven to account for memory allocated by Python native code, Java direct memory, and other types of non-heap memory. This setting is especially important on Kubernetes, because if a worker's memory usage exceeds the total allocated heap and additional memory then it is terminated with an out-of-memory error.
- JVM Profile - The Java Virtual Machine (JVM) contains a garbage collector to free unreachable memory automatically. There are multiple garbage collection algorithms, and many tuning parameters available for each algorithm. See Remote Processing Profiles for more information. The JVM Profile drop-down menu provides the following four options:
- Default - Use the default garbage collection parameters for your Deephaven system. This defaults to
G1 GC, but the Deephaven administrator can change the value. - CMS GC - Use Java's CMS (Concurrent Mark Sweep) garbage collection. Note that this garbage collector was removed in Java 17.
- G1 GC - Use Java's newer G1 (Garbage First) garbage collection.
- GI MarkStackSize 128M - Use the Custom MarkStackSize profile.
- None - Do not use any garbage collection parameters. Desired garbage collection parameters must be manually defined in the query's "Extra JVM Args" settings (see next topic).
- Default - Use the default garbage collection parameters for your Deephaven system. This defaults to
- Log GC Details - Garbage Collection (GC) is a memory management process that automatically removes objects not being used by a Java application. When the check box is selected (the default setting), Garbage Collection information for Legacy PQ workers is included in the PEL logs.
- Extra JVM Arguments - This field allows users to access different Java utilities that are not included in the base Deephaven installation. For example, one may want to run a different profiler or debugging processor. These items can be included in the Deephaven configuration by typing the extra JVM arguments in this field.
- Extra Environment Vars - Extra Environment Variables pass additional configuration information to Deephaven.
- Extra Classpaths—The Extra Classpaths field tells Deephaven where to look on the file system (server) for additional class files.
In addition to the general advanced settings above, the following tabs provide options specific to the selected worker type, allowing for fine-grained control over the worker's environment and resource allocation:
If you select a Core+ Python worker, then there are three additional options for configuring the worker's Python environment:
- Create a temporary virtual environment for this worker - When selected, a new virtual environment is created for this worker. On bare metal installations, a worker may not change the default shared virtual environment. To install additional packages (either with the Additional packages field or with
deephaven_enterprise.venv), you must create a temporary virtual environment. On Kubernetes clusters, you can install packages into the default virtual environment, as it is specific to your container instance and not shared across workers. - Include default packages - When selected, the temporary virtual environment is initialized with a copy of the packages in the default environment. Note that some of these packages are necessary for Deephaven to function, but you may want to exclude them so that you can experiment with different versions of the packages.
- Additional packages - A space-separated list of additional requirements to install into the virtual environment on startup.
When running on a Kubernetes cluster, the following additional parameters are also available.
Note
Your Deephaven administrator may not permit changing all of these values (see Kubernetes worker parameters for more information).
- CPU Shares - Controls the number of CPU shares requested by the worker pod. If not specified, no explicit CPU request is made and the cluster uses the default value.
- Container Image - The path to the container image to use for this worker.
- Pod Template - An alternative pod template to use for this worker. This allows you to change many of the worker settings.
The following four options allow you to attach storage to your worker. This is necessary, for example, to create an in-worker DIS or Kafka Ingester:
- Persistent Volume Claim - Mount the persistent volume claim with this name in your worker pod, or create a persistent volume claim if it does not exist.
- Storage Class - If creating a new volume claim, use this storage class.
- Storage Size - The amount of storage in bytes. May be expressed in Mi, Gi, etc as in 10Gi.
- Mount Path - Location for the volume to be mounted in your worker.
Buttons
At the bottom of the Settings tab are the following buttons:
- Delete: This deletes the PQ.
- Copy: This copies the configuration settings and the script, which creates a draft of a new, identical query in the Query Monitor.
- Revert: This reverts any changes made since saving the settings and restores the settings to the last saved version.
- Save: This saves the current configuration settings.
Permissions
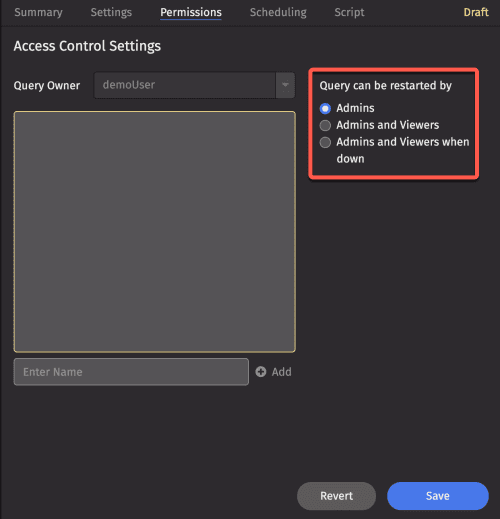
The Permissions tab opens the Access Control Settings, where users or user groups can be authorized to view and/or restart queries.
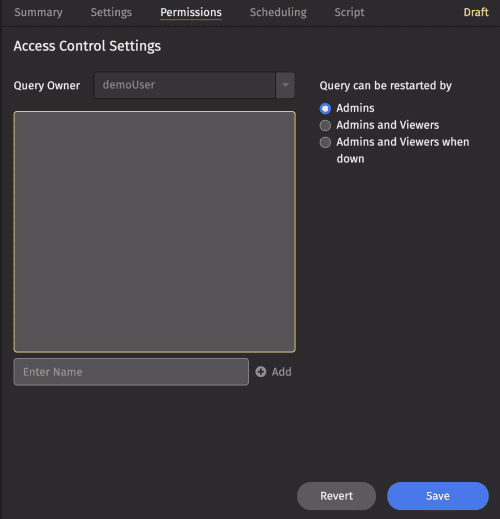
When creating a new query, your username is automatically added as the Query Owner for that query.
Note
Only superusers can open this field.
To add additional viewers to the query, select the Enter Name field. Type or select a name from the list, and click Add.
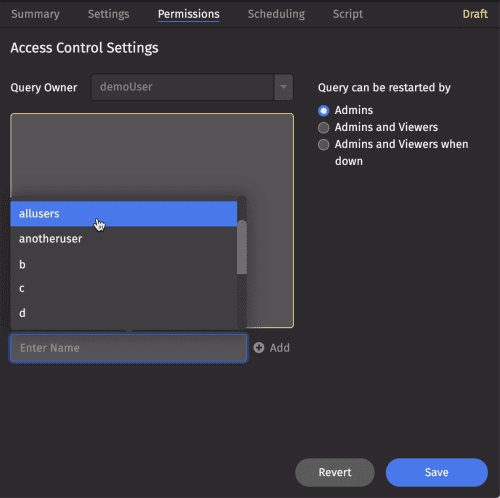
Once you add a user or user group to the authorized list, you can assign viewer or admin privileges using the drop-down next to the name.
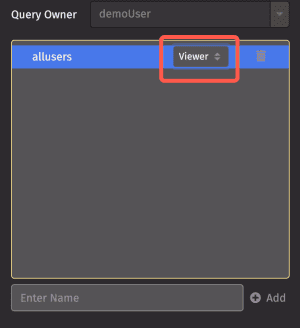
As the name implies, viewers can view the name of the query and its associated tables and plots, but they cannot edit the query code or start/stop the query (unless granted permission).
To the right of the authorized user list, you can choose which group(s) can restart the query:
Scheduling
The Scheduling tab is where you set the conditions upon which the query runs.
Schedule Type
The first section in the panel allows you to set the schedule for your query and set the respective parameters based on the scheduling option chosen. The available schedule types typically include:
- Daily
- Monthly
- Dependent
- Range
- Temporary (Batch Queries only)
- Continuous (Live Queries only)
- Disabled
Daily
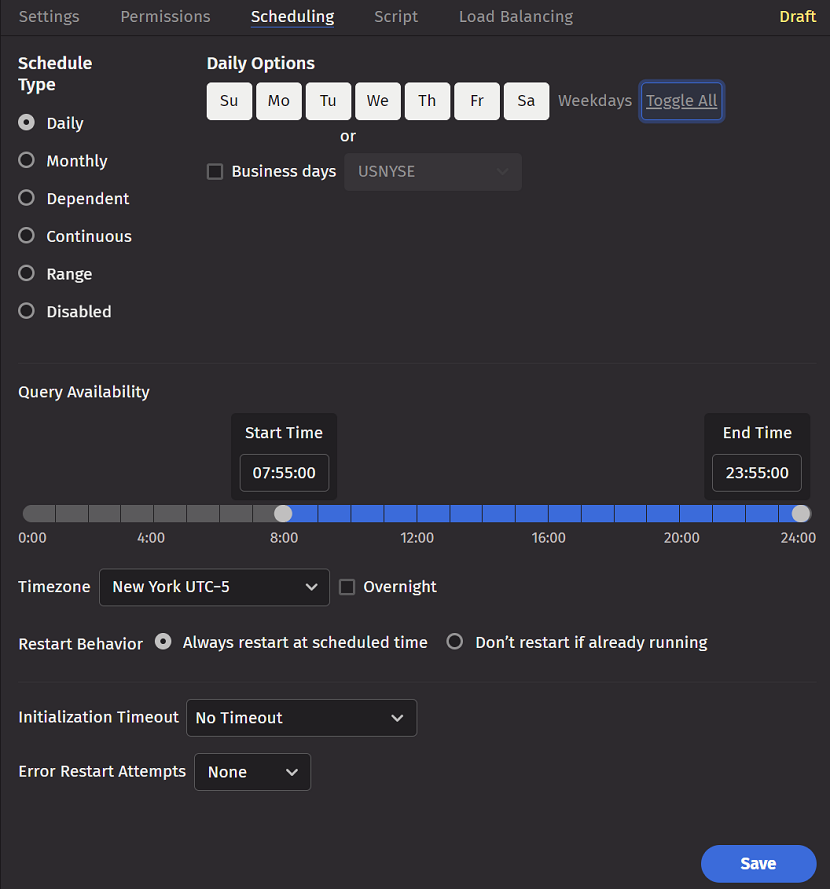
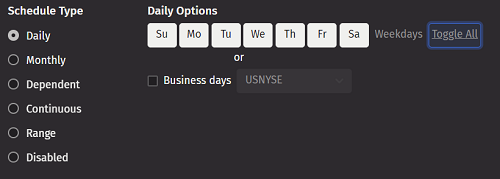
When Daily is selected, the top right part of the panel shows options for each day of the week. You can click on each day individually to include them in or remove them from the schedule, or you can select Weekdays or Toggle All to update the options accordingly. If Business Days is selected, the appropriate business calendar from the adjacent drop-down menu needs to be selected.
If Always restart at scheduled time is selected, a running query restarts when its next start time arrives (for example, if it was manually started). If Don’t restart if already running is selected, a running query does not restart when its next start time arrives.
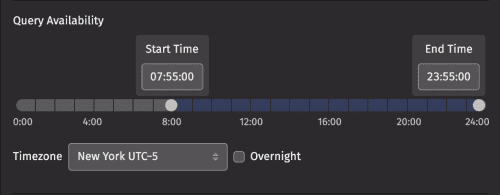
If Live Query is selected as the query configuration type, the middle of the panel shows a range slider for start and end time, as well as Timezone options and the Overnight checkbox. To adjust the the start time and end time, you can drag and drop the sliders to the desired position, or type values in directly.

If Batch Query is selected as the query configuration type, the middle of the panel shows the Repeat on Interval checkbox, and Start Time and Timezone options.
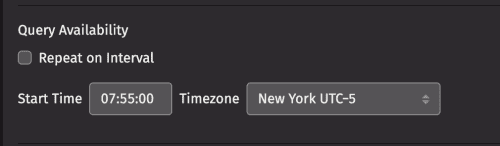
The Repeat on Interval setting enables you to set a timed interval (in minutes) for when the query should run again. When selected, the following options also appear:

When Skips Repeats If Unsuccessful is selected, Deephaven skips the Repeat on Interval process if the query did not process completely.
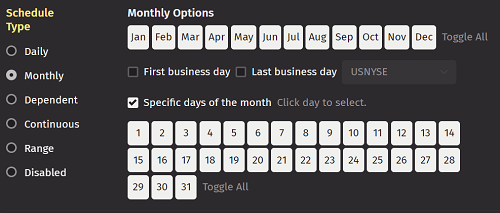
Monthly
When Monthly is selected, the top right part of the panel shows options for each month. The bottom of the Schedule Type section shows options for Specific Days of the Month. There are also options for First Business Day and Last Business Day, which require an appropriate business-calendar to be selected from the accompanying drop-down menu.
If Always restart at scheduled time is selected, a running query restarts when its next start-time arrives (for example, if it was manually started). If Don’t restart if already running is selected, a running query does not restart when its next start time arrives.
If Live Query is selected as the query configuration type, the middle of the panel shows a range slider for start and end time, as well as Timezone options and the Overnight checkbox. To adjust the the start time and end time, you can drag and drop the sliders to the desired position, or type values in directly.
If Batch Query is selected as the query configuration type, the middle of the panel shows the Repeat on Interval checkbox, and Start Time and Timezone options.
The Repeat on Interval setting enables you to set a timed interval (in minutes) for when the query should run again. When selected, the following options also appear:
When Skips Repeats If Unsuccessful is selected, Deephaven skips the Repeat on Interval process if the query did not process completely.
Dependent
Dependent scheduling means the running of this query is dependent upon another query. The first part of the panel prompts you to select a query and then configure the conditions on which the dependent query should run.
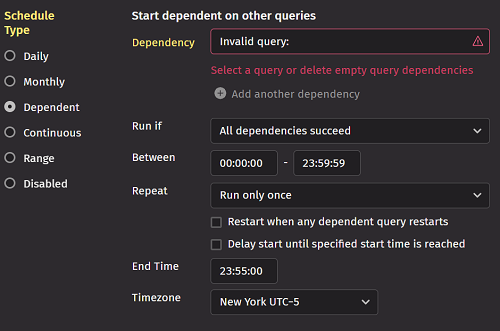
In the Dependency field, select the appropriate query. To select one or more additional dependencies, click the Add button at the bottom of the drop-down.
You can delete additional dependencies by clicking the trash can icon next to the query name:

The panel provides options to configure when to run or repeat the query.
The Run if field provides the following options:
- Any dependency succeeds - This means the dependent query runs when any one of the selected queries has successfully completed.
- Any dependency fails - This means the dependent query runs if any of the selected queries tries to run but fails.
- All dependencies succeed - This means the dependent query runs when all of the selected queries have successfully completed.
- All dependencies fail - This means the dependent query runs if all of the selected queries tried to run but failed.
The Repeat field provides the following options:
- Run only once
- Run each time conditions are met (also see the Restart when any dependent query restarts option below for further details)
The Restart when any dependent query restarts checkbox restarts the dependent query when the trigger condition is met, regardless of its state. If this is not selected, a dependent query is not restarted if it's not stopped when its dependencies are met. If the Repeat field is set to "Run Only Once" and the dependent query is already running, then even if a dependency restarts the dependent query continues to execute. If you want a running dependent query to restart each time a dependency restarts, then you must also select "Run each time conditions are met" in the Repeat field.
The Delay start... checkbox re-enables Query Availability options for the dependent queries configuration type. The query does not start until its dependent condition is met AND the start time has passed. If Overnight is checked, the live query is scheduled the same way as a typical overnight query.
Temporary
Note
This schedule type currently applies to Batch Queries only.
A temporary query is one that runs one time based on available resources. Once completed, it permanently deletes itself after a set time. These queries are especially useful when copying queries that import or merge data, as a temporary query can be defined to load data into a specific partition.
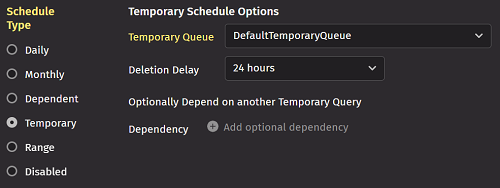
When Temporary is selected, the panel shows two drop-down menus:
- Temporary Queue—The name of the temporary queue that runs the query. The system administrator allocates temporary queues, which run queries when resources are available.
- Deletion Delay - The length of time before this query deletes itself once it has been run (whether the run was successful or not).
If you choose to add an optional dependency, you are prompted to select a query as shown:
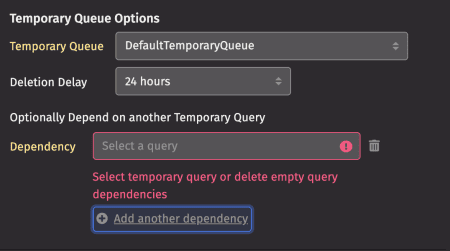
Selecting a dependency means that the query only runs after the chosen query completes successfully. A temporary query can only be dependent on another temporary query, not a query with another scheduling type. Click on the trash can icon to delete dependencies.
Continuous
Note
This schedule type only applies to Live Queries.
Continuous scheduling is an option for queries that would normally have an end time, such as a Live Query (Script). With continuous scheduling, the query does not have a defined start and stop time, but is instead defined to run continuously, with an optional daily restart.
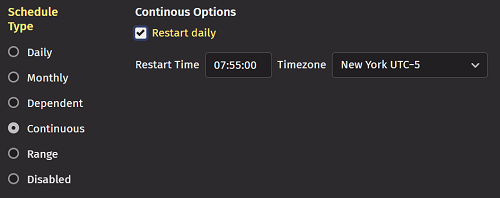
If the Restart Daily option is chosen, then a restart time must be selected. The query is stopped and restarted at this time every day.
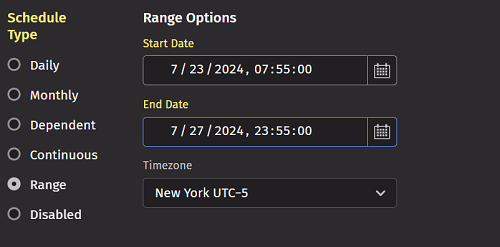
Range
Range scheduling allows you to specify a specific date/time on which a query should start, and another specific date/time on which the query should stop.
- If the start date/time is not specified, the PQ starts immediately.
- If the stop date/time is not specified, the PQ runs continuously and will not stop automatically.
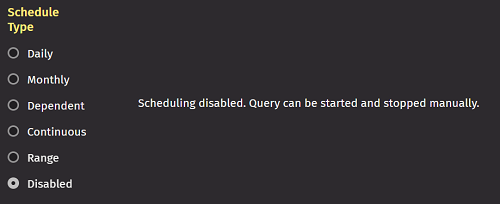
Disabled
When Disabled is selected, the rest of the options in this panel become unselectable. You must then start and stop the query manually.
Queue Configuration
For schedule types such as Daily, Monthly, Continuous, and Range, you can often specify the execution queue for the Persistent Query. This selection is typically available as a dropdown menu at the bottom of the Scheduling tab, allowing you to choose between available system queues.
- Default Queue: If selected, the query runs on the system's default processing queue. This is suitable for most standard queries and utilizes the standard resource allocation.
- Temporary Queue: Selecting a temporary queue means the query will run on a specifically allocated queue. These are often used for resource-intensive, short-lived, or ad-hoc tasks that shouldn't impact the main production queues. System administrators define and manage temporary queues. Note that the
Temporaryschedule type has its own integrated Temporary Queue selection, which includes specific lifecycle management like automated deletion of the query itself after execution.
Overnight Scheduling
Overnight scheduling is an option for queries that require an end time and are scheduled to run Daily or Monthly.
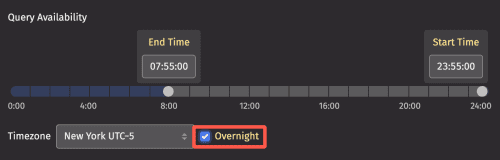
When Overnight is selected, the day(s) selected under Daily/Monthly Options (days of the week or calendar days) apply to when the query starts.
The Start Time selected for the query must be later than the End Time. For example, if an overnight query is scheduled to run on Monday and Tuesday from 17:00 - 16:00, the query would run on the following schedule every week:
- It starts Monday at 17:00
- It stops Tuesday at 16:00
- It starts Tuesday at 17:00
- It stops Wednesday at 16:00
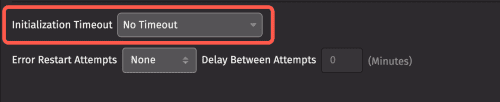
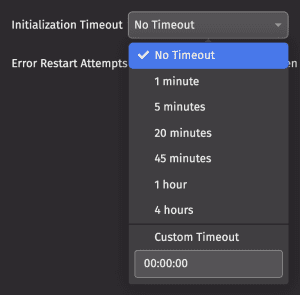
Timeout
For Live Queries, the Initialization Timeout setting enables you to set a period of time that the query is allowed to spend initializing; if it does not reach the Running state within that period, it is stopped. For Live Queries, this defaults to No Timeout (or a value of 0), which means no timeout is enforced. You may want to change this setting if you want to limit the amount of time your query is allowed to spend initializing.
Batch Queries require a maximum run time, which dictates how long the query can execute. A value of 0 is not allowed. The Scheduling dialog prompts you to select an appropriate value. A query that executes for longer than this timeout is stopped.

Click the drop-down menu to choose a preset option or enter a Custom Timeout value:
Error Restart Attempts
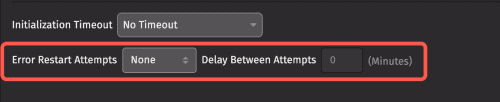
The Error Restart Attempts drop-down allows the query to restart automatically if it fails. An optional delay in minutes between restarts can be entered; if a query fails, the next restart attempt is delayed by this time. The error count resets next time the query is started due to its scheduling, or 24 hours after the last failure.
If you do not specify a delay and a query has attempted to restart more than 10 times since the last time the error count was reset, the query waits for a minute between retry attempts. This is to prevent a rapidly failing query from consuming excessive system resources.
Script
The Script tab allows you to write a new PQ script, or edit an existing script if you have the appropriate permissions.
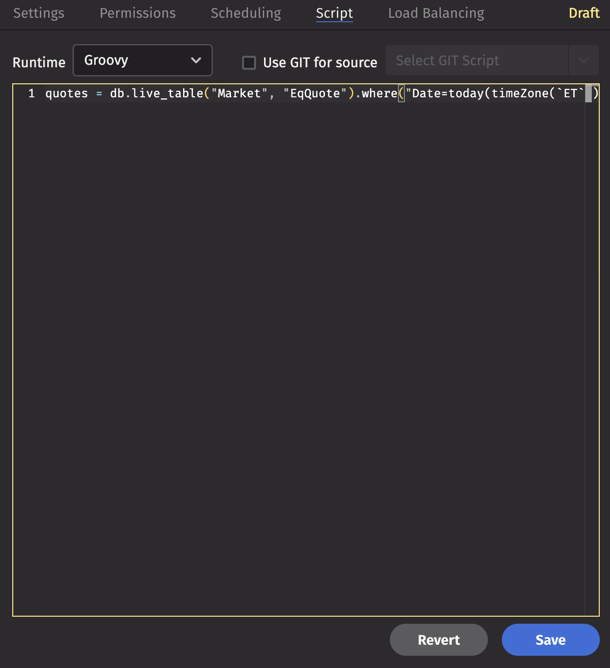
Runtime
Choose your preferred programming language: Groovy or Python.
Source from git
Query scripts are often written and stored within the Script Editor window in Deephaven, but you can also store your query script in a Git Repository that is accessible to Deephaven. When "Use GIT for source" is checked, you can select the appropriate script in that repository from the drop-down menu to associate it with this PQ.
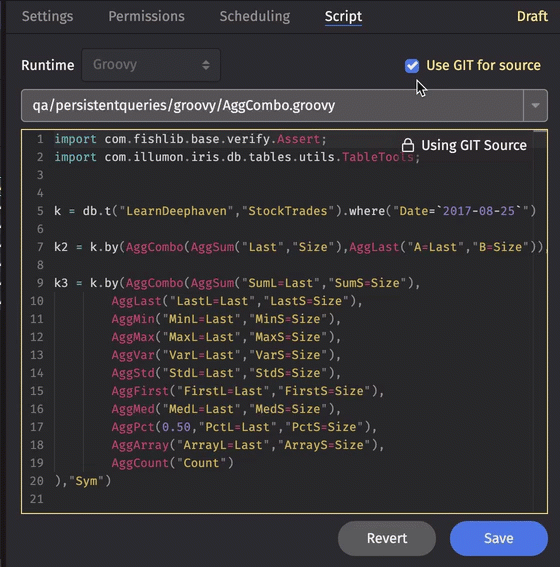
Queries are read-only in the UI while "Use GIT for source" is checked.
Note
Please consult with your system administrator to see if access to a Git Repository is possible for your installation. See also how to Develop a query with Git.
Revert
This reverts any changes made since the previous save, and restores the script to the last saved version of the query.
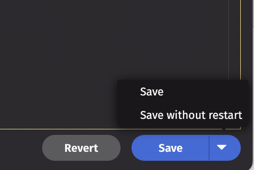
Save
This button saves the current query configuration.
Load Balancing
The Load Balancing tab is where you configure replicas and spares for redundancy and load balancing.
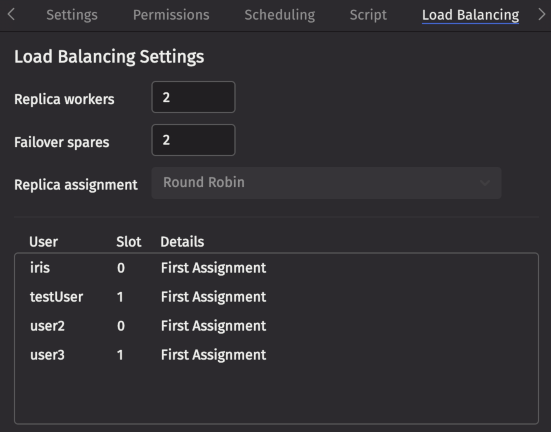
Replica workers
Set the number of active replicas to run. Replicas are identical copies of a query. Deephaven assigns users to one replica according to the assignment policy.
Failover spares
Set the number of failover spares. Spares are identical copies of a query that Deephaven uses to quickly replace a failed replica.
Replica assignment
Set the policy for assigning users to replicas. The default is round robin, which assigns each user to the next replica when they log in.
Assignment table
This table shows which users are assigned to each replica. Assignments are made automatically by the assignment policy, and cannot be changed from the UI.
Query Logs
The Query Logs tab displays logs related to the selected query. Use this tab to review execution details, errors, and other relevant log messages generated during the query's operation.
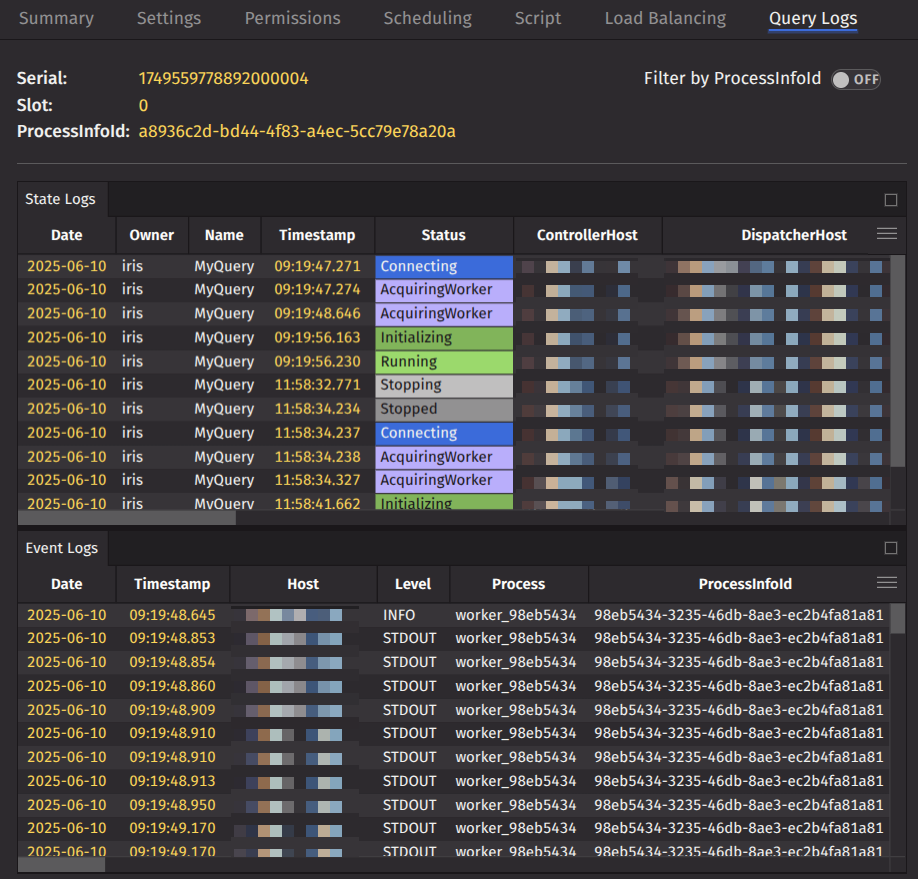
Summary
At the top left of the view, you'll find a summary displaying the query's serial ID, the replica slot, and the latest process info ID. For queries without replicas, the slot is zero. If replicas are present, the main row for the query displays a dash for the slot, and the process info ID corresponds to your assigned replica. Expanding the query row reveals the slot and process info ID for each specific replica.
Here is an example of an expanded and selected replica.
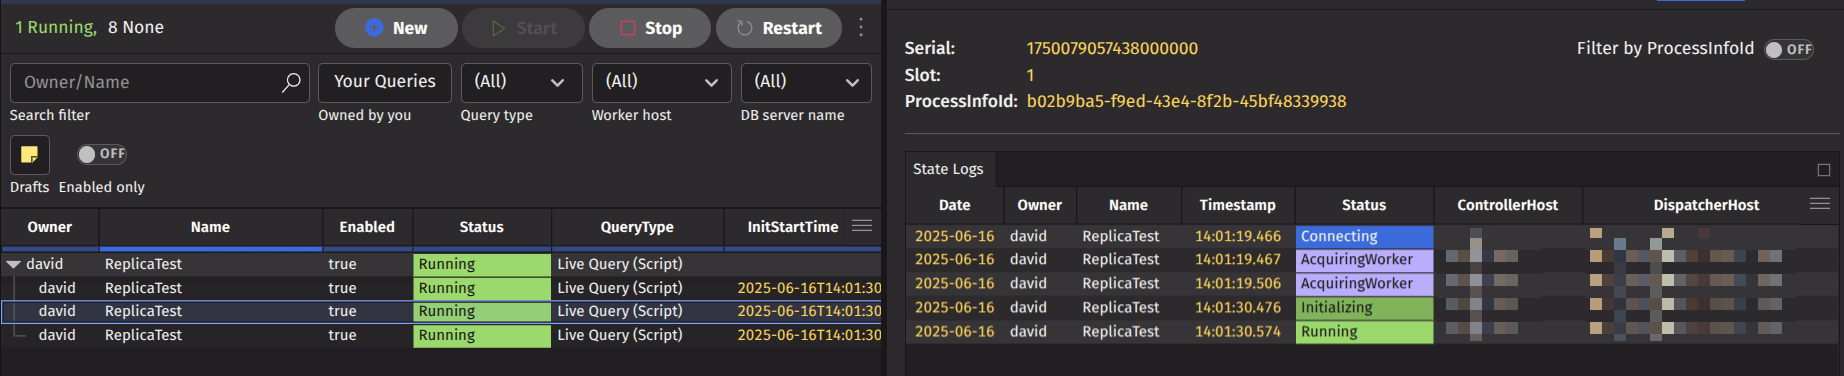
Filters
The tables in this view are automatically filtered by serial ID and, if applicable, by slot. A toggle switch at the top right lets you filter by process info ID. You can also use quick filters or advanced filters to further refine the displayed data, making it easier to find relevant information in the tables.
Log Tables
The view includes two tables: the State Log table and the Process Event Log table. These tables provide detailed information about query state changes and process events, helping you diagnose and troubleshoot issues with your query.
Edit Persistent Queries
You can edit existing Persistent Queries within the Query Monitor Summary / Configuration. Click the drop-down arrow within the Save button for additional options: restart the query immediately or apply the changes upon the next scheduled restart. This option is only available as long as the following are true:
- The query is not a temporary query.
- The query is not in a failed state.
- The owner has not changed.
- The query type has not changed.
- The scheduler and scheduler properties have not changed.
- The Admin Groups have not been removed.
Export Persistent Queries
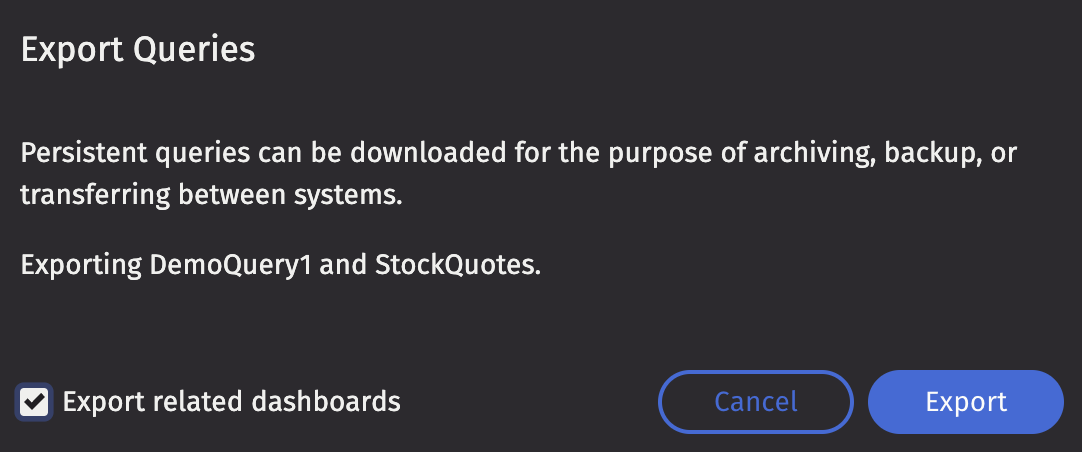
Select one or more queries in the list and click the Export Selected Queries button.
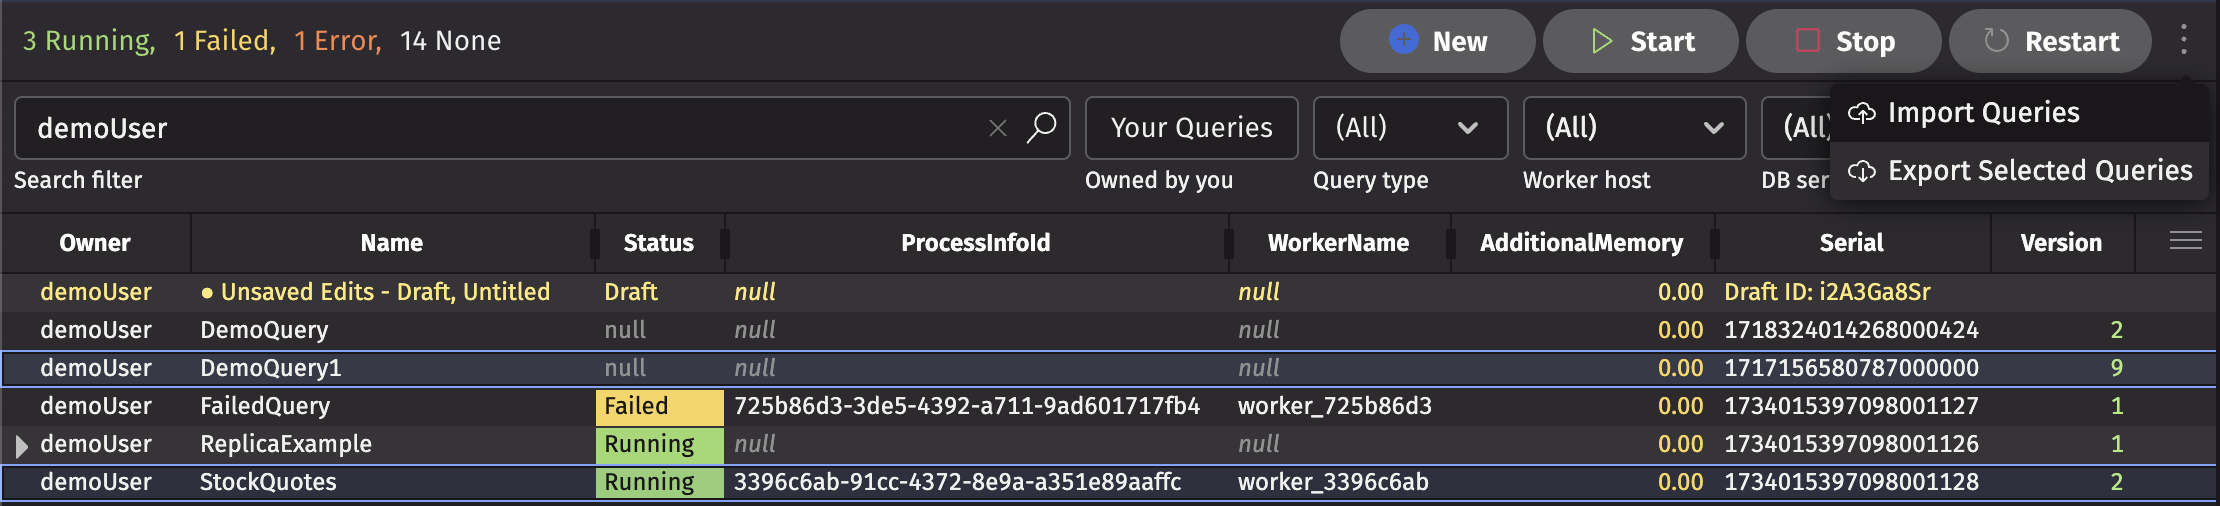
Choose whether to include all dashboards that include panels from the selected queries and then click Export. The queries will be exported as an XML file, or as a ZIP file if dashboards are included.
Import Persistent Queries
Click the Import Queries button.
Choose the XML or ZIP file to import. The queries for import will be displayed. Select which queries you wish to import and make any modifications necessary before selecting Import.
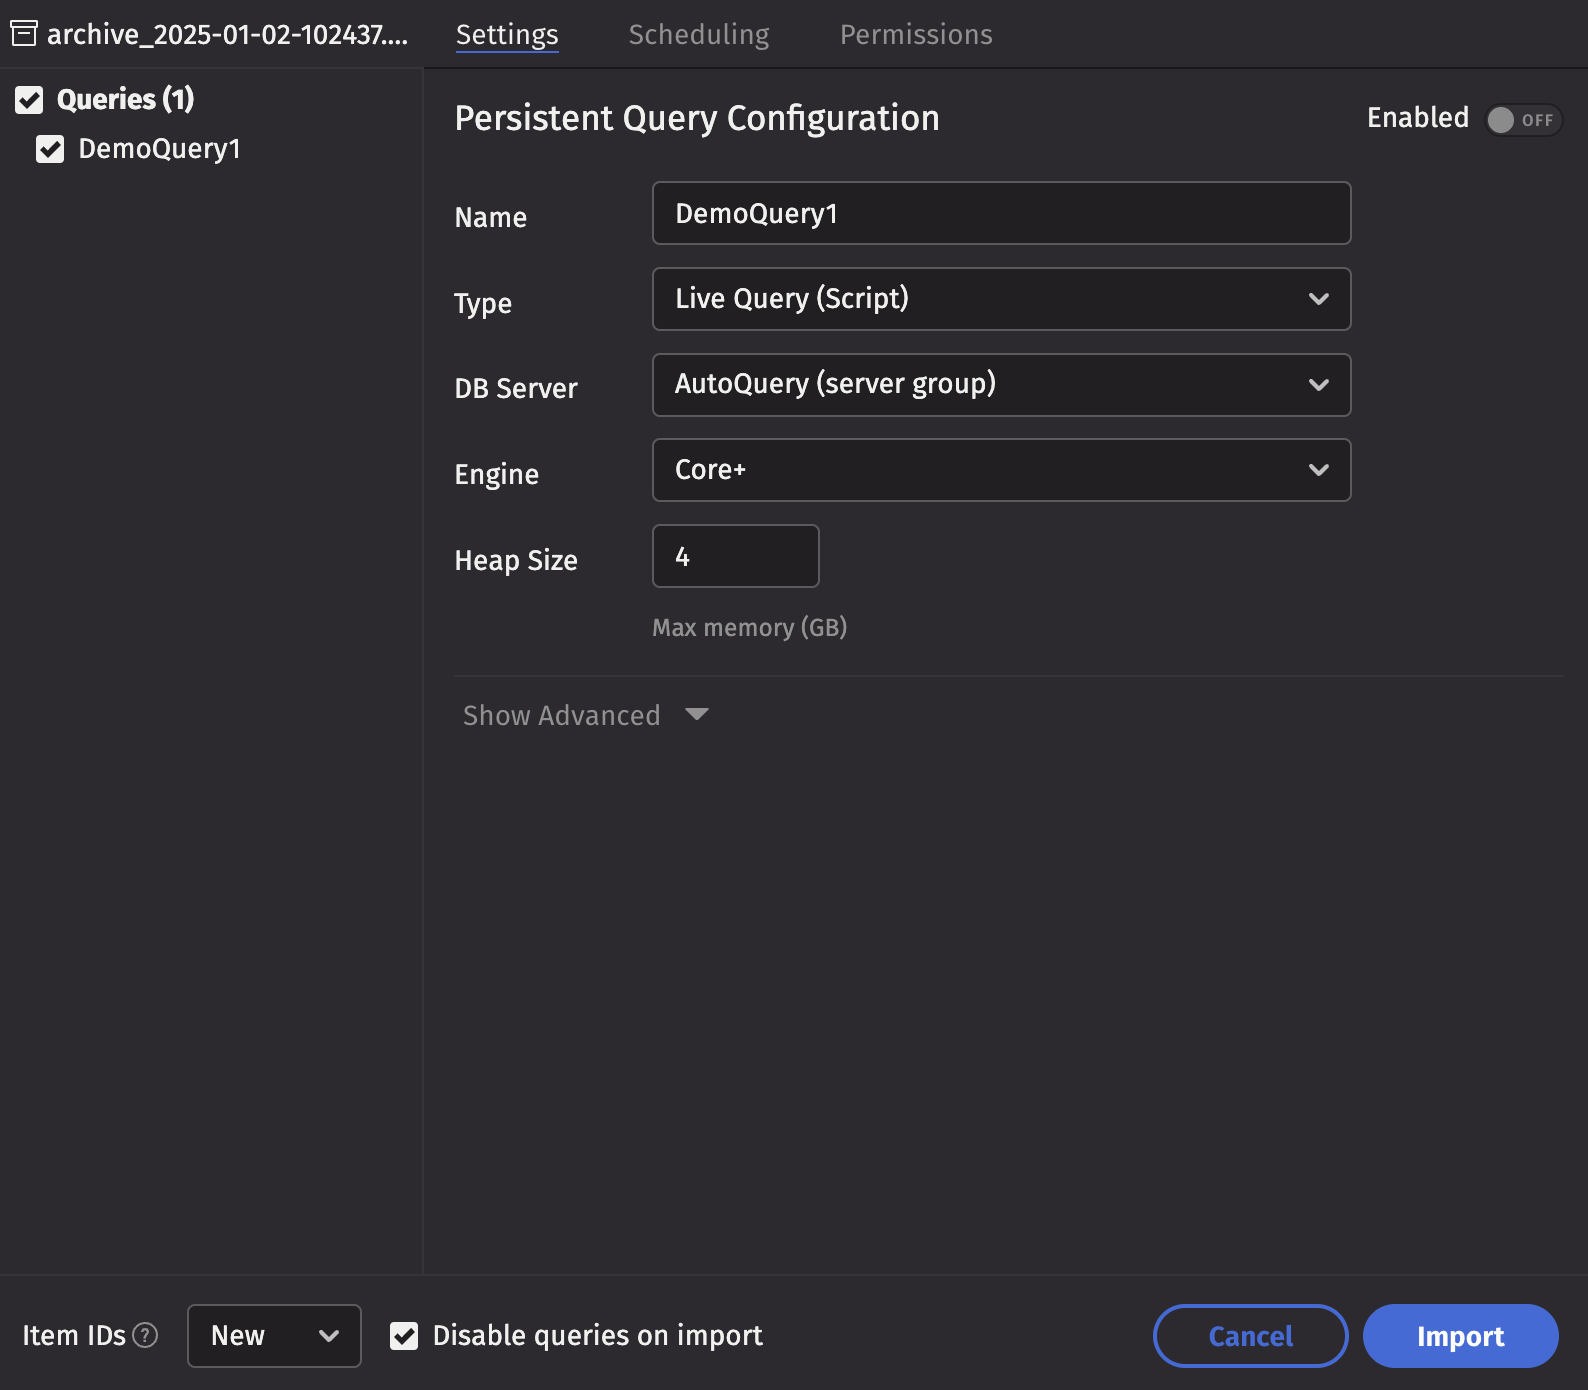
Item IDs
There are a few options to decide what to do with the query serial numbers when importing:
- New: Each imported query will have a new serial number generated.
- Keep: Each imported query will keep the serial number it had when exported. If a query with the same serial number already exists, the import will not be allowed.
- Replace: Each imported query will keep the serial number it had when exported. If a query with the same serial number already exists, the existing query will be replaced with the imported query.
Disable queries on import
If you do not want queries to start running immediately after import, you can choose to disable them on import. Alternatively, you can disable individual queries before importing by using the "Enabled" button in the query configuration.