Multiple server deployment
In this section, we will show how to deploy the Deephaven components in a multi-server environment. We will deploy:
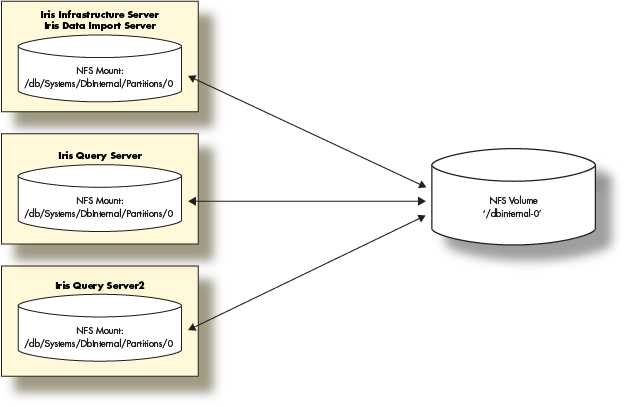
- One server combining a Data Import Server with an Infrastructure Server.
- Two Query Servers.
The solution will also depend on a storage volume that needs to be available to mount from each of the Deephaven servers.
Prerequisites
- A storage layer (e.g., NFS Server) with exported volumes available to the deployed Deephaven servers.
- Deephaven ships with a schema using the namespace
DbInternalwhich contains query performance data among other data. After the Deephaven software install, there will be directories in/db/Intraday/DbInternaland /db/Systems/DbInternal. - In this deployment, we will mount a NFS volume for the
DbInternalhistorical data and use that to demonstrate the steps involved to provide historical data volumes for any namespace.
- Three servers or VMs with at least the minimum physical or virtual hardware resources.
Prepare the storage layer (NFS Server)
- Assure the Deephaven users and groups are able to read and write to any NFS exports.
- Create a data volume on the storage server to hold the Historical data.
- This will be the first historical volume for the 'DbInternal' namespace so we will call it 'dbinternal-0'.
DbInternalhistorical does not use very much space. 10g should be sufficient.
- Export the
dbinternal-0data volume.
Deploy the Deephaven Servers
- Provision three servers using the procedures outlined in the Deephaven Installation guide. Note: You will need to substitute the hardware sizing in this guide for those provided in the Installation Guide.
- Install the Deephaven Software on each Server. When installing Deephaven, there are two packages to install: the Deephaven Database package and Deephaven Configuration package. Your Deephaven account representative will provide you with the latest versions of these two packages. To install the software, you will first need to copy the packages onto your provisioned Deephaven Linux host. Once the packages have been copied to the host, you should SSH onto the server and run the following commands to install the Deephaven Database and the Deephaven Configuration packages:
The installation includes a default set of configuration files and sample data for a basic Deephaven installation.
- Install MySql Java Connector Software:
Deephaven can use MySql (mariadb) to store authentication and database ACL information. This requires the
mysql-connector-javaJAR to be installed into/etc/sysconfig/illumon.d/java_lib:
Setup the Historical Partition on each server
- Verify the
DbInternalhistorical mounts:ls -l /db/Systems/DbInternal/ - Two directories should exist:
WritablePartitionsandPartitionsand be owned by the userdbmerge. If not, you can create them and set the proper permissions. - Mount the
DbInternal-0NFS volume on the providedPartitions/0sub-directory:
- Verify the link from
WritablePartitions/0to theParititions/0mount exists: If the symbolic link does not exist, create it as follows:
Final steps
Congratulations. Deephaven is now running on three servers with two servers serving queries for end users.
The next steps are to set up nightly merges of Intraday data to the Historical data volume mounted and for users to connect to Deephaven using the Deephaven Console.
Nightly merge jobs
To merge the query performance Intraday data to the Historical data volume mounted, run the merge command on the infrastructure server:
This command should be added as a nightly cron job on the infrastructure server:
Deephaven Console installation
The easiest way to use Deephaven is to launch the web UI. By default, the infrastructure server hosts the UI at https://deephaven-infra-server.example.com:8123/iriside for installations without Envoy and https://deephaven-infra-server.example.com:8000/iriside for installations with Envoy.
To use Deephaven Classic, refer to the Deephaven Launcher installation guide to download and connect remotely from your Windows, Mac or Linux desktop.
End users can now use the Deephaven Console client application to access Deephaven and begin executing queries.
Deephaven ships with a schema using the namespace DbInternal which contains query performance data among other data. This data can be queried from the Deephaven Console as follows: