Basic installation
This guide offers detailed instructions for installing Deephaven directly on one or more host machines.
The steps presented use no third party containerization or deployment tools. For more information on installing Deephaven in other ways, see:
Prerequisites
Before you start, make sure you have read and understood the planning guide and ensure your system(s) meet the minimum system requirements. You also need:
- A host from which to run the installation scripts, referred to as the Installation Host. Deephaven will not be installed on the Installation host if it is not part of the cluster.
- A user with SSH access to the installation targets, also called the service user. This guide uses
dh_serviceas the service user.
Domain names and DNS records
It is strongly recommended that all machines have DNS records configured before beginning the installation. The Installation Host must be able to resolve all etcd and configuration server hostnames when the installation scripts are generated. All other nodes wait to resolve DNS until the installation scripts run.
The cluster.cnf file must include mappings describing each node in the cluster. The cluster configuration section provides more details.
TLS certificates
Deephaven uses TLS certificates for the web IDE, which must be provided during installation. These files are not required if valid web certificates have already been generated.
These certificates must:
- Be stored as x509 certificates in pem format, without passwords.
- Be named
tls.crt(certificate) andtls.key(private key). - Have Extended Key Usage of TLS Web Server Authentication and TLS Web Client Authentication.
- Have a Subject Alternative Name matching the Fully Qualified Domain Name of all the hosts in the cluster. More details follow in the cluster configuration section.
- Be readable by the user running the installation script(s).
Note
If you use wildcard certificates, note that they are only valid for one subdomain level; *.my.company suffices for test.my.company, but NOT for my.test.my.company.
This certificate should be obtained from an internal corporate certificate authority already trusted for use in the organization or from an external provider, such as Digicert or Verisign. It must be trusted by web browsers to use the Deephaven web IDE, by your organization's Java installation, and by the operating system's cacert truststore.
For PKI environments (certificates issued by internal Certificate Authorities), the tls.crt file should be a certificate chain that includes the root and issuing CA and the certificate for the Deephaven cluster. The PKI guide provides more information about how Deephaven uses certificates.
Prepare the Cluster nodes
Make sure you make the following configuration changes on each node that you want to install Deephaven on.
Disable swapping
If swapping is permitted, the kernel may swap a significant portion of RAM allocated to Deephaven processes. This can dramatically reduce the performance of workers and services, causing timeouts and adversely impacting system stability. For this reason, disabling swaps on servers hosting Deephaven is strongly recommended.
Set minimum process limits
Deephaven uses many processes for system services, running consoles, and Persistent Queries. The system must be configured so that Deephaven can create processes as required.
Add or adjust the following settings in /etc/security/limits.conf file. These first group of settings ensure that Deephaven can start processes as required:
Set minimum open file limits
Deephaven workers read many files when accessing data and make network requests that require file descriptors. The system must be configured so that Deephaven processes can open as many files as required, or services and workers may fail unpredictably.
Add or adjust the following settings in /etc/security/limits.conf file. These settings allow Deephaven to open as many files as it needs to access data for users:
Warning
If you choose to use specific users instead of * in the sections above, you must make sure that you include a copy of each line for each Deephaven system user (DH_MERGE_USER, DH_QUERY_USER, and DH_ADMIN_USER) so that sufficient process and file handles can be opened.
Install a supported JDK (optional)
Deephaven requires a Java JDK installation. If your system has internet access, you may skip this step, as the installer automatically installs a supported JDK using the version you specify during configuration. If you install the JDK separately, install the same version you configure. See the Version Matrix for supported versions.
Install Python (Optional)
The Deephaven Installer uses the cluster configuration to decide which version of Python to use. If the version of Python requested is not detected and the Installer can access the Internet, it downloads and installs the version from source code. If you do not allow the installer to access the Internet, you must ensure that the correct version of Python is installed, or the installation will fail. See the Python configuration cluster configuration options for more information.
Prepare the installer host
The Deephaven installation process is carried out from a local directory on an Installation Host. This host does not need to be part of the cluster itself, but it must have SSH access to all the nodes within the cluster.
To perform the installation, you will need a service account. You can specify any user in the cluster.cnf file as DH_SSH_USER. If you do not specify DH_SSH_USER, the installer will use the current user by default.
Note
For production deployments, Deephaven recommends specifying both DH_SSH_USER and DH_SSH_KEY so authentication to the target hosts can be strictly controlled.
The service user needs some administrative permissions on the nodes to modify the filesystem, and sudo permissions to act as the various Deephaven user accounts. See Elevated Permissions for more information.
Create a directory to place the installation files into:
Install a supported JDK
The installation process requires Java to install Deephaven on the cluster's nodes. Make sure that you install Java on the Installation Host. Deephaven recommends that you use the same version of Java that you are installing on the Deephaven nodes.
Define your cluster configuration
Deephaven clusters are defined by the cluster.cnf file. This file describes the cluster's topology, including which physical nodes are present, what services run on each host, and what software versions are installed.
For a complete description of the settings available in cluster.cnf files, see the Cluster Configuration guide.
Below is an example cluster configuration file for a typical three-node Deephaven system. You can use this file as a starting point. Place it in the installation directory you created and change the properties as needed.
Example cluster.cnf file
Note
The cluster configuration file defines your system's topology. You should treat it as any other source code and place it under source control. You need it whenever you perform system updates.
Collect installation media
Next, download the installation media from the address provided by your Deephaven representative and place it directly into the installation directory on the Installation Host. The files you need are:
-
The Deephaven Installer
-
The Enterprise system archive
-
One or more Core+ archives
-
The etcd archive (download)
-
TLS Certificates. Create a directory for the certificates in the installation directory and place your certificate files there.
Generate the installation scripts
Now that the nodes are configured, the certificates are ready, and the installation media is in the correct place, you must run the installation generator. The installation generator uses the cluster configuration file you created to generate a set of install scripts that install and configure Deephaven on each node.
Note
The installation generator updates the cluster configuration file with the default settings for any parameters left unspecified.
A note on elevated permissions
The Deephaven installer requires elevated permissions to install a few system services (such as Monit, Java, and etcd), create Deephaven service users, and create database and configuration directories. All commands that need elevated permissions are contained in the dh_root_prepare.sh script, which allows your security team to audit the commands.
Caution
If your organization has restrictions on how elevated permissions may be used, a system administrator may manually perform these steps. See the Elevated permissions section. However, Deephaven strongly recommends that you use the dh_root_prepare.sh script that is generated with the section above for this purpose. Executing these steps manually can be error-prone and mistakes at this stage can make the installation very difficult.
Install Deephaven
Run the Installer
To install Deephaven on all your nodes, simply run the generated master installation script:
See the troubleshooting sections if errors occur.
Install Envoy (Optional)
If you plan to use Envoy as a front proxy for Deephaven, you need to install and run Envoy separately before you can access the system externally. See the Envoy documentation for further details.
Configure an administrator
To start using the system, you need to configure an administrative user. Run the following commands on the infrastructure node of your cluster:
If you are configuring users using Active Directory or SAML the process may be different. See Verifying the installation.
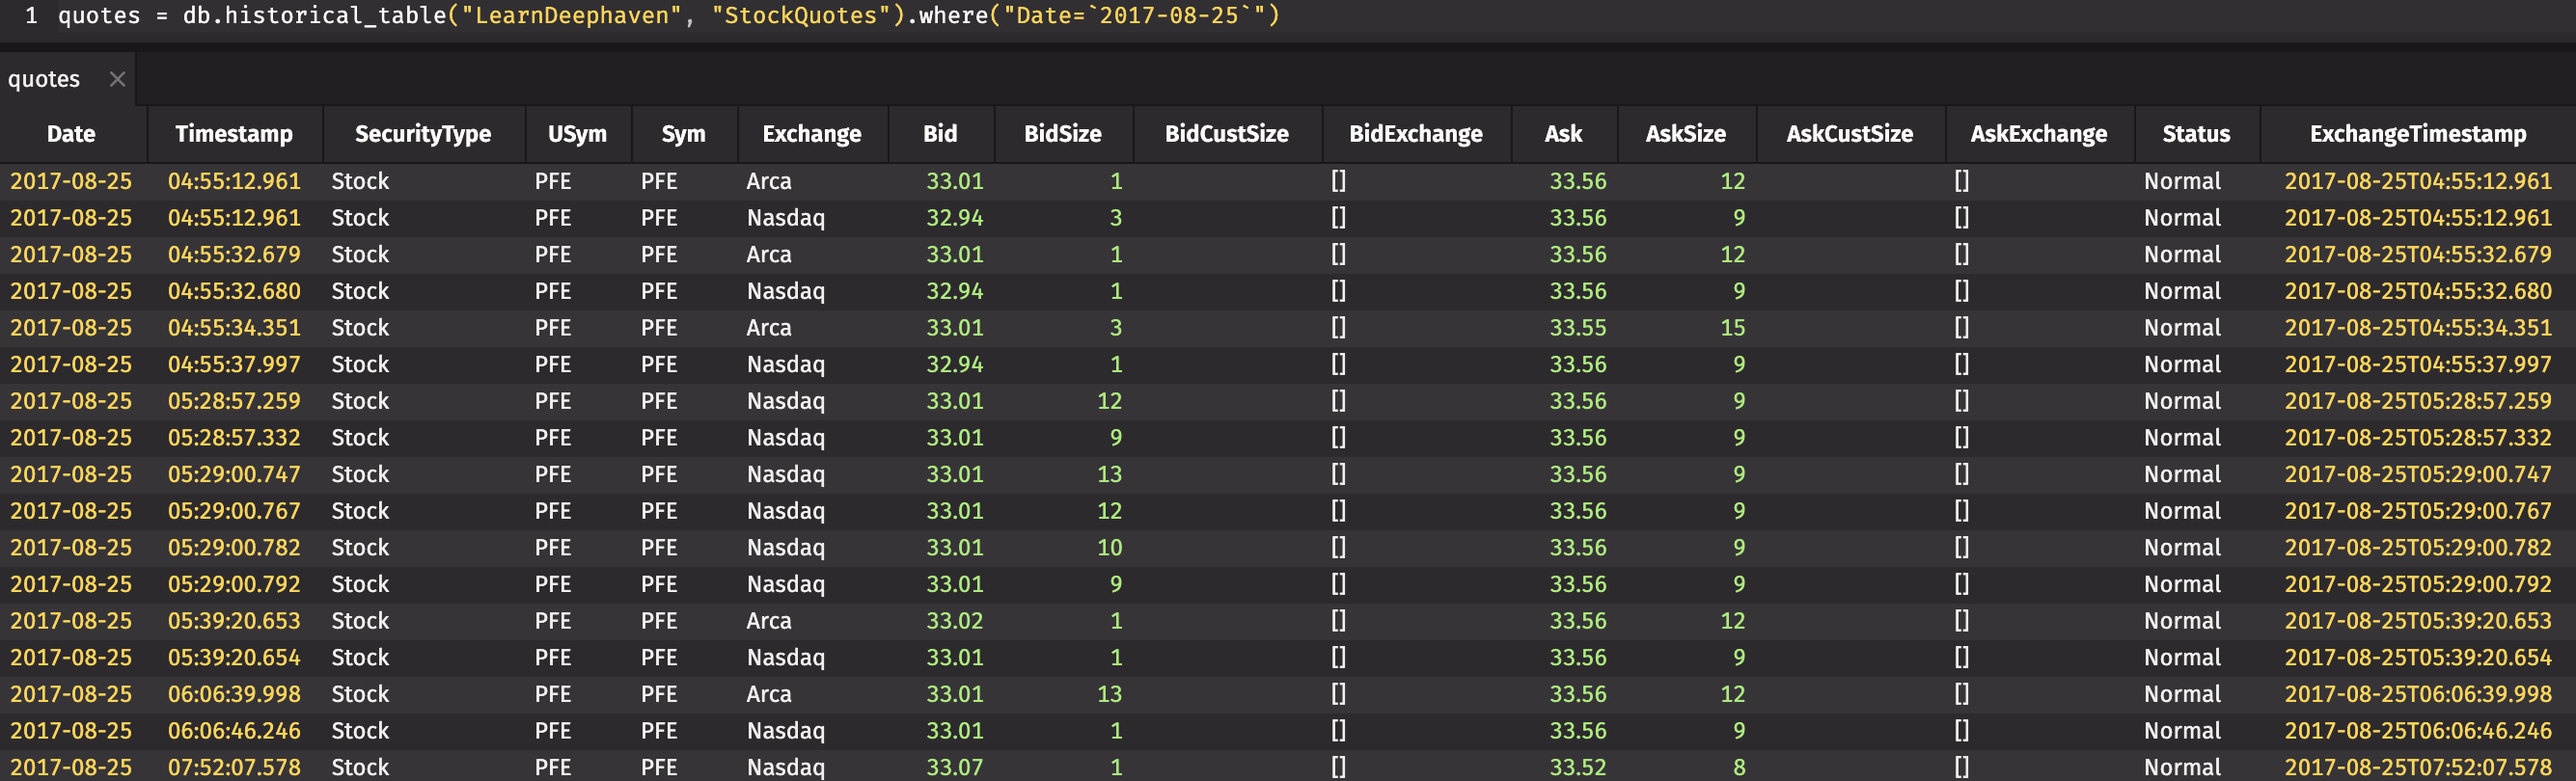
Install example data
Many of the example queries in the Deephaven documentation are based on the LearnDeephaven data set. This data set consists of three tables of historical data covering a few dates from 2017-08-21 to 2017-08-25, plus 2017-11-01. The LearnDeephaven dataset and its corresponding namespace take about 350MB on disk.
To install the LearnDeephaven data set, run the following command once on the cluster infrastructure node:
Note
After installing LearnDeephaven, query workers need to be restarted before they can access it.
Install custom libraries
You can install your own custom Java libraries into Deephaven by placing them into /etc/sysconfig/illumon.d/java_lib on each host.
Verify the installation
Check services
On each node, run the following to check that all Deephaven services have started and are available.
Note
If dh_monit up times out, use dh_monit summary to see which process has problems.
If Python is available, you can validate the installation with check-deephaven-cluster, which runs the following tests against the cluster to confirm that:
- The passed in user can authenticate.
- The
WebClientDataquery is running. - Groovy and Python Core+ workers can be created on each query and merge server.
- Each query server is correctly writing the
DbInternal.ProcessEventLogtable to the DIS, and can read it back.
check-deephaven-cluster takes the URL of the installation's connection.json file, and one of three authentication methods: username/password, private key file, or SAML. The connection.json argument is optional. If not provided, the script uses the connection.json file in the standard location.
Note
Port 8000 in the commands below is the port used by installations with Envoy enabled. For systems without Envoy, the port is 8123.
Check user interfaces
-
From a browser, connect to
https://deephaven-host:8000/or, if not using Envoy,https://deephaven-host:8123/, and attempt to log in and create a console.- Launch a Query Config panel and verify the three initial Persistent Queries (ImportHelperQuery, RevertHelperQuery, and WebClientData) are running:
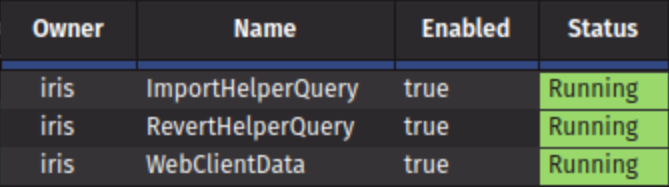
- Launch a Query Config panel and verify the three initial Persistent Queries (ImportHelperQuery, RevertHelperQuery, and WebClientData) are running:
-
Verify the Swing UI using the Deephaven Launcher.
Adding and removing nodes
You can add more nodes to a Deephaven cluster after it has been created. This can improve the system's fault tolerance and increase available compute resources. The most typical examples of adding nodes are:
- Dedicated servers for query processing or data import processing. This allows scale-out of the system to handle more users and/or larger volumes of data.
- Authentication server nodes. Having one or more backup authentication servers allows for continued use of the system in case the primary authentication server is inaccessible.
- Configuration server nodes. Having one or more backup configuration servers allows for continued use of the system in case the primary configuration server is inaccessible. etcd provides high availability and fault tolerance for the storage of configuration data, but the configuration server is the interface through which this data is provided to other Deephaven services.
- Persistent Query Controllers. Additional controllers provide redundancy.
Similarly, servers no longer needed can be removed from a cluster.
Note
This process does not support changes to the etcd nodes of a cluster.
To add or remove nodes, simply modify the cluster.cnf file, adding or removing DH_NODE_$N blocks for the nodes you wish to add or remove from the cluster. Then, run the installation process again, starting from the generation stage.
Note
When removing nodes, be sure to re-number the values for the remaining nodes in the configuration. For example, if you had 5 nodes, DH_NODE_1 through DH_NODE_5, and you deleted node 3, you need to renumber DH_NODE_4 and DH_NODE_5 properties in the cluster.cnf file.
Appendices
Appendix A: Elevated permissions
Caution
Deephaven recommends allowing the installer to configure the system(s) automatically. However, if you cannot run the installation script with elevated permissions, you may run the following steps by hand with a privileged user.
Create Deephaven service accounts
Deephaven uses three service user accounts internally: irisadmin, dbmerge, and dbquery. All three accounts must be members of dbmergegrp and dbquerygrp, and have secondary membership in a group with the same name as the user. The user home of each account must be /db/TempFiles/$user_name.
Caution
The shell snippets here use the default Deephaven service account names. If you have customized DH_ADMIN_USER, DH_QUERY_USER, DH_MERGE_USER, or any of the corresponding group properties, you must use those values below!
Set up user home:
Create local user accounts:
If group membership is incorrect, it can be fixed via the usermod command. Be sure to replace $user with the actual user name, or set the environment variable appropriately:
Note
If you wish to use different user account names, you should set the cluster.cnf variables DH_*_USER and DH_*_GROUP, as explained here.
Configure sudoers
The service user and Deephaven system users require certain sudo permissions to be configured. See the Sudoers appendix for more details.
Install third-party dependencies
Install etcd
To install ETCD 3.5.17, follow the steps below.
- Create the etcd user and groups:
- Download and install etcd:
For information on configuring the etcd systemd service, see Appendix E: dh-etcd service unit file.
Create Deephaven directories and permissions:
Owned by dbmerge:dbmergegrp:
Note
If you ran the Set up user home commands, /db and /db/TempFiles already exist.
Owned by irisadmin:irisadmin:
Owned by irisadmin:dbmergegrp:
Owned by dbmerge:dbmerge:
Owned by dbquery:dbquery:
Owned by etcd:irisadmin (only on nodes running etcd server ROLE_ETCD=true):
Create necessary soft links
Alter monit system files
In order to prevent access to root permissions, the monit process supervision tool, which normally runs as the root user, must be edited to instead run as the DH_MONIT_USER (by default, irisadmin).
Before altering this system service, be sure to first stop monit via sudo systemctl stop monit.
-
Edit
/etc/monit/monitrcand make the following changes:-
Ensure the file
/etc/monit/monitrcis owned by DH_MONIT_USERsudo chown irisadmin:irisadmin /etc/monit/monitrc
-
Replace
set log /var/log/monit.logwithset log /var/log/deephaven/monit/monit.log -
Uncomment the four lines of code:
-
-
Edit
/etc/logrotate.d/monitand make the following changes:- Replace
/var/log/monit.logwith/var/log/deephaven/monit/monit.log
- Replace
- Edit
/etc/monitrcand make the following changes:- Ensure the file
/etc/monitrcis owned by DH_MONIT_USER - Replace
set log /var/log/monit.logorset log syslogwithset log /var/log/deephaven/monit/monit.log - Uncomment the four lines of code (if they are commented out):
- Ensure the file
- Invoke
sudo systemctl edit monit.service. This creates the file/etc/systemd/system/monit.service.d/override.conf, and opens it in vi. Set the user and group owner toDH_MONIT_USERin the space between blocks of comments (lines 3-7):
Note
If you set DH_MONIT_USER to another user, change the User and Group in the above snippet.
- Update monit system file ownership if they exist.
- Restart the monit process
Note
If monit runs successfully, but some script fails while attempting to call systemctl, you can set DH_SKIP_MONIT_CHECK=true in cluster.cnf to direct the installation to skip all monit checks and trust that monit is set up correctly.
Restart system services
etcd tokens
The etcd initial cluster token (specified by the --initial-cluster-token flag when starting etcd members for a new cluster) is a unique identifier critical for bootstrapping. Its primary role is to ensure that etcd can generate unique cluster IDs and member IDs, even if other aspects of the configuration (like member IP addresses) might be reused across different cluster deployments (e.g., in test environments or during disaster recovery drills). This uniqueness prevents members from different clusters from accidentally joining together, which could lead to data corruption or cluster instability.
Note
Authentication tokens, used for client access to an already running etcd cluster (such as simple tokens or JWT tokens), are a separate concept related to etcd's internal authentication mechanisms and are distinct from the initial cluster token discussed here.
When starting a new etcd cluster, each etcd member is configured with this token. All members of the same cluster must use the same token value. This token acts as a safeguard so that members from different clusters do not accidentally join together, which could lead to data corruption or cluster instability.
Why is the etcd token important?
- Cluster isolation: Prevents members from different clusters from joining together.
- Safety: Reduces the risk of accidental cluster merges, especially in environments where multiple clusters may exist.
- Best practice: Using a unique token for each new cluster is recommended for operational safety.
Tip
Use a unique, descriptive token for each new cluster. For example, you can generate one with uuidgen or use a name like deephaven-prod-cluster-YYYY-MM-DD.
How to create and use an etcd token for your Deephaven cluster:
-
Choose a unique token value for your new cluster. This can be any non-empty string, but it is best to use a value that is unique to your environment and reasonably short since it becomes part of file paths.
Example (generate a random token):
Or use a descriptive name:
-
Ensure this token is used by each etcd member. In Deephaven's traditional installation, the
DH_ETCD_TOKENvariable incluster.cnfis used by the installation scripts to configure thedh-etcd.service(or equivalent startup mechanism for etcd members) with the--initial-cluster-tokenflag. All etcd members in the same cluster must be configured with the identical token value.
Caution
Do not re-use tokens for different clusters. Re-using tokens can result in accidental cluster merges or data loss.
For more details on troubleshooting etcd cluster initialization, see the etcd troubleshooting guide.
etcd directory structure and backup considerations
In addition to its role in cluster bootstrapping, the etcd token is used to organize etcd installations under cluster-specific directories. This structure allows multiple etcd installations to coexist on the same system and provides clear separation of configuration and data.
Directory structure:
- Configuration directory:
/etc/etcd/dh/<cluster-token>/- Contains all etcd process configuration files and certificates - Data directory:
/var/lib/etcd/dh/<cluster-token>/- Contains the etcd database (the most critical component for cluster state)
Latest links:
For convenience, symbolic links point to the current cluster directories:
/etc/etcd/dh/latest→/etc/etcd/dh/<cluster-token>/var/lib/etcd/dh/latest→/var/lib/etcd/dh/<cluster-token>
Backup recommendations:
Both directories should be included in your backup strategy:
- Critical: The data directory (
/var/lib/etcd/dh/<cluster-token>/) contains the etcd database and is essential for cluster recovery - Important: The configuration directory (
/etc/etcd/dh/<cluster-token>/) contains certificates and configuration files needed for proper cluster operation
Tip
Deephaven's backup scripts include flags specifically for backing up these etcd directories. Consult your backup documentation for the appropriate flags to include both configuration and data directories in your backup routine.
Appendix B: Users and groups
Deephaven uses the following users and groups. You can customize these users using cluster.cnf settings. See Custom Users.
| Group Name | Suggested gid | Members |
|---|---|---|
dbmerge | 9000 | dbmerge |
dbquery | 9001 | dbquery |
irisadmin | 9002 | irisadmin |
dbmergegrp | 9003 | dbquery, dbmerge, irisadmin |
dbquerygrp | 9004 | dbquery, dbmerge, irisadmin |
| User Name | Suggested uid |
|---|---|
dbquery | 9000 |
dbmerge | 9001 |
irisadmin | 9002 |
Caution
The uid and gids associated with the users and groups must be consistent across all hosts so users can read and write the proper locations.
Caution
Special care must be taken when using network-provided users, like active directory. monit must not be started until the users exist, so if your users are provided over the network, you must make sure the monit service waits to start until the users have been loaded.
Appendix C: Generated Scripts
When you run the installation generator, it generates the following scripts:
master_install.sh— Run this file from the Installer Host to install the entire cluster. It copies the tar.gz or rpm installer to each host and then runs all the other scripts below in the correct order on the correct machine.dh_root_prepare.sh- This script is copied to each Remote Host and then run on that host. This is the only script that invokessudo, and only if needed.dh_install.sh- This script is copied to each Remote Host and then run there. It unpacks the Deephaven tar.gz or rpm and runs thepost_install.shscript.dh_keygen.sh— This script is run on the Installer Host. It copies or creates all necessary certificates to the correct machines and then cleans up all temporary files that might contain certificates or private keys.etcd_configure.sh- This script is run on the Installer Host and tests if the etcd cluster is healthy and correctly configured. If not, it generates and provisions all necessary files for the etcd cluster and then tests again that the cluster is healthy.dh_node_finalize.sh— This script is run on the Installer Host and finalizes the cluster setup. It generatesiris-endpoints.prop, imports all necessary files into etcd, and enables all monit services.dh_log_sync.sh— This script is run on the Installer Host and copies all logs from Remote Hosts to the Installer Host, making it simpler to debug failures.dh_node_validate.sh- This script is copied to each Remote Host and performs some system validation to ensure that the product is correctly configured.dh_node_cleanup.sh- This script is copied to each Remote Host and cleans up all temporary files and all logs.
Appendix D: Sudoers
Tip
If DH_MODIFY_ETC_SUDOERS=true in the cluster.cnf file, the Deephaven installer automatically configures these rules for you.
The service user and Deephaven system users require sudo permissions for specific commands. Use visudo -f /etc/sudoers.d/deephaven to create a sudoers file for Deephaven at /etc/sudoers.d/deephaven and place the following rules inside it.
Caution
Make sure that:
- The line
#includedir /etc/sudoers.dis enabled in your/etc/sudoersfile. - Replace
dh_servicewith the user you configured as the install service user.
Deephaven sudoers file
Warning
systemctl enable grants root access. Anyone with write permissions to dh-etcd.service can effectively become root on the system. Ensure strict control of write permissions on this file, or have your system administrator enable the service before performing the Deephaven installation. See Appendix E: dh-etcd service unit file for an example unit file configuration.
If you do pre-enable the dh-etcd service, be sure to replace the etcd-token with your own value and assign that token to DH_ETCD_TOKEN=etcd-token in your cluster.cnf file.
Appendix E: dh-etcd service unit file
The following is an example dh-etcd.service systemd unit file that can be used to pre-enable the etcd service before Deephaven installation:
Replace etcd-token with your own value and assign that token to DH_ETCD_TOKEN=etcd-token in your cluster.cnf file.
Appendix F: Troubleshooting
If an error occurs during the installation, detailed log files can be found in the logs directory of where you ran the installer. Further, all logs from remote hosts are copied to DH_LOCAL_DIR/logs/$node_hostname.
Tip
You can run the dh_log_sync.sh script to copy logs from remote machines to the local installer host. The log files are also contained in the remote installation directory on the host.
Installation configuration scripts write logs to /var/log/deephaven/install_configuration. Log files containing sensitive information are only visible to the irisadmin user. Before installation runs, log files in /var/log/deephaven/install_configuration are moved to /var/log/deephaven/previous_install, so only logs relevant to the last installation are found in install_configuration. After installation completes, Deephaven services write their logs to /var/log/deephaven/<service name>/.
Certificate problems
If the services fail because a matching Subject Alternative Name (SAN) cannot be found, check that /etc/sysconfig/illumon.d/dh-config/clients/single/host contains the correct name or IP address of the Configuration Server, and that /etc/sysconfig/deephaven/trust/truststore-iris.pem has a SAN for its configuration_server entry that matches the contents of the host file. Note that this requires reading the contents of the .pem file with something like OpenSSL that can decode the X509 formatting.
For example, run:
Then paste the certificate_server section of the .pem file to decode it.
Please refer to the TLS Certificates section to ensure that your certificates meet the minimum requirements.
Failures during dh_node_finalize.sh
If the dh_node_finalize.sh script does not complete normally, the dh_install.sh script may encounter problems trying to update files in etcd that have not yet been imported. If this happens:
-
Disable ETCD imports:
-
Re-run the installation.
dh_node_finalize.shshould now succeed. -
Enable etcd imports:
Errors in Auth Server Logs
It is normal to see Authentication Server failures in the Configuration Server log while the Authentication Server is starting up. The Configuration Server must start first, as it is a dependency for the Authentication Server. The Configuration Server then attempts to connect to the Authentication Server, and retries while waiting for the Authentication Server to begin accepting connections. This nuance is handled gracefully if processes are started using /usr/illumon/latest/bin/dh_monit up (passing the --block flag directs dh_monit to wait until all processes are online).
Appendix G: Migrating ACLs to etcd
The ACL migration tool (/usr/illumon/latest/bin/migrate_acls) is used to copy existing ACL data from a SQL store to etcd. This tool must be run with Deephaven service admin rights. If it is run against a system that already has some ACL data in etcd, it fails. The overwrite argument directs the tool to remove all existing etcd ACL data (only ACL data - not other data stored in etcd) and replace it with the ACL data from the SQL store.
To migrate ACL data from SQL into an etcd store that does not yet have any ACL data:
Or, if there is already etcd ACL data which should be replaced:
Migration of ACL data should be performed before reconfiguring the system to use etcd for ACL data.
The following property settings indicate that a system uses etcd for ACL data:
IrisDB.groupProvider=etcdIrisDB.permissionFilterProvider=etcdauthentication.server.customauth.class=com.illumon.iris.db.v2.permissions.EtcdDbAclProvider
If the setting DH_ACLS_USE_ETCD=true (which is the default in versions 1.20231218 or later) is used in the cluster.cnf file during installation, the installer adds these settings to the iris-endpoints.prop configuration file. If manually enabling etcd ACL storage, these settings can be added to iris-endpoints.prop or iris-environment.prop, as long as they are not overridden later by other settings. iris-endpoints.prop entries take precedence over those in iris-environment.prop, and settings further down a file take precedence over those further up.
To allow password management for Deephaven logins in etcd, managed user authentication must also be enabled by iris.enableManagedUserAuthentication=true.
After migrating ACLs and importing the new properties, use /usr/illumon/latest/bin/dh_monit to restart all Deephaven services on all nodes. Once the system has restarted, if the installation was using a dedicated SQL service for ACLs, that service can be stopped, disabled, and, if desired, uninstalled.
If DH_ACLS_USE_ETCD=true was used during the upgrade from a system that had been using a SQL ACLs data store, the etcd ACL store is enabled and populated, but only with the initial minimal set of ACL data. In this case, after the upgrade, the ACL migration tool should be run with the overwrite option, as detailed above.