Controls
The Controls menu provides a variety of tools to help you interact with your data in Deephaven's web interface, including filters, markdown widgets, and more. Access the Controls menu by clicking the Controls icon in the navigation bar:

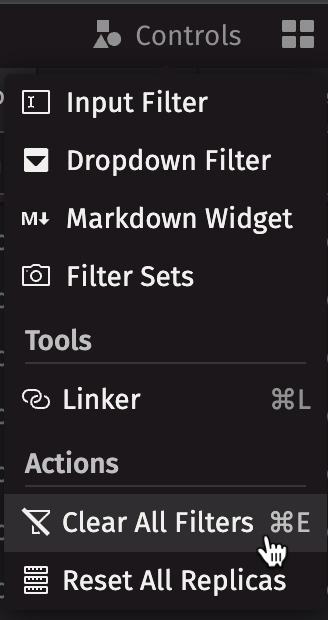
From the Controls menu, you can access the following tools:
- Input Filter
- Dropdown Filter
- Markdown Widget
- Filter Sets
- Linker
- Clear All Filters
- Reset All Replicas

Input Filter
Input Filters apply your specified filter to all tables and dynamic plots in your dashboard.
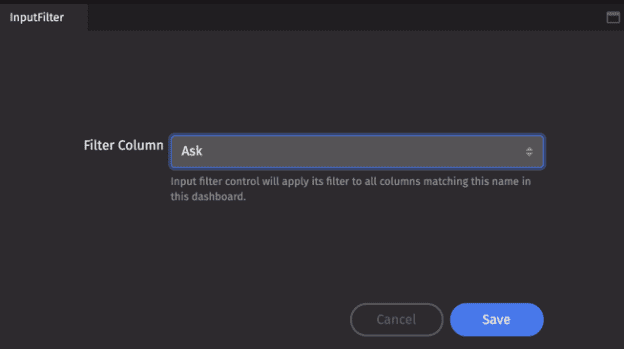
Once you choose a Filter Column from the drop-down list in the Input Filter panel, you will be prompted to enter a value. The filter statement options available in Quick Filters are based on the data types in each column being filtered. See Quick Filter Statement Options in the Appendix for a complete list. The Sym column has been chosen in the following examples. Once you enter a value, the filter will be immediately applied to your dashboard.
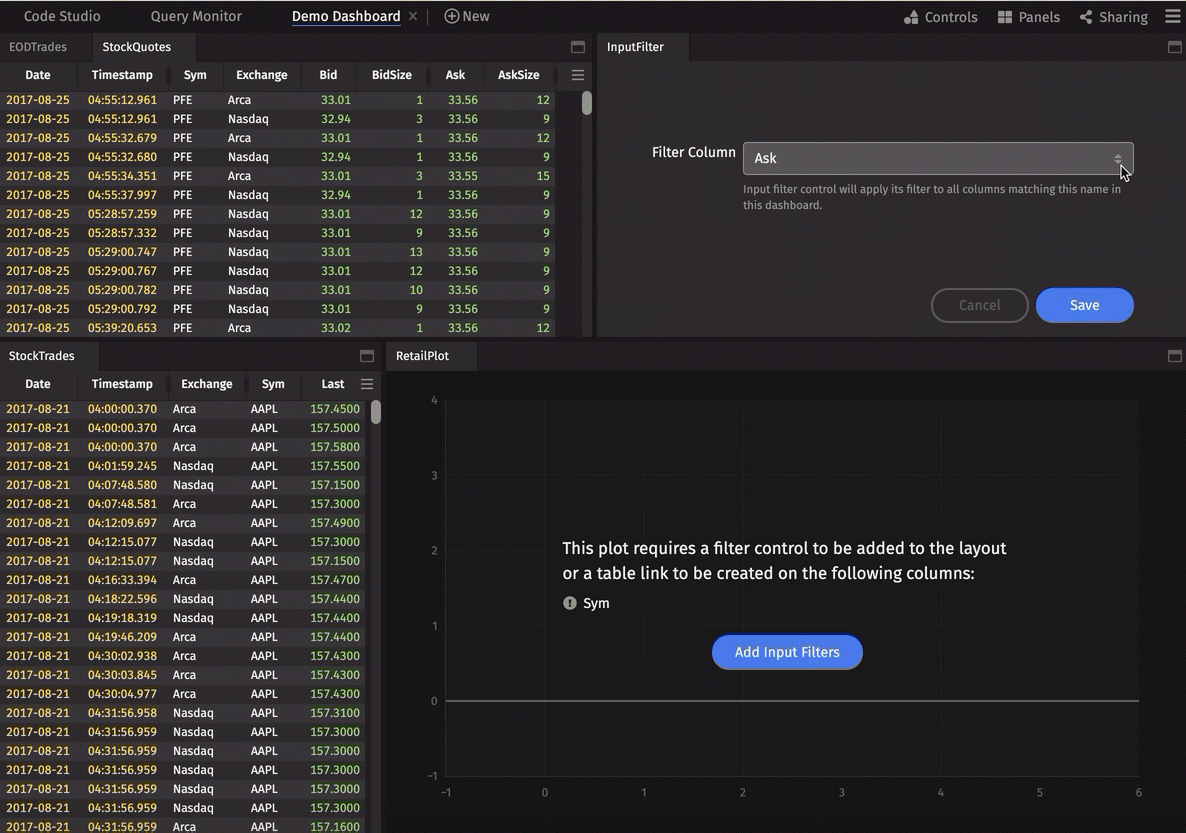
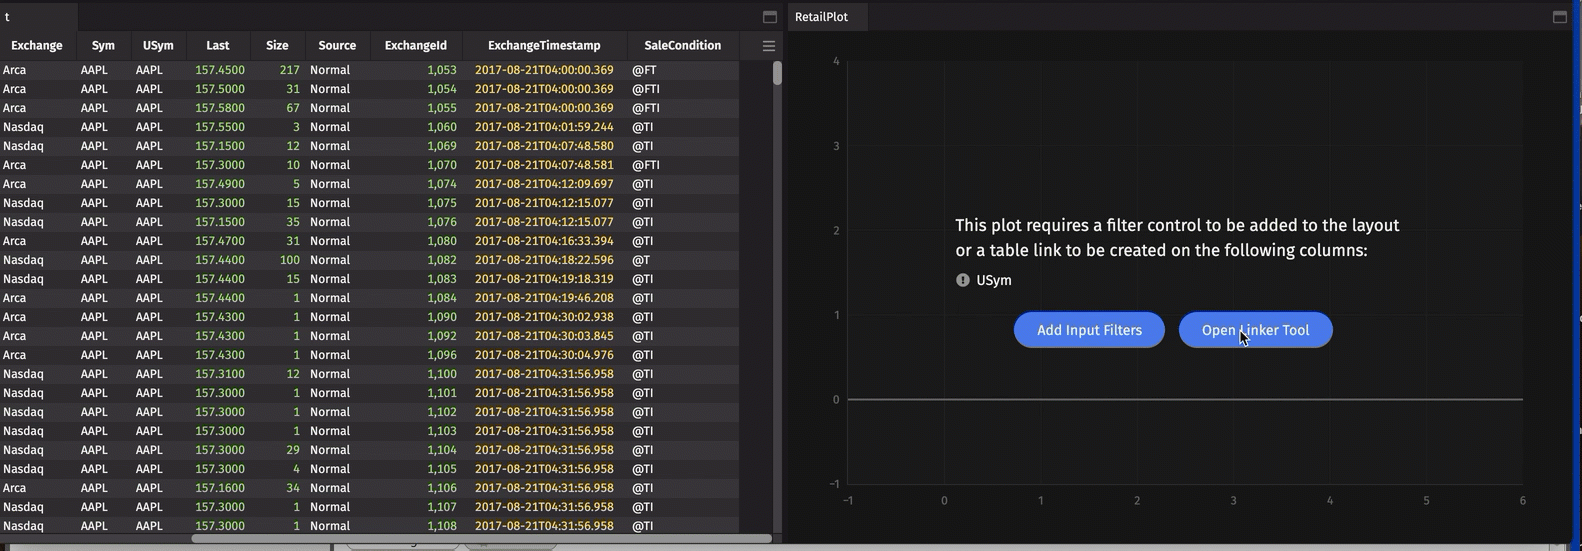
Note that Input Filters will only work on dynamic plots with a selectable dataset, which must be configured using the appropriate plotting methods.
Dynamic plots will not draw until a filter is applied. You can add an Input Filter from the Controls menu, or the button in the plot's panel:

Tip
You can also use the Linker tool with dynamic plots.
Closing the Input Filter panel removes all the associated filters from the dashboard's dynamic plots.
Dropdown Filter
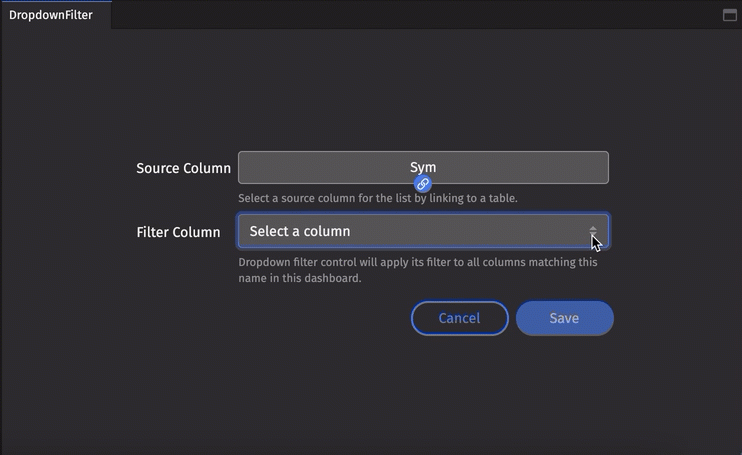
The Dropdown Filter control takes a source column as an input and filter column as an output. It uses the source column to create a dropdown list of filter options. Selecting a value from this list filters all columns in the dashboard that match the filter column name by the selected value.
The dropdown list expects unique values for the column source. It is recommended that you create a new table with just the column of interest, and apply a select_distinct to get a list of unique values. You can also exclude values by further filtering the Select Distinct table. You can sort the options list by sorting the source column.
Once you add a Dropdown Filter widget to the dashboard from the Controls menu, you will be prompted to choose a source column. Click the Source Column button and move your cursor to the desired column:

Note
Dropdown lists are user-friendly for a small number of options. We enforce a max number of 256 option values.
Click Done, then choose an appropriate Filter Column:
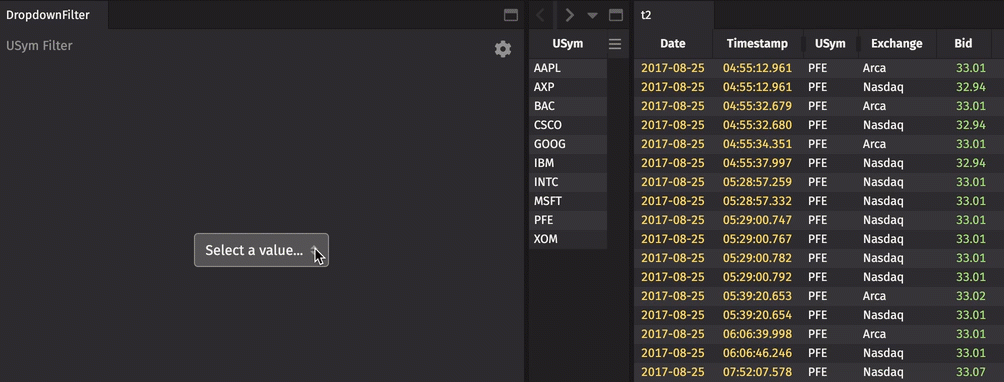
The Dropdown Filter automatically populates a dropdown list of the available values in the source column. Choose any value to filter all the tables in your dashboard that include the selected Filter Column. Sorting and filtering the source table will update the values in the Dropdown Filter.
For example, the Dropdown Filter below first links to the USym column in a small table of values. The subsequent dropdown list is used to filter the USym column in the other open table to the selected value:
To edit your configuration, click the gear icon at the top right of the Dropdown Filter widget:

Deleting a source column or closing the source table unlinks the Dropdown Filters.
Markdown Widget
The Markdown Widget is a tool for including text (or images) in the Deephaven Web interface. These notes can include references to:
- the queries running in a Dashboard.
- code snippets/explanations.
- instructions/comments.
- messages to customers, clients, or coworkers.
- contact info.
- and more.
Once a Markdown Widget has been added to the interface from the Controls menu, its content can be edited by double-clicking in the panel.
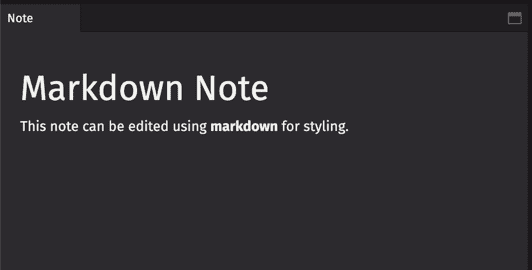
The Markdown Widget uses GitHub-flavored markdown syntax.
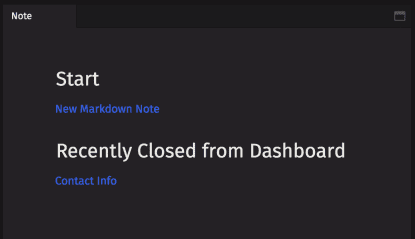
Manage Markdown Widgets
Markdown Widgets are saved with the Dashboard or Code Studio in which they were originally created. If the Markdown Widget is open when the dashboard is closed, the Widget will remain paired when it is reopened.
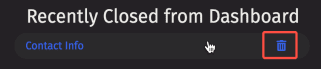
If a Markdown Widget is closed during your session, it can be retrieved by selecting Markdown Widget from the Controls menu, and then clicking its name from the Recently Closed list:
Hovering your cursor over the name of a widget will reveal the trash can icon, which you can click to permanently delete the widget.
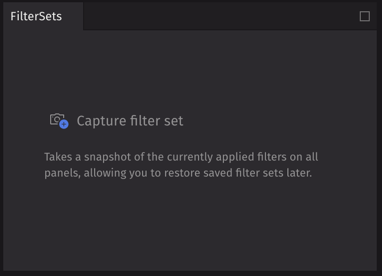
Filter Sets
Filter Sets capture the current state of all filters applied across the current dashboard (including plots, tables, etc.) into one "set" that you can then reapply at a later time.
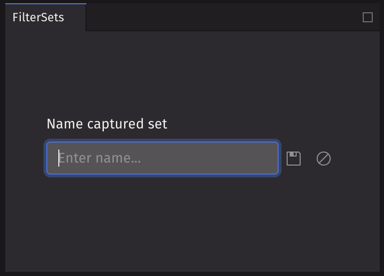
Capture the current state as a new filter set:
Now, name the set:
After you have saved your first filter set, you can access a drop-down list of all available sets:
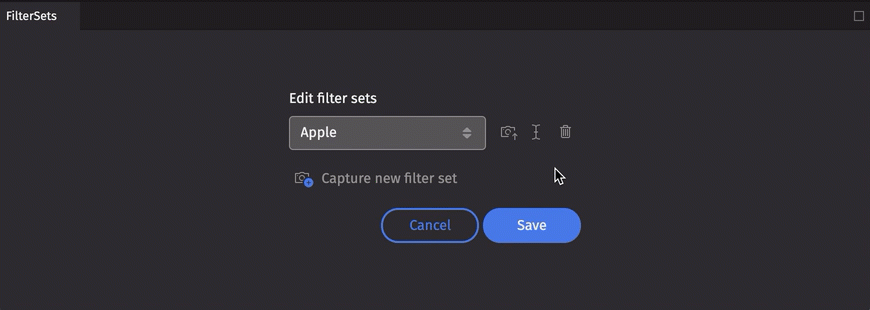
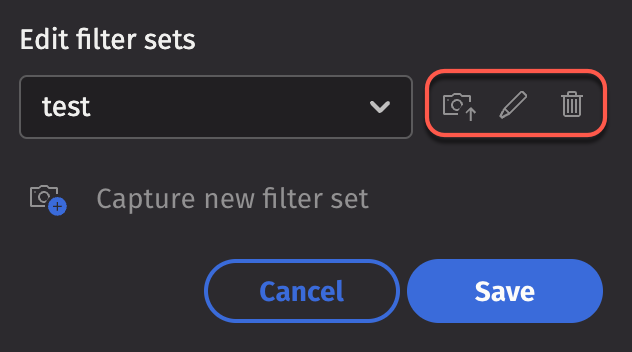
The Filter Sets panel will now show three options: Update, Edit, or Delete:
Linker
Deephaven's Linker feature enables a user to interactively filter the content in one table based on the content selected in another table. The objects must first be "linked" with each other, with one table as the source and one or more other tables as the target(s). When a cell in the source table is double-clicked, the respective columns in the target table are filtered to that value.
Note
You can only link columns of the same data type.
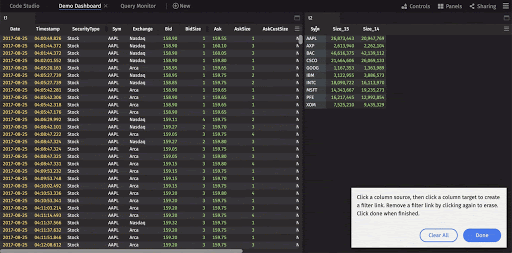
When you select the Linker tool from the Controls menu, the following instructions will appear:
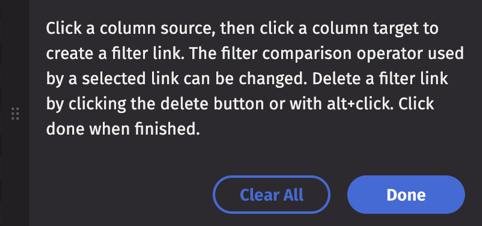
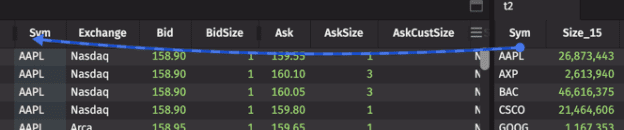
After you click a column source, an arrow will appear as you drag your cursor to your desired target. In the example below, the Sym column in t2 (the source table) is linked to the Sym column in t1 (the target table).
Note
The default operation is an equals filter, but can be changed after establishing a link.
Click Done to save your changes.
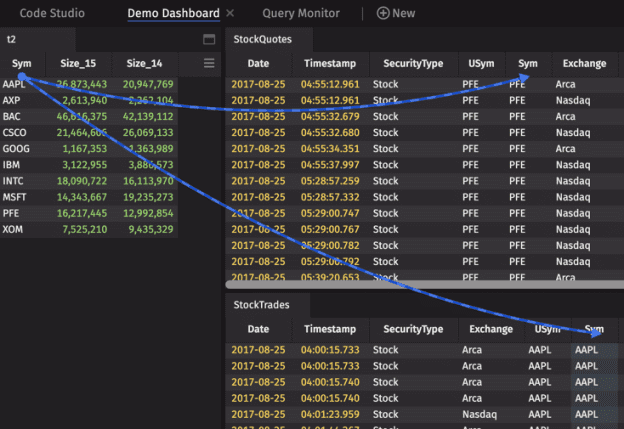
Now that the tables are linked, double-clicking on a row in the Sym column in t2 will automatically filter the contents of t1. In this example, double-clicking on GOOG in the source table filters the target table to show only rows with the GOOG symbol:
You can also link multiple tables at once:
After you've linked tables, your selections are saved and will reopen to allow you to edit or clear the links when you access the Linker.
The Linker tool is also compatible with dynamic plots, which must be configured using the appropriate plotting methods.
Click Clear All to remove your links. Use Remove All Filters or Remove Column Filter in the table context menu to restore the tables to their original state.
Actions
The Actions tab in the Controls menu provides options to clear all filters, and to reset Replica workers.
Clear All Filters
The Clear All Filters button removes all filters of any type in the active dashboard at once.
Reset All Replicas
Select Reset All Replicas to reset all replica workers in the current dashboard.
