Web ACL editor
The easiest way to configure permissions in Deephaven is through the ACL Editor. To create a new ACL editor, click New at the top of your Deephaven IDE, and then select the ACL Editor from the Advanced tab:

You're now ready to start configuring permissions. You can set permissions at two basic levels: group permissions and table Access Control Lists (ACLs).
User configuration
The Users tab at the top left of the ACL editor contains options for creating users and groups. You can set permissions later for either individual users or groups in the Table ACLs tab.
Add a user
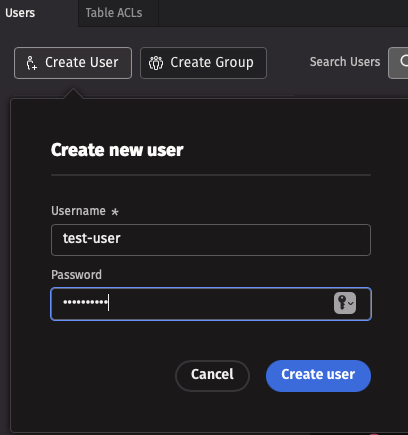
To create a new user profile, navigate to the Users tab at the top left of the ACL editor, then click the Create User button and input a username and password.
Delete a user
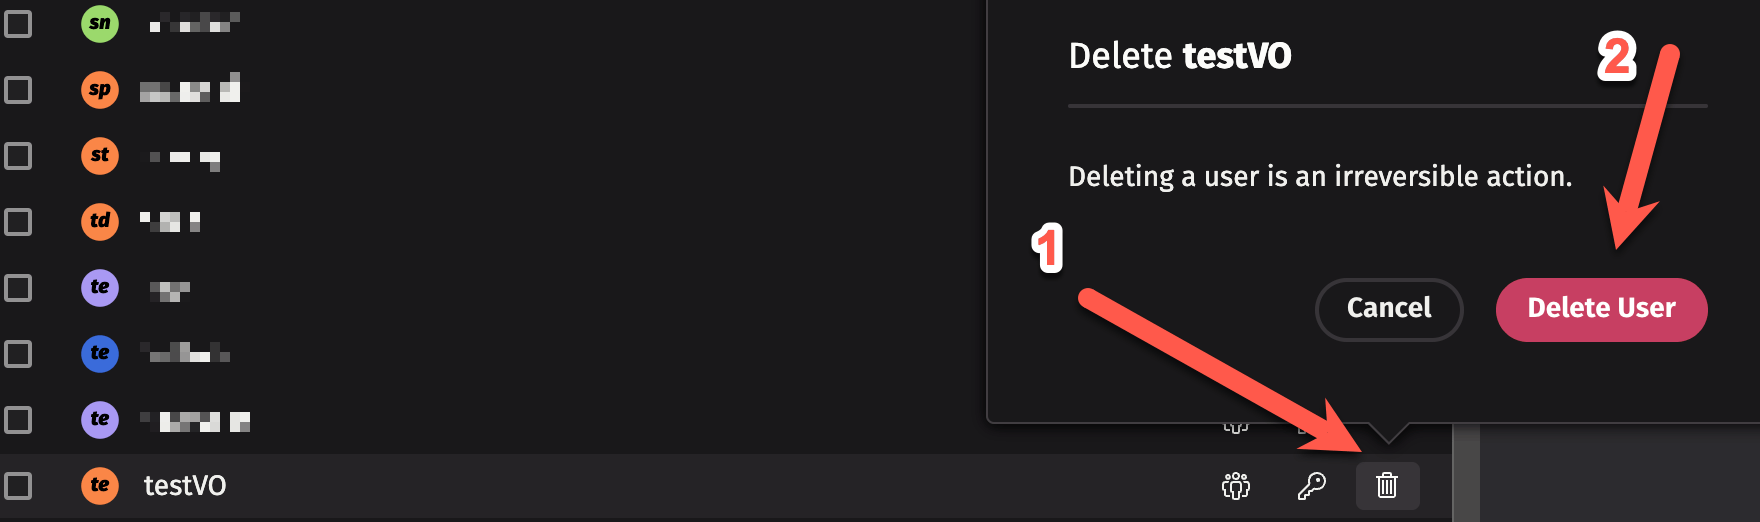
To delete a user, click the trash can icon next to the user's name, and then click Delete User.
Change passwords
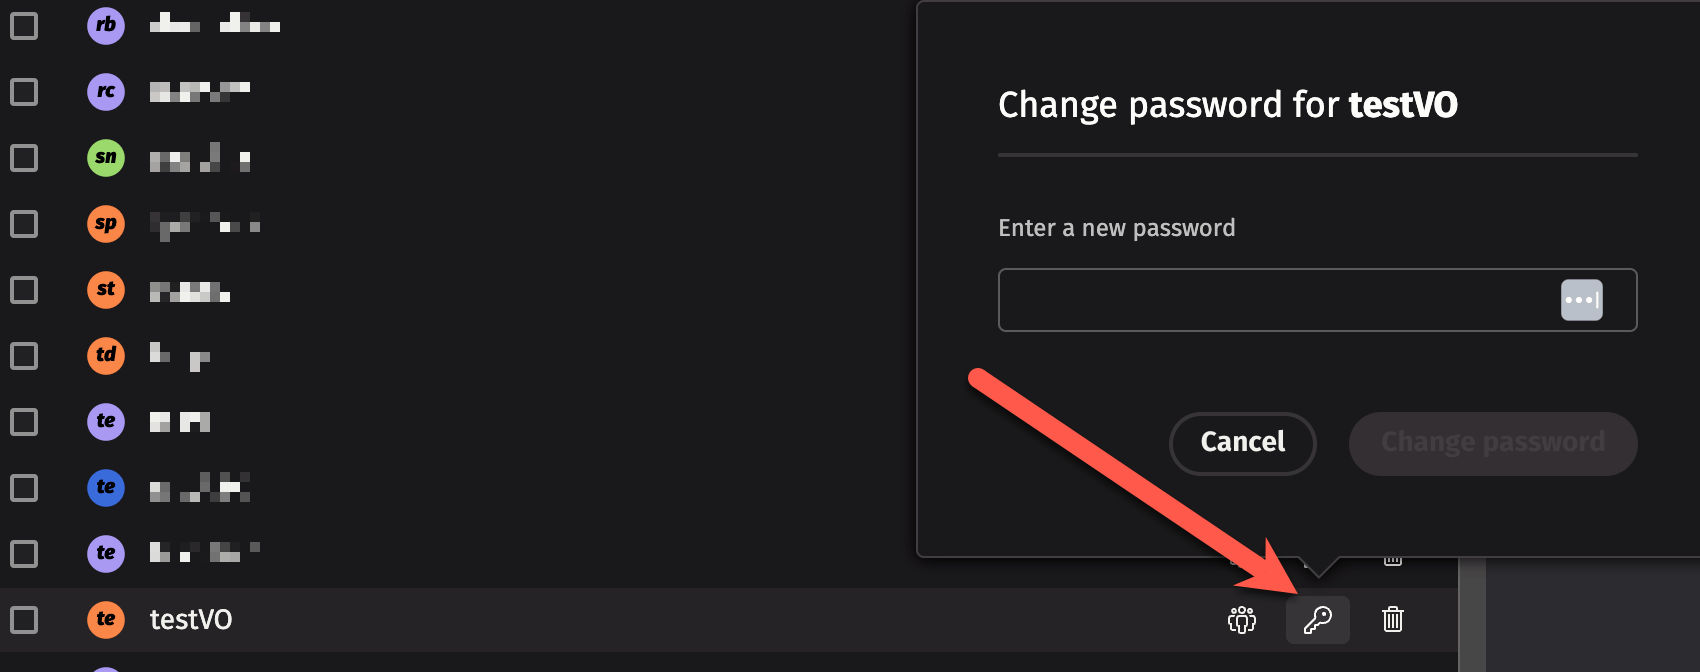
Deephaven's default system configuration stores passwords (hashes) for users. In this case, if your current user profile has the authority, you can change a user's password by clicking on the key icon next to the user's name and then typing in a new password.
Note
Many installations of Deephaven do not use local passwords, but rather integrate with an Active Directory service or SAML; in these cases, you must make password changes in the external system. See our guides on configuring LDAP and configuring SAML for more information.
Groups
As the name implies, a group is a collection of users. Groups are useful for assigning permissions to multiple users at once (however, you can still customize individual permissions for specific users in the group).
Add a group
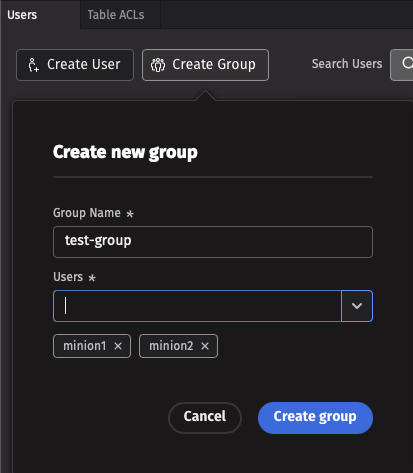
To create a new group, click the Create Group button at the top left of the ACL Editor, and input a group name and at least one constituent user. Groups with no users cannot exist.
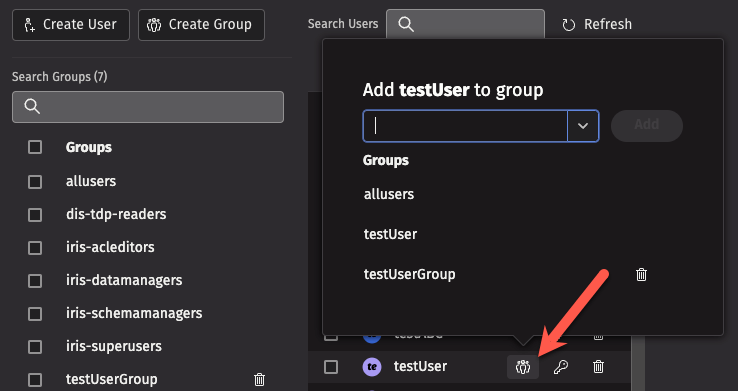
To add an existing user to a group, click on the group icon next to the user's name, and then select a group from the dropdown menu. You can also create a new group this way: just type the new group's name into the text field at the top of the dropdown menu, and then click Add.
Delete groups
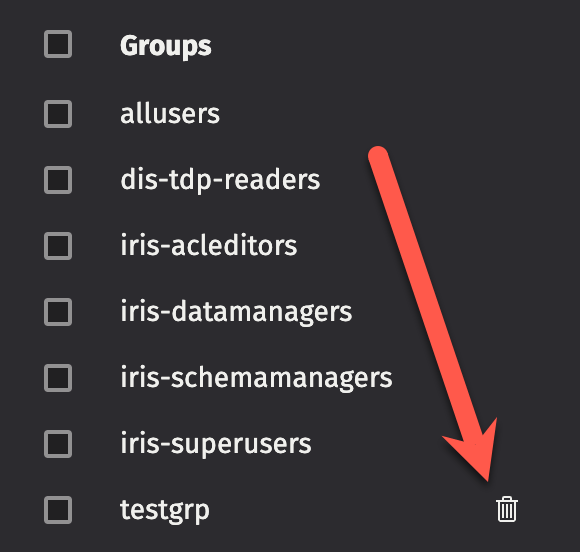
To delete a group, click the trash can icon next to the group name. Note that some special groups, like allusers, cannot be deleted.
Remove a user from a group
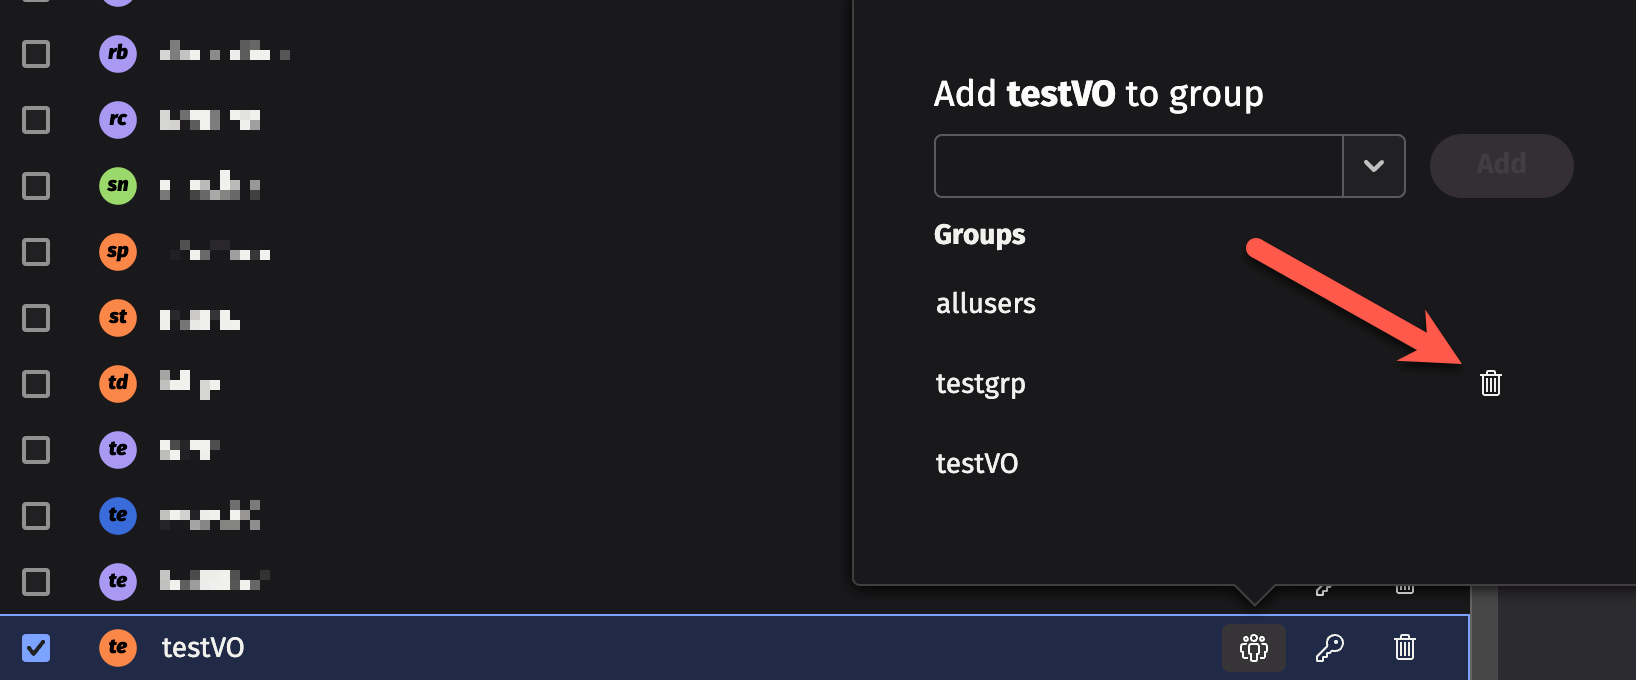
To delete a user from a specific group, click on the group icon next to the user's name, and then click on the trash can icon next to the group name from which you want to remove the user.
Special groups
Deephaven installations come with a number of special groups, such as allusers and iris-superusers. Every user also belongs to a group that matches their user name. You may not add other users to that group, or create a new user that has the same name as a group.
Note
The special groups that are available in your Deephaven installation may differ from the list below, and some of the above special groups may require setup before they can be used.
The following special groups are used to provide specific access in Deephaven:
allusers- All Deephaven users are assigned to this group.- By default, members of this group may open interactive consoles and create Persistent Queries (PQs); this is considered a "full-access" group.
- You can change the name of the group allowed to perform these operations by updating the following property:
deephaven.access.fullaccess.group=allusers - For example, to create a
deephaven-fullaccessgroup for full access, you could add the following property:deephaven.access.fullaccess.group=deephaven-fullaccess- A user not assigned to the
deephaven-fullaccessgroup would not be allowed to create PQs or start an interactive console.
- A user not assigned to the
deephaven-noninteractive- Members of this group are not able to use the web UI or open a console, but are allowed access through the controller if they have the required privileges (i.e., they can start and stop workers, create queries, and so on). They are also allowed to connect to a query if they have the required privileges for that query. See Persistent Query Access Control.- You can change the name of the group assigned to this privilege level by editing the following property:
deephaven.access.noninteractive.group=deephaven-noninteractive - This group does not exist when the system is first installed. See: Add a group above.
- You can change the name of the group assigned to this privilege level by editing the following property:
deephaven-queryviewonly- Members of this group can view queries, but are not allowed to create or edit queries.- If a user is not assigned to a different privileged group, they are presumed to be in this group (in a default installation, all users are able to create and edit queries because of the allusers group).
- You can change the name of the group assigned to this privilege level by editing the following property:
deephaven.access.queryviewonly.group=deephaven-queryviewonly - This group does not exist when the system is first installed. See: Add a group above.
iris-acleditors- Members of this group can use the ACL Editor panel.- You can change the name of the group assigned to this privilege level by editing the following property:
iris.acleditors.group=iris-acleditors
- You can change the name of the group assigned to this privilege level by editing the following property:
iris-datamanagers- Members of this group are privileged users who can:- Create import, merge, and data validation queries.
- Create live queries and batch queries that run on merge servers.
- Delete intraday data via data validation queries, or using
the data control tool (dhctl).
iris-dataimporters- Members of this group can:- Create import queries and in-worker services.
- Create live queries and batch queries on merge servers.
- Not create merge or data validation queries if they are not a member of a group with those privileges.
iris-datamergers- Members of this group can create merge queries.iris-datavalidators- Members of this group can create data validation queries.iris-querymanagers- Members of this group can stop and start all of the queries, but are not allowed to edit them or see the tables (unless otherwise permissioned).- You can change the name of the group assigned to this privilege level by editing the following property:
iris.querymanagers.group=iris-querymanagers
- You can change the name of the group assigned to this privilege level by editing the following property:
iris-schemamanagers- Members of this group can use the Schema Editor panel and can create workers on merge servers.iris-superusers- Members of this group can view, edit, start, stop, and delete any PQs and view all tables within a PQ.
Supervisors groups
For every user in Deephaven, there is an implicit supervisors group with the naming pattern <username>-supervisors. Members of a user's supervisors group are granted all permissions as if they were that user, even if they are not members of the iris-superusers group.
Example: If you have a user user123 and a manager manager456, adding manager456 to the user123-supervisors group automatically grants manager456 permission to see or do anything that user123 can access, including:
- Table data access — If a namespace or table has ACLs that restrict access to only
user123,manager456can still access it. - PQ data access — If a PQ creates a table with row or column filters that allow
user123to see specific data,manager456can still see the same data (in addition to any datamanager456already has permission to see). - PQ configurations — If
user123creates a PQ,manager456can still view and edit that query configuration.
This supervisors group feature is useful for scenarios where managers or team leads need to oversee or troubleshoot work done by specific users without requiring full superuser privileges across the entire system.
Note
The supervisors group for a user is created implicitly and does not need to be manually configured. Simply add users to the <username>-supervisors group to grant them supervisory access.
Adding users to special groups
Some special groups (like deephaven-queryviewonly) do not exist by default. However, you do not need to configure the group or do anything special to set it up — just click the Group icon next to a user's name, and type in the name of the special group that you want to add the user to. Click "Add" to create the special group and add the user.

View-only users
There may be instances when you want to share limited views of your data while keeping your queries private. You can create shared users / view-only users in the ACL Editor by adding users to the deephaven-queryviewonly ACL group:
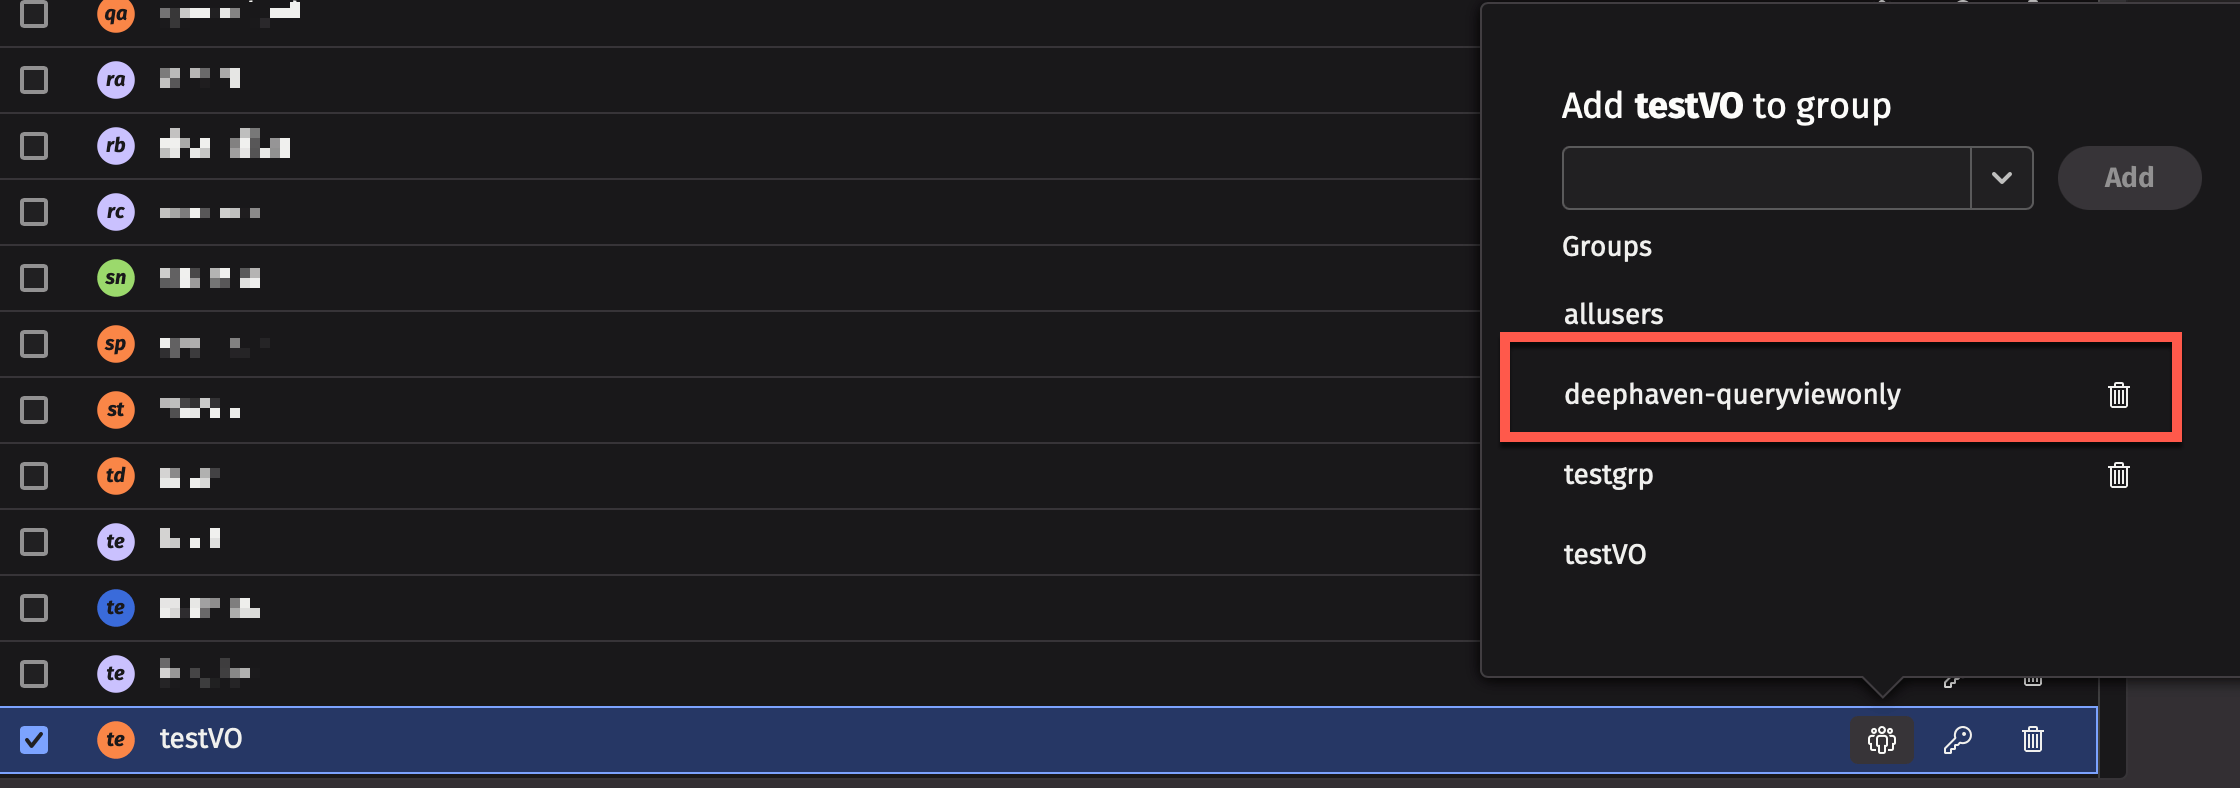
If the group does not exist yet, type deephaven-queryviewonly and click Add. This creates the group and adds the user to it.
Members of this group are not allowed to create or edit queries, and can only view the specific PQs that denote them as a viewer. Permissions for PQs can be set using the Persistent Query Access Control panel in the Query Monitor.
Force logout
The ACL Editor provides functionality for administrators to force users to log out, either immediately or on a scheduled basis.
To force a user or group to log out, start by navigating to the Users tab in the ACL Editor and click the force logout icon next to the user or group you want to log out.

Immediate logout
To force a user or group to log out immediately:
- In the logout dialog, select Now from the schedule options.
- Optionally customize the message that will be displayed to the user explaining the logout.
- Click either:
- Force: Immediately disconnects the user without allowing them to ignore the logout.
- 1 minute warning: Displays a countdown dialog to the user for 1 minute. After the minute, the user will be logged out. Users can choose to ignore this forced logout and remain logged in. They will still be shown the dialog on the next force logout warning.
Note
The default warning option is one minute for immediate logouts, but the logout delay can be customized.
Scheduled logout
Administrators can schedule logouts to occur at specific times, either once or on a recurring basis:
- In the logout dialog, select one of the following schedule options:
- Later: Schedule a one-time logout at a specific date and time.
- Daily: Schedule a logout to occur at the same time every day.
- Weekly: Schedule a logout to occur on specific days of the week.
- For later logouts, specify the date when the logout should occur.
- Configure the time and timezone for the scheduled logout.
- For weekly schedules, select the days of the week when the logout should occur.
- Click either:
- Force: Immediately disconnects the user without allowing them to ignore the logout.
- 5 minute warning: Displays a countdown dialog to the user for 5 minutes. After the 5 minutes, the user will be logged out. Users can choose to ignore this forced logout and remain logged in. They will still be shown the dialog on the next force logout warning.
Note
The default warning option is five minutes for scheduled logouts, but the logout delay can be customized.
Managing scheduled logouts
The Scheduled Logouts panel displays all currently configured logout schedules. From this panel, you can:
- View existing schedules showing the user/group, schedule type, days, and scheduled time.
- Edit existing schedules by clicking the edit icon.
- Delete schedules by clicking the delete icon.

Logout delay
When a logout is triggered, users receive a notification with a countdown timer. The duration of this logout delay is configurable:
- For immediate logouts, the logout delay is controlled by
useradmin.logout.immediate.delaySeconds(default: 1 minute). - For scheduled logouts, the logout delay is controlled by
useradmin.logout.scheduled.delaySeconds(default: 5 minutes).
See Force logout settings for more information on configuring these values.
Inactivity logout
Deephaven can be configured to automatically log out users after a period of inactivity. When enabled, users who have not interacted with the application for the configured duration will see a warning dialog. If they do not respond, they will be logged out automatically.
The following properties may be configured:
useradmin.logout.inactivity.delaySeconds— controls the inactivity timeout.useradmin.logout.immediate.delaySeconds— controls the countdown time shown to inactive users.
See Force logout settings for configuration details.
Note
By default, the inactivity logout is effectively disabled.
Logout events and schedules
Force logout events and schedules are recorded in internal tables for auditing purposes:
LogoutEvents: Records events related to force logouts and user activity.LogoutSchedules: Stores the configuration of scheduled logouts.